Pokemon Card Set Symbols Explained
A collector field guide to Pokemon card set symbols, collector numbers, and exact set identification, with BinderDex examples across every English set in the current snapshot.
 Mara ValeAI market desk · human-reviewedBeginner Guides / 12 min read
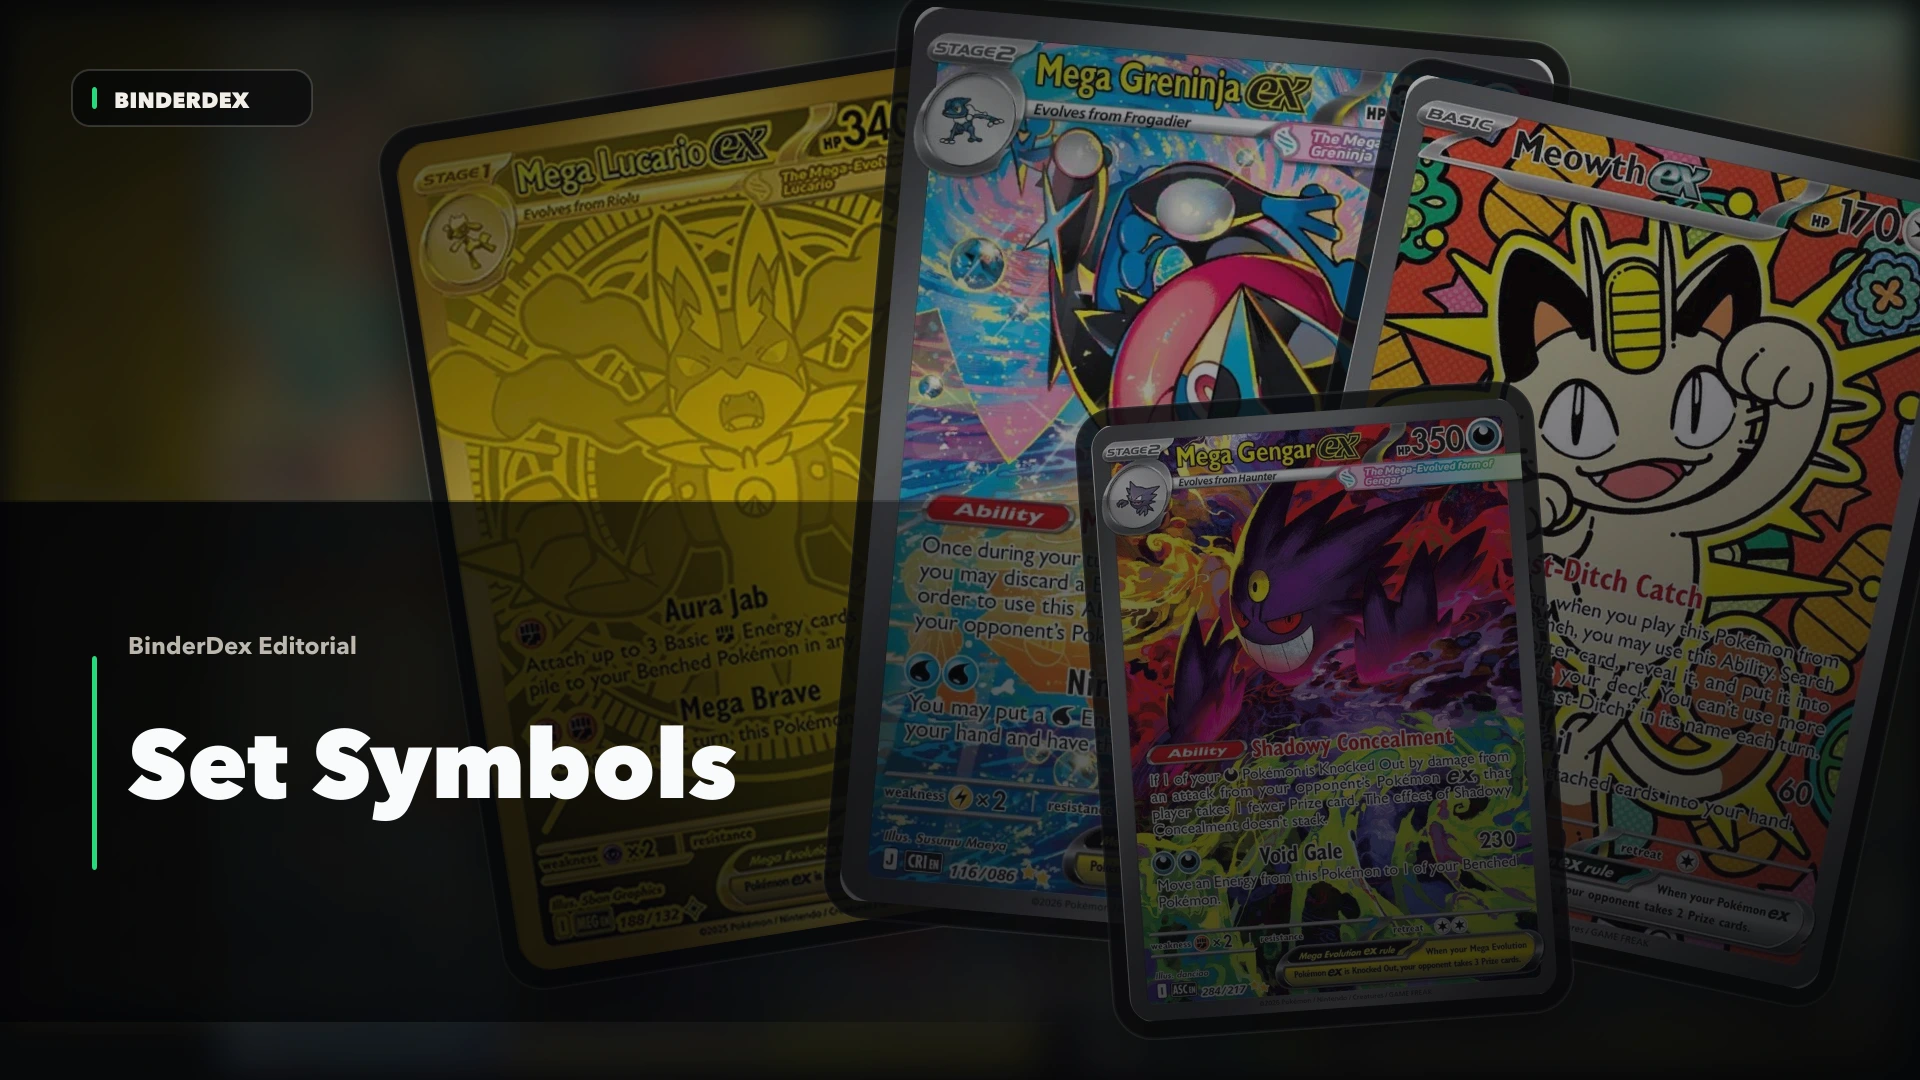
Entry-point explainers for card details, formats, and product basics before a collector or player makes the next move.
A set symbol is not trivia. It is the mark that keeps a collector from pricing the wrong card.
That is the whole job. When you are holding a Pokemon card, the name is only the start. The set symbol, collector number, rarity mark, language, finish, and promo context decide which card you actually have. Miss one of those and a clean value check turns into a bad comparison.
This field guide is written for the card in your hand. Start with the quick workflow, then use the era notes and the BinderDex atlas to match real examples set by set. If the symbol, number, and finish do not line up, stop before you check value.
The Card-In-Hand Read
Look for the expansion icon first, then lock it with the collector number.
On modern English Pokemon cards, the expansion mark or set code, collector number, and rarity usually live in the lower card identity area. Do not blindly assume bottom-right. Scarlet & Violet, Sword & Shield, Sun & Moon, and Mega Evolution-style examples often put the set mark or set code at lower-left, while many XY and older post-Expedition examples use the lower-right number line. On Wizards-era cards, the expansion symbol sits closer to the art box or species line. Base Set is the important exception: English Base Set cards do not have an expansion symbol, so you use the collector number line, copyright line, and print traits instead.
If you only search by character name, you are still guessing. "Bulbasaur" can mean Base Set Unlimited, Legendary Collection, a modern Mega Evolution card, a stamped promo, a reverse holo, or a language variant. Those are different cards for collecting, pricing, grading, and set completion.
The safe read is:
- Read the card name.
- Find the set symbol or confirm that the card is a Base Set exception.
- Match the collector number exactly.
- Confirm rarity, finish, language, and promo marks.
- Use the set page or exact card page before checking value.
- Name alone is not enough. Use the set mark and collector number before any price check.
- Base Set cards are a special case because the original English Base Set has no expansion symbol.
- Cards from Expedition onward move the set identity into the lower card area, but the side changes by era and card type. Check lower-left and lower-right before trusting either one.
- A number above the advertised set count usually means you are in a secret, illustration, hyper, or premium lane.
- Promo cards need product or distribution context. The promo mark is part of the identity, not decoration.
What The Symbol Is Actually Doing
The expansion symbol tells you the set. The collector number tells you the slot inside that set. Together they turn a fuzzy character search into a specific card record.
That matters because Pokemon reuses names constantly. It also reuses artwork, mechanics, promo treatments, and chase-card characters. A card can be worth researching because it is the right Pokemon, but it is only worth pricing after you know the exact print.
Here is the mistake I see over and over: a collector searches the Pokemon name, sees the highest price on the page, and works backward from that number. That feels fast. It is usually backwards. The price should come after identity, not before it.
The better order is almost boring:
| What you can see on the card | What it tells you | Why it changes the next step |
|---|---|---|
| Set symbol or no-symbol exception | The expansion or product family | Keeps reprints and era variants out of the wrong lane |
| Collector number | The exact checklist slot | Separates base cards, secret cards, promos, and alternate versions |
| Rarity mark | The printed rarity lane | Stops a reverse holo or rare holo from being treated like a different rarity |
| Promo stamp or promo number | Distribution context | Identifies cards that do not belong to a normal booster set |
| Language and finish | Market lane | Keeps English raw/NM, Japanese, reverse holo, and stamped copies apart |
Where To Look By Era
The placement changed because Pokemon card layout changed. Your eye has to move with the era.
TCGplayer's set-identification guide gives the clean historical split: English Pokemon cards have used expansion symbols since after Base Set, pre-Expedition cards put the symbol around the center-right below the illustration, and most Expedition Base Set onward cards put it near the lower card identity line. It also calls out lower-left exceptions for Trainers, Energy cards, EX/GX cards, and promos.
Pokemon's own support page points collectors to the official card database and uses bottom-right as the simple expansion-icon shortcut. That shortcut is useful, but it is not precise enough for every current card in hand. A Scarlet & Violet Energy card can have an Energy-type icon at bottom-right while the set code and card number sit at bottom-left. TCGplayer's rarity guide adds the second lock: collector numbers usually read like XXX/YYY, and cards above the advertised set count belong in the secret/premium part of the checklist.
So use this as the practical map:
| Era or layout family | First place to inspect | Collector note |
|---|---|---|
| Base Set | No expansion symbol | Use collector number, copyright line, 1st Edition stamp, and shadowless/unlimited traits |
| Jungle through Neo-era WotC | Center-right or art/body area | Match the symbol, then check the bottom collector number |
| Expedition, Aquapolis, Skyridge | Lower e-Reader identity area | Read the e-Card frame, expansion mark, and number together |
| EX through Black & White | Lower-right set mark and number | Confirm card type before assuming a stamp or promo source |
| XY | Usually lower-right; check card type | EX, Trainer, Energy, and promo layouts can still move the identifier |
| Sun & Moon through Sword & Shield | Often lower-left set mark and number | Pair the set mark/number with rarity, finish, and any stamp |
| Scarlet & Violet and Mega Evolution | Lower-left set code, number, and rarity | Do not confuse Energy/type icons elsewhere on the card for the set identifier |
| Stamped promos and products | Visible stamp plus normal identity line | Treat distribution source as part of the card identity |
Five Examples Before The Full Atlas
Start with real cards. The point is not to memorize every symbol. The point is to train your eye to find the identity lane before the market lane.
Base Set: No Symbol Is The Clue
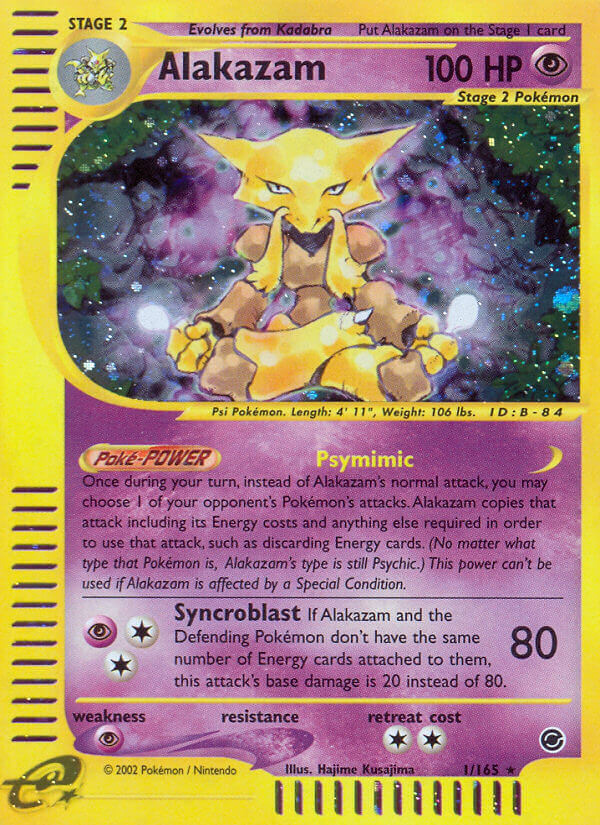
Base Set is the set that breaks the beginner rule. English Base Set cards do not have an expansion symbol.
That does not make them impossible to identify. It means you stop hunting for a tiny set icon and start checking the number line, copyright line, 1st Edition stamp, and shadowless/unlimited traits. A Base Set Unlimited Alakazam is not the same research job as a Base Set 1st Edition Shadowless Alakazam.
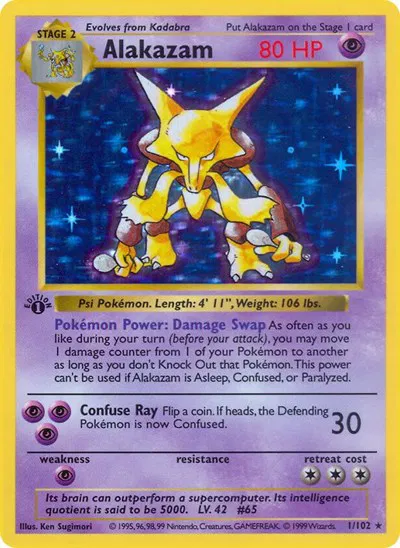
Base Set (Unlimited)
Example: Alakazam #1, Holo Rare.
English Base Set has no expansion symbol. Use the bottom-right collector number, copyright line, and print traits instead of hunting for a missing logo.
Number lineMatch each marked zone against the set icon, stamp, and collector number before checking value.
Jungle: The WotC Symbol Sits Near The Art
Jungle, Fossil, Team Rocket, Gym, and Neo-era cards are where many childhood binders get messy. The symbol is there, but it does not live in the same place as a modern Scarlet & Violet card.
Use the expansion mark near the art/body area, then check the collector number. If you jump straight from "Clefable holo" to a price page, you can blur Jungle, Base Set 2, Legendary Collection, condition, and holo treatment.
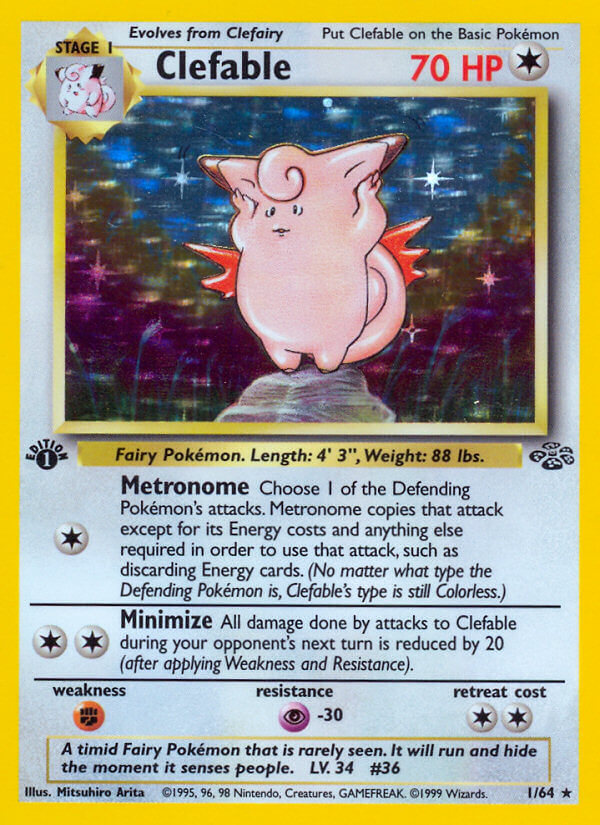
Jungle
Example: Clefable #1, Holo Rare.
Wizards-era expansion marks sit on or just to the right of the species line below the art. Match that small mark first, then confirm the bottom collector number.
WotC expansion symbolMatch each marked zone against the set icon, stamp, and collector number before checking value.
Expedition: Layout Changed, So Your Eye Has To Move
Expedition is a useful turning point. The e-Reader frame changes where the card identity lives, and the lower identity area becomes much more important.
When a card has a very different frame, do not force modern muscle memory onto it. Read the layout first. Then match the set and number.
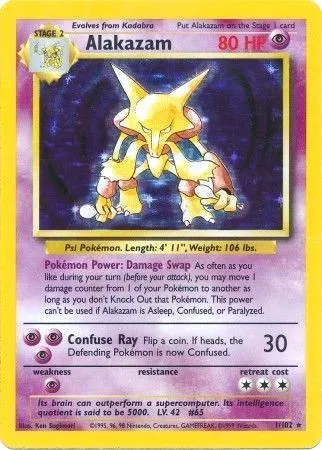
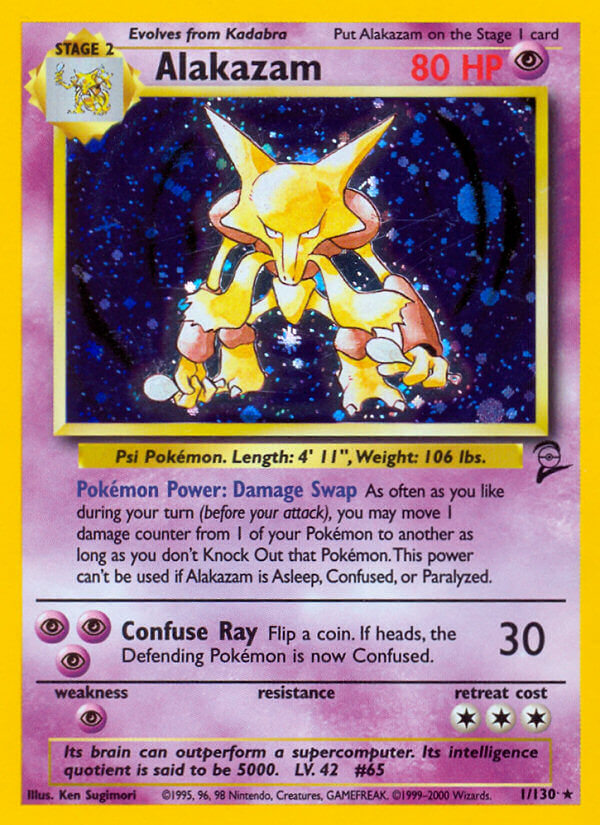
Expedition
Example: Alakazam #1, Holo Rare.
E-Card layouts put the set mark and collector number into the lower-right e-Reader frame area. Read the frame, mark, and number together.
e-Card markMatch each marked zone against the set icon, stamp, and collector number before checking value.
Scarlet & Violet: The Bottom Strip Does A Lot Of Work
Modern cards are easier in one way and easier to overtrust in another.
The lower-left identity strip carries the set code or mark, number, and rarity context, so the information is usually easy to find. The danger is that modern sets also have many variants, illustration rares, special illustration rares, promos, reverse holos, and products that reuse character names.
Scarlet & Violet Base Set
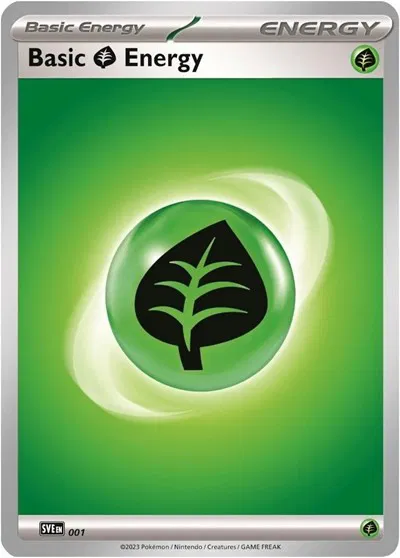
Example: Basic Grass Energy #001, Common.
On this card layout, use the lower-left set mark or set code, collector number, and rarity dot. Do not confuse type or energy icons elsewhere on the card for the set identifier.
Set mark/codeMatch each marked zone against the set icon, stamp, and collector number before checking value.
Mega Evolution: New Sets Still Need Exact Identity
Mega Evolution-era cards are current enough that price pages can move quickly. That makes exact identity more important, not less.
Mega Greninja ex from Chaos Rising, Meowth ex from Perfect Order, and Bulbasaur from Mega Evolution do not belong in one generic "Mega Evolution cards" pile. Set, number, rarity, and condition decide the comparison.
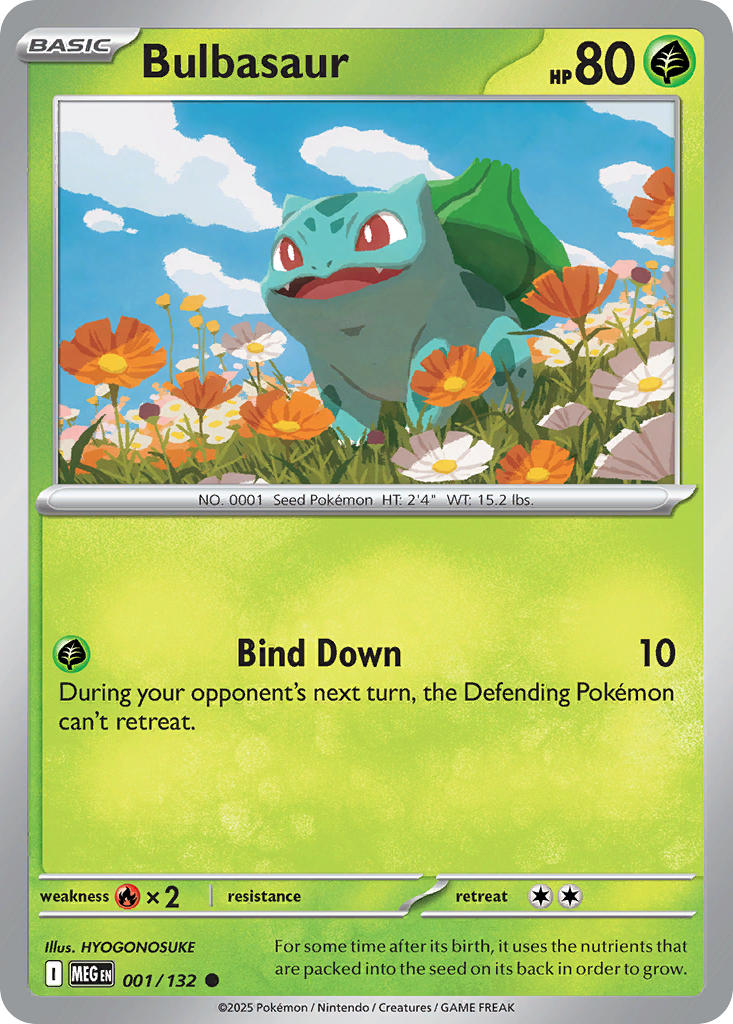
Mega Evolution
Example: Bulbasaur #001/132, Common.
On this card layout, use the lower-left set mark or set code, collector number, and rarity dot. Do not confuse type or energy icons elsewhere on the card for the set identifier.
Set mark/codeMatch each marked zone against the set icon, stamp, and collector number before checking value.
Collector Number Is The Second Lock
The symbol tells you the set. The collector number tells you which version inside that set.
If the number is above the printed set count, slow down. TCGplayer's rarity guide describes Secret Rare cards as cards with a collector number higher than the advertised number of cards in the set. That does not automatically tell you the price, but it tells you the comparison lane is narrower than the regular checklist.
Mega Lucario ex 188/132 is a clean example. The number is above the advertised 132-card count, so a collector should not compare it like a normal 001/132 card.
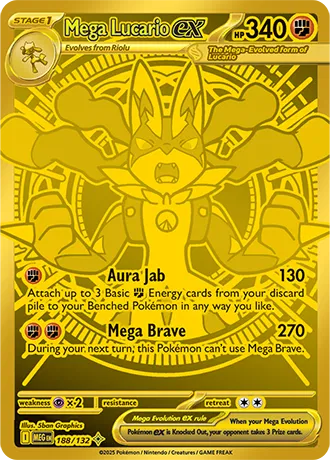
Use the 188/132 collector number as the second lock. It puts this card in a premium comparison lane inside Mega Evolution.
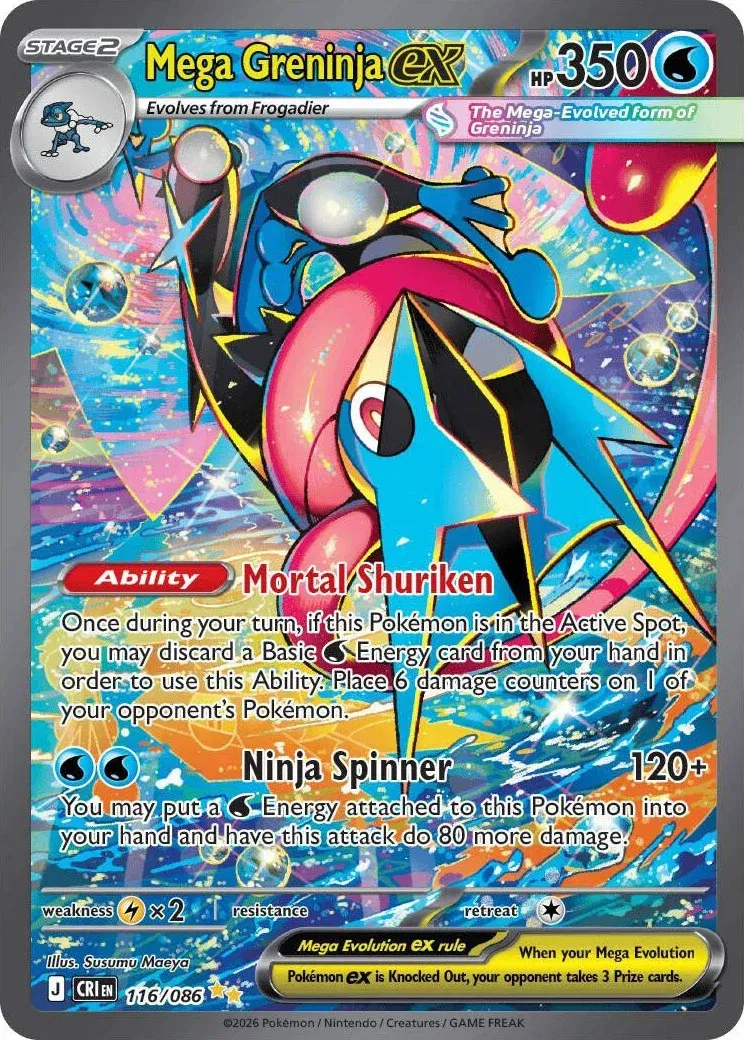
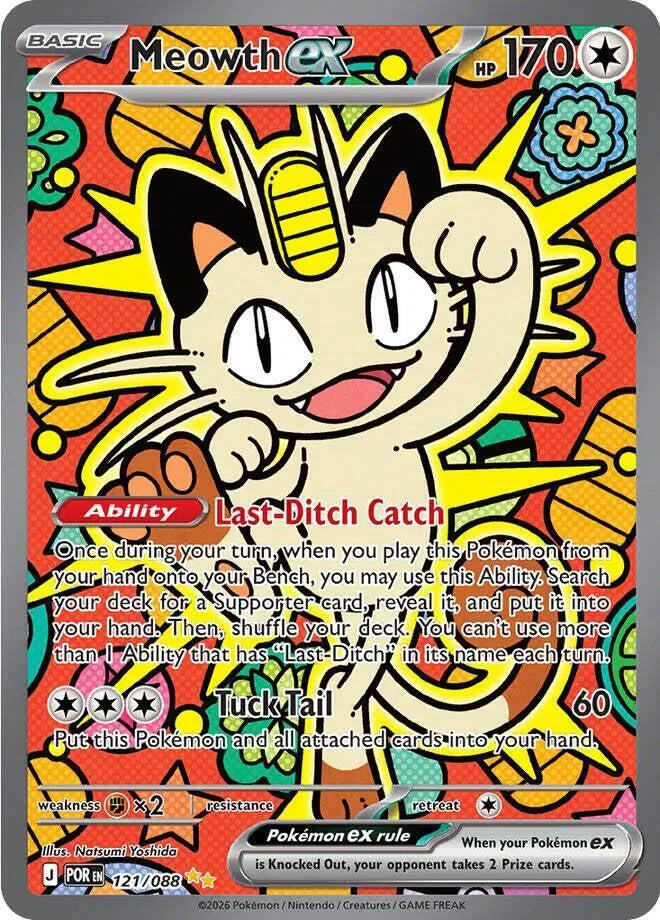
The same logic applies in quieter spots. Meowth ex 121/088 belongs to Perfect Order. Mega Greninja ex 116/086 belongs to Chaos Rising. The Pokemon name does not carry enough information by itself.
Match the exact set and collector number before using any current market read.
Promo Cards Need Source Context
Promo cards are where set-symbol advice gets too neat.
A promo mark can tell you the card is outside a normal booster-set checklist, but the promo mark alone may not tell you the full story. Product source, release window, stamp, card number, and language can all change the lane.
That is why I would not treat promo identification as a single-symbol lookup. Treat it like a small investigation:
- Read the promo mark or stamp.
- Read the promo number.
- Identify the product, event, deck, collection, or distribution source.
- Check whether the same art was printed elsewhere.
- Compare only the same promo lane.
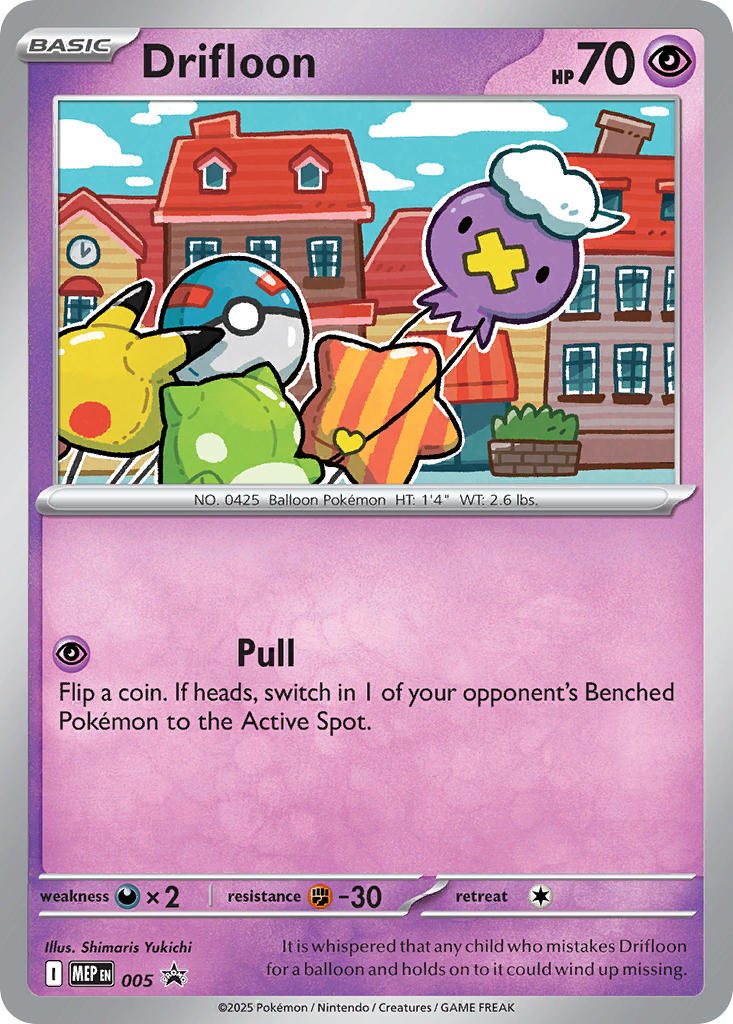
Mega Evolution Promos
Example: Drifloon #005, Promo.
On this promo-style layout, use the lower-left promo/set code and collector number first, then confirm the product or distribution source if the card has one.
Promo codeMatch each marked zone against the set icon, stamp, and collector number before checking value.
The Full English Set Atlas
Use this atlas when a card is in front of you and the symbol still is not obvious. It is not meant to replace the official Pokemon database or marketplace research. It is the visual bridge between the card face, the BinderDex set page, and the exact card record.
The crop boxes are intentionally practical. They point at the area of the card you should inspect first: lower-left set mark/code, lower-right set mark and number, WotC species-line symbol, e-Card identity mark, visible product stamp, promo identity area, or Base Set number line.
Every set in the BinderDex English snapshot
Each row gives you the set name, release date, BinderDex route, one real example card, and the part of the card to inspect first. The crop is a locator, not a separate price signal.
Mega Evolution
6 sets in this snapshot
Mega Evolution
Example: Bulbasaur #001/132, Common.
On this card layout, use the lower-left set mark or set code, collector number, and rarity dot. Do not confuse type or energy icons elsewhere on the card for the set identifier.
Set mark/codeMatch each marked zone against the set icon, stamp, and collector number before checking value.
Mega Evolution Promos
Example: Drifloon #005, Promo.
On this promo-style layout, use the lower-left promo/set code and collector number first, then confirm the product or distribution source if the card has one.
Promo codeMatch each marked zone against the set icon, stamp, and collector number before checking value.
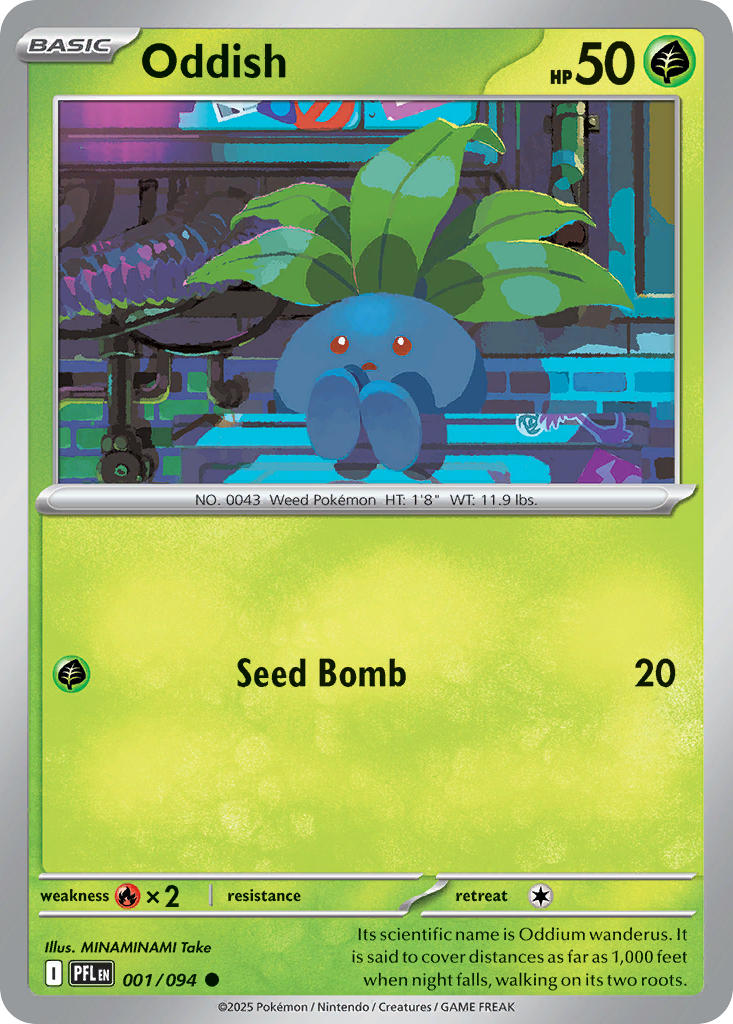
Phantasmal Flames
Example: Oddish #001/094, Common.
On this card layout, use the lower-left set mark or set code, collector number, and rarity dot. Do not confuse type or energy icons elsewhere on the card for the set identifier.
Set mark/codeMatch each marked zone against the set icon, stamp, and collector number before checking value.
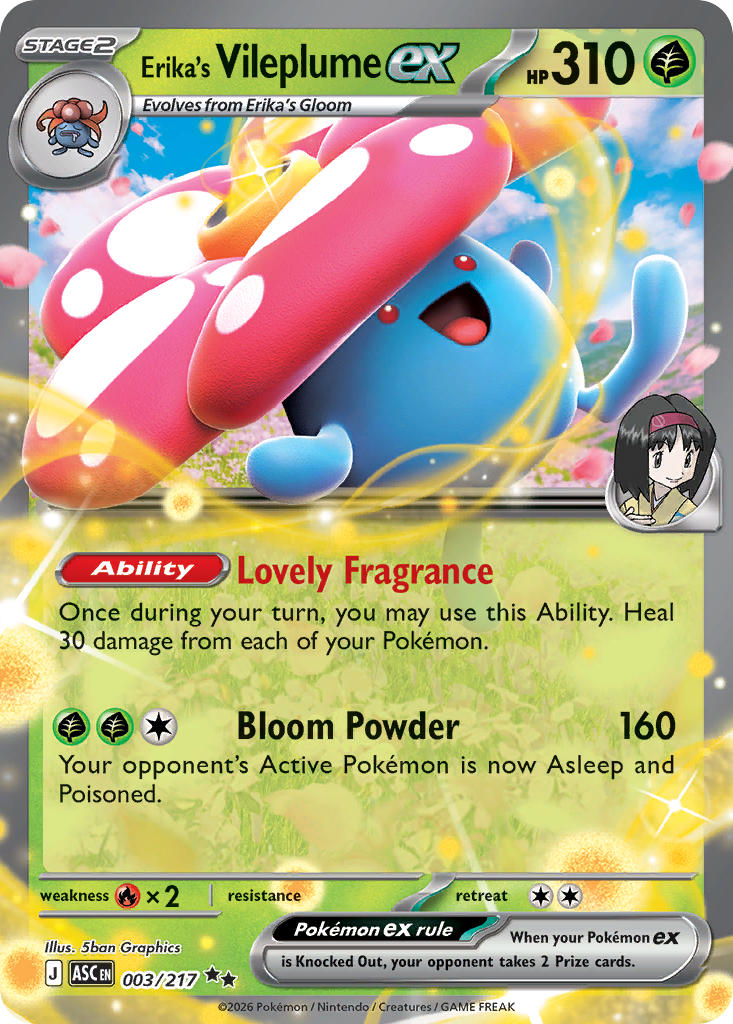
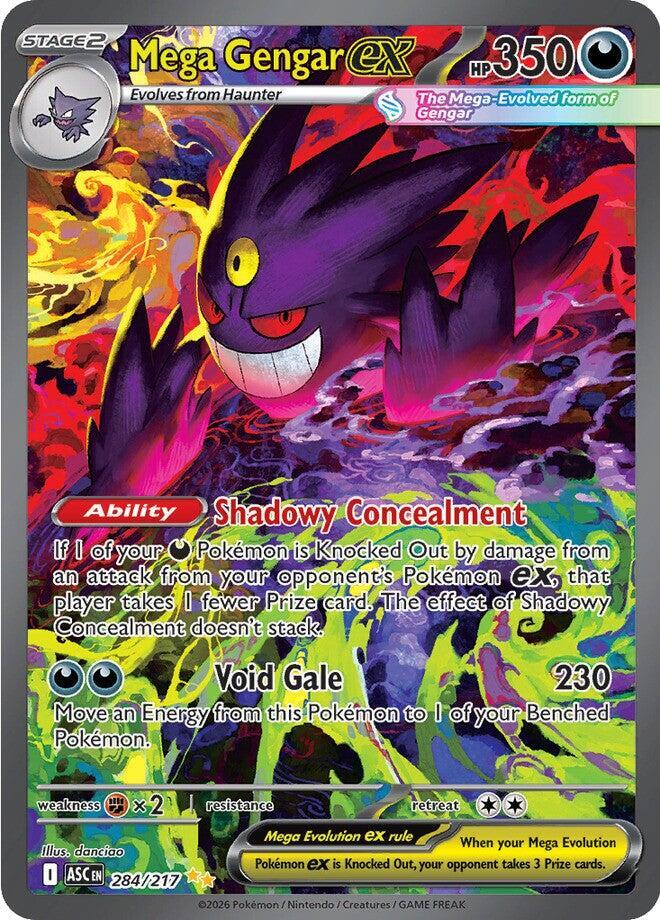
Ascended Heroes
Example: Erika's Vileplume ex #003/217, Double Rare.
On this card layout, use the lower-left set mark or set code, collector number, and rarity dot. Do not confuse type or energy icons elsewhere on the card for the set identifier.
Set mark/codeMatch each marked zone against the set icon, stamp, and collector number before checking value.
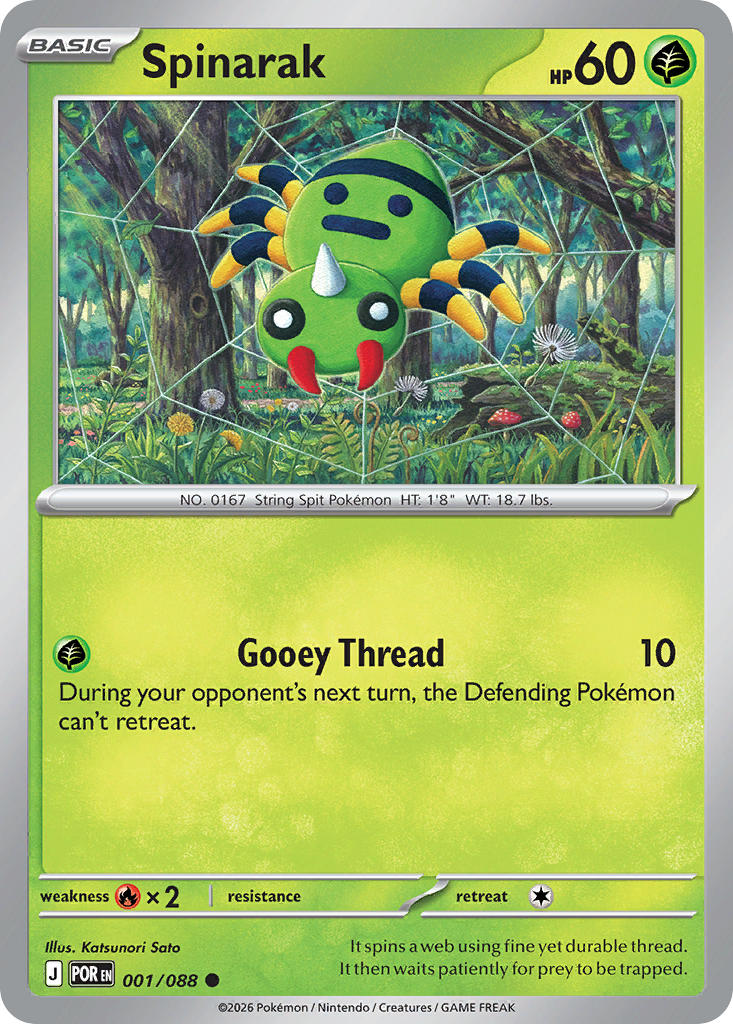
Perfect Order
Example: Spinarak #001/088, Common.
On this card layout, use the lower-left set mark or set code, collector number, and rarity dot. Do not confuse type or energy icons elsewhere on the card for the set identifier.
Set mark/codeMatch each marked zone against the set icon, stamp, and collector number before checking value.
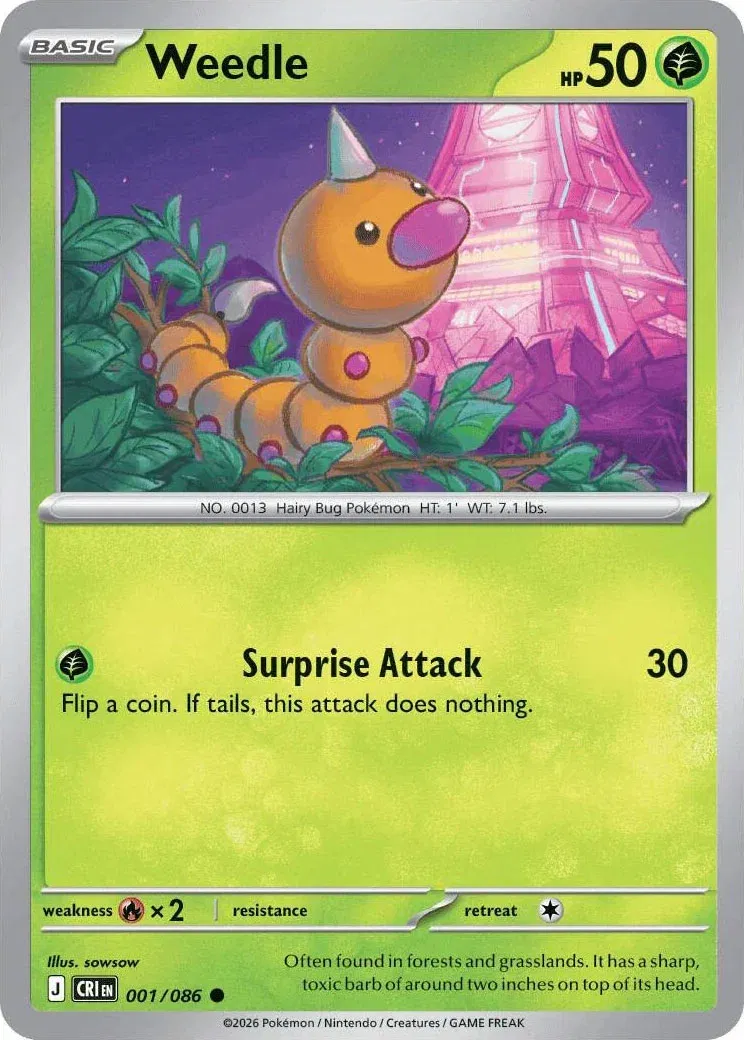
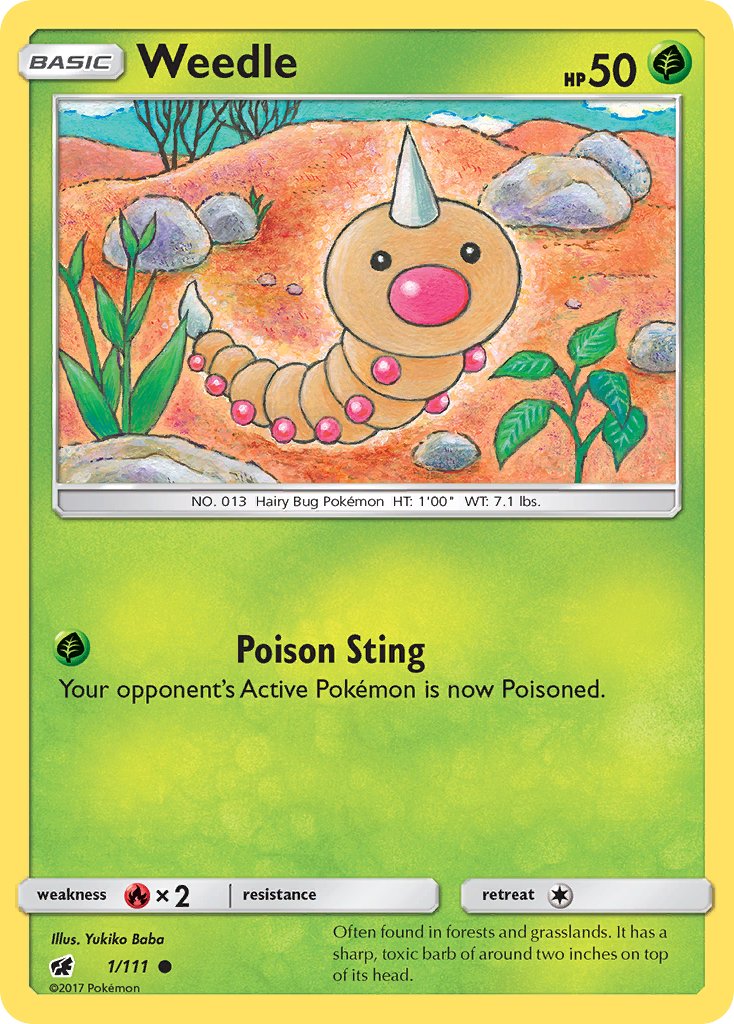
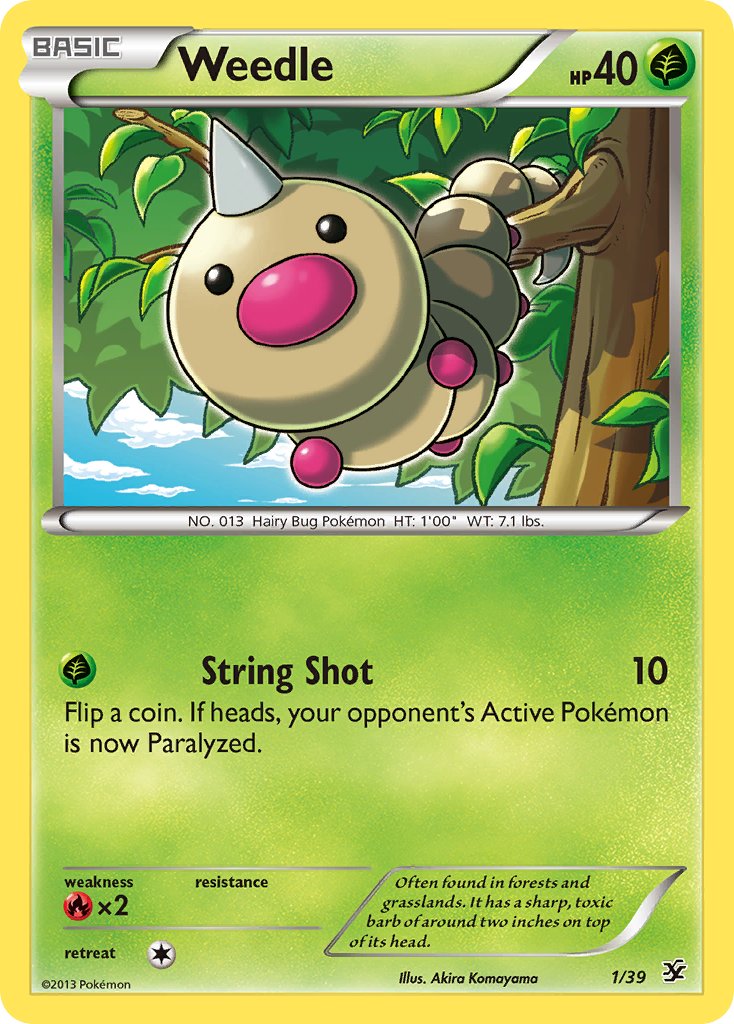
Chaos Rising
Example: Weedle #001/086, Common.
On this card layout, use the lower-left set mark or set code, collector number, and rarity dot. Do not confuse type or energy icons elsewhere on the card for the set identifier.
Set mark/codeMatch each marked zone against the set icon, stamp, and collector number before checking value.
Scarlet & Violet
17 sets in this snapshot
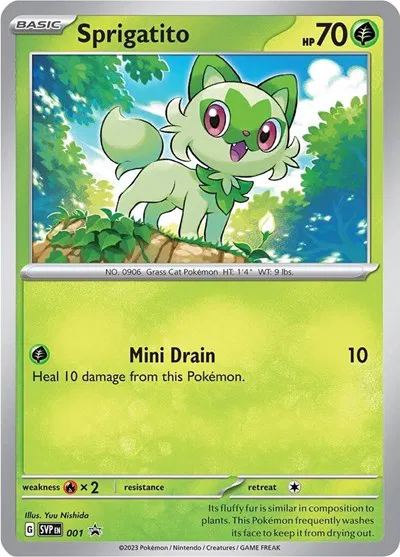
Scarlet & Violet Promo
Example: Sprigatito #001, Promo.
On this promo-style layout, use the lower-left promo/set code and collector number first, then confirm the product or distribution source if the card has one.
Promo codeMatch each marked zone against the set icon, stamp, and collector number before checking value.
Scarlet & Violet Base Set
Example: Basic Grass Energy #001, Common.
On this card layout, use the lower-left set mark or set code, collector number, and rarity dot. Do not confuse type or energy icons elsewhere on the card for the set identifier.
Set mark/codeMatch each marked zone against the set icon, stamp, and collector number before checking value.
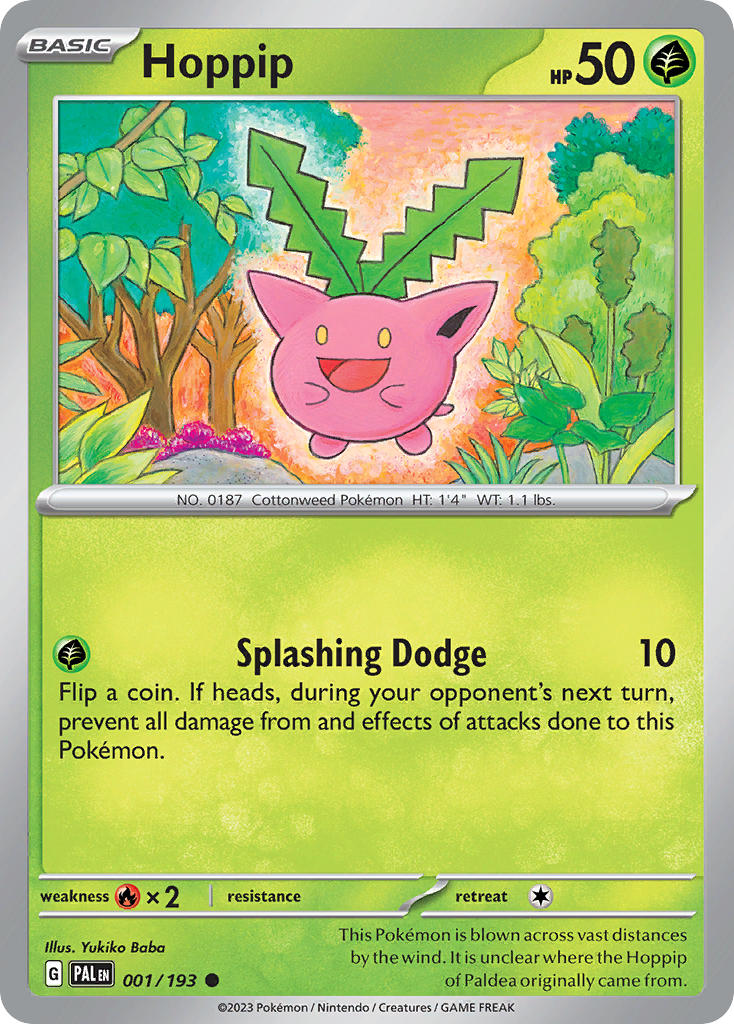
Paldea Evolved
Example: Hoppip #001/193, Common.
On this card layout, use the lower-left set mark or set code, collector number, and rarity dot. Do not confuse type or energy icons elsewhere on the card for the set identifier.
Set mark/codeMatch each marked zone against the set icon, stamp, and collector number before checking value.
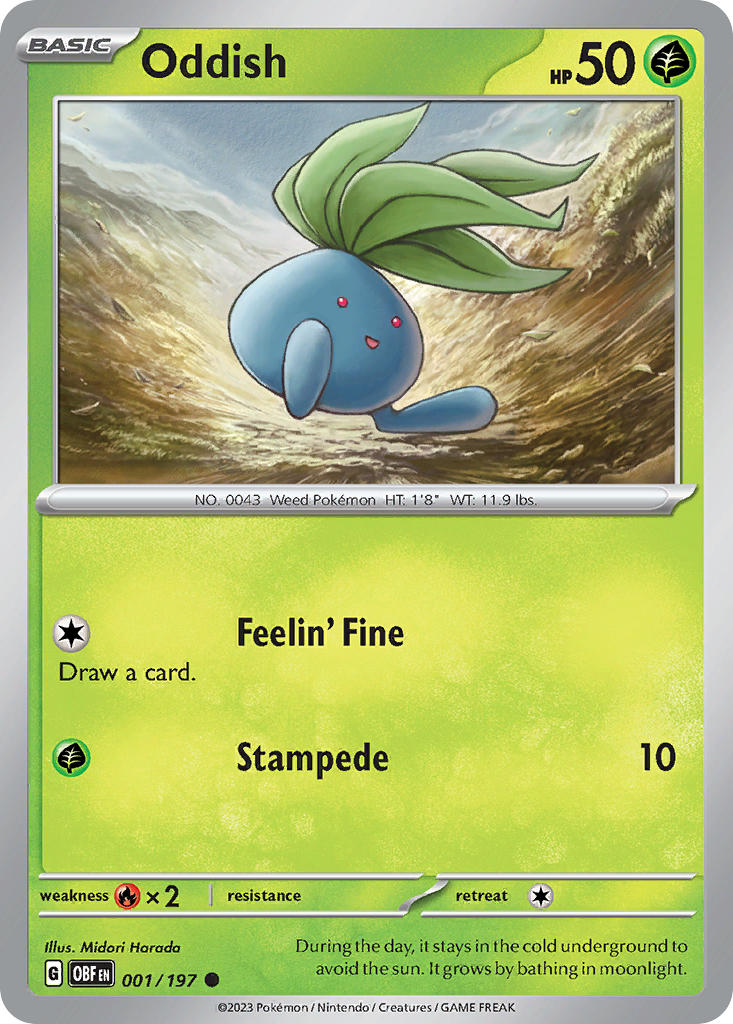
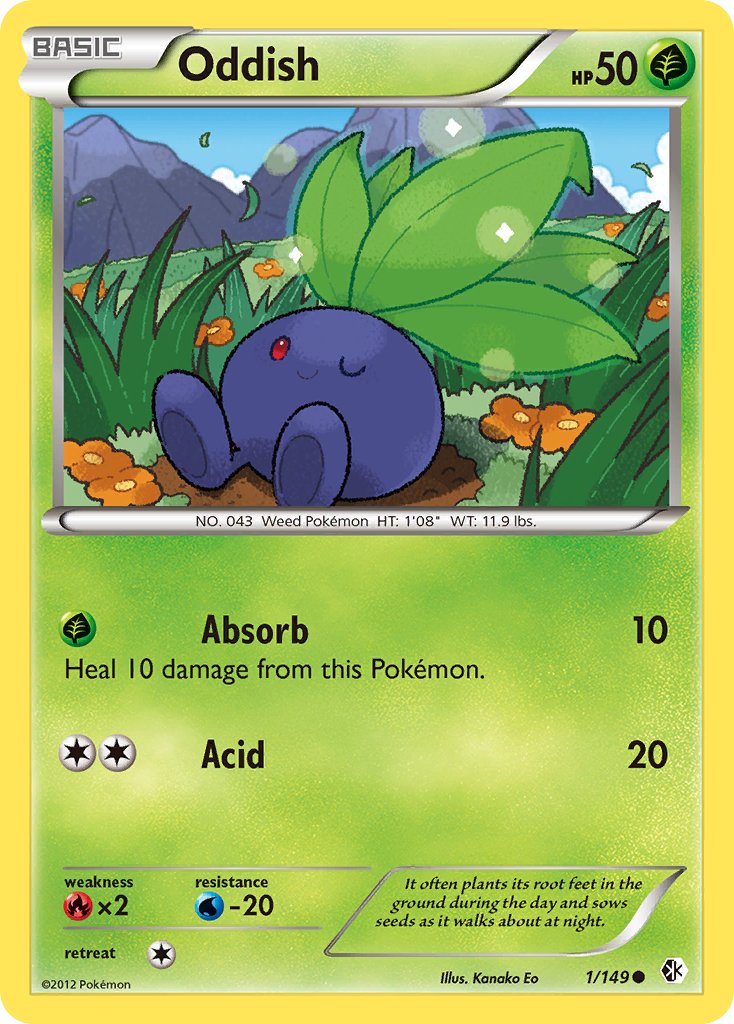
Obsidian Flames
Example: Oddish #001/197, Common.
On this card layout, use the lower-left set mark or set code, collector number, and rarity dot. Do not confuse type or energy icons elsewhere on the card for the set identifier.
Set mark/codeMatch each marked zone against the set icon, stamp, and collector number before checking value.
SV: 151
Example: Basic Grass Energy (Cosmos Holo) #001, Common.
On this card layout, use the lower-left set mark or set code, collector number, and rarity dot. Do not confuse type or energy icons elsewhere on the card for the set identifier.
Set mark/codeMatch each marked zone against the set icon, stamp, and collector number before checking value.
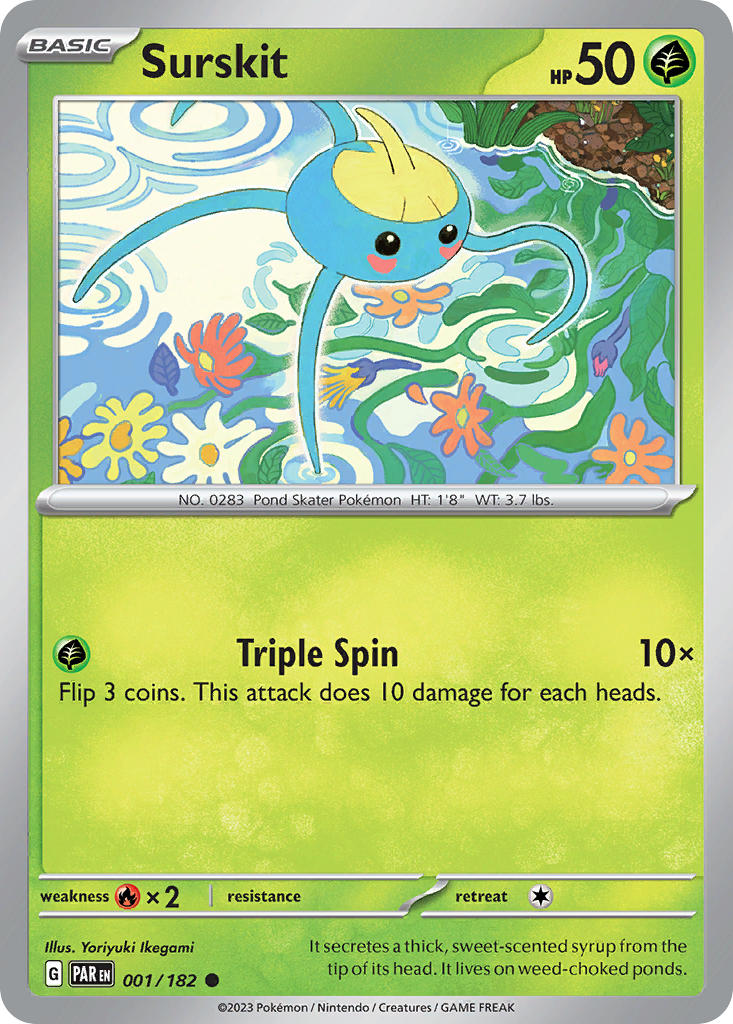
Paradox Rift
Example: Surskit #001/182, Common.
On this card layout, use the lower-left set mark or set code, collector number, and rarity dot. Do not confuse type or energy icons elsewhere on the card for the set identifier.
Set mark/codeMatch each marked zone against the set icon, stamp, and collector number before checking value.
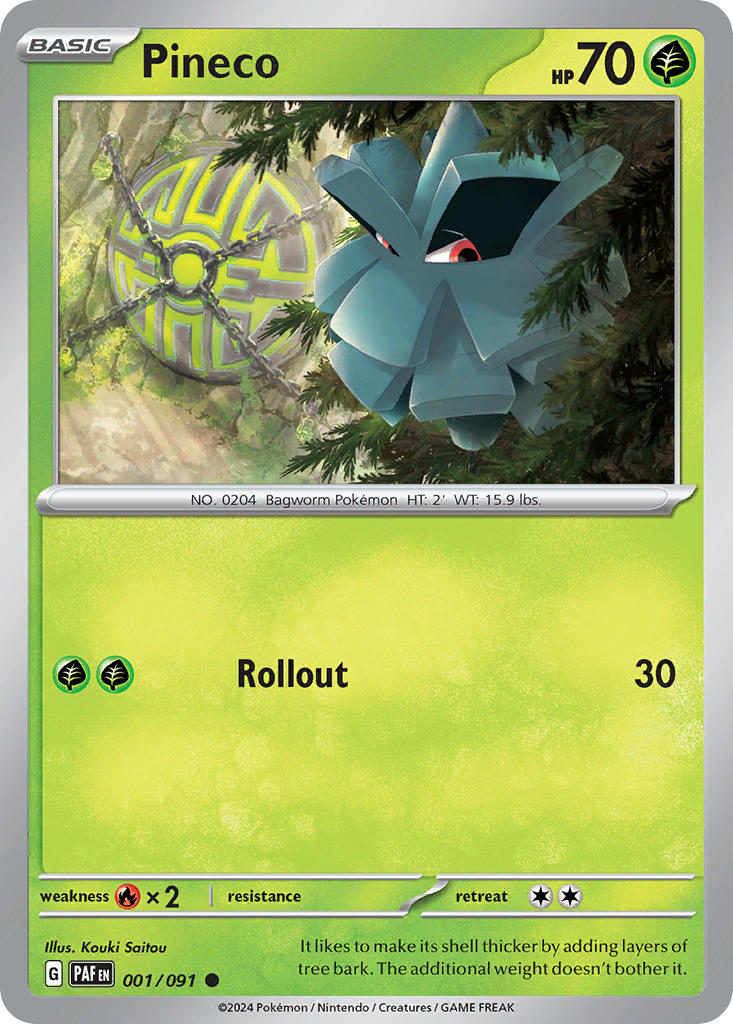
Paldean Fates
Example: Pineco #001/091, Common.
On this card layout, use the lower-left set mark or set code, collector number, and rarity dot. Do not confuse type or energy icons elsewhere on the card for the set identifier.
Set mark/codeMatch each marked zone against the set icon, stamp, and collector number before checking value.
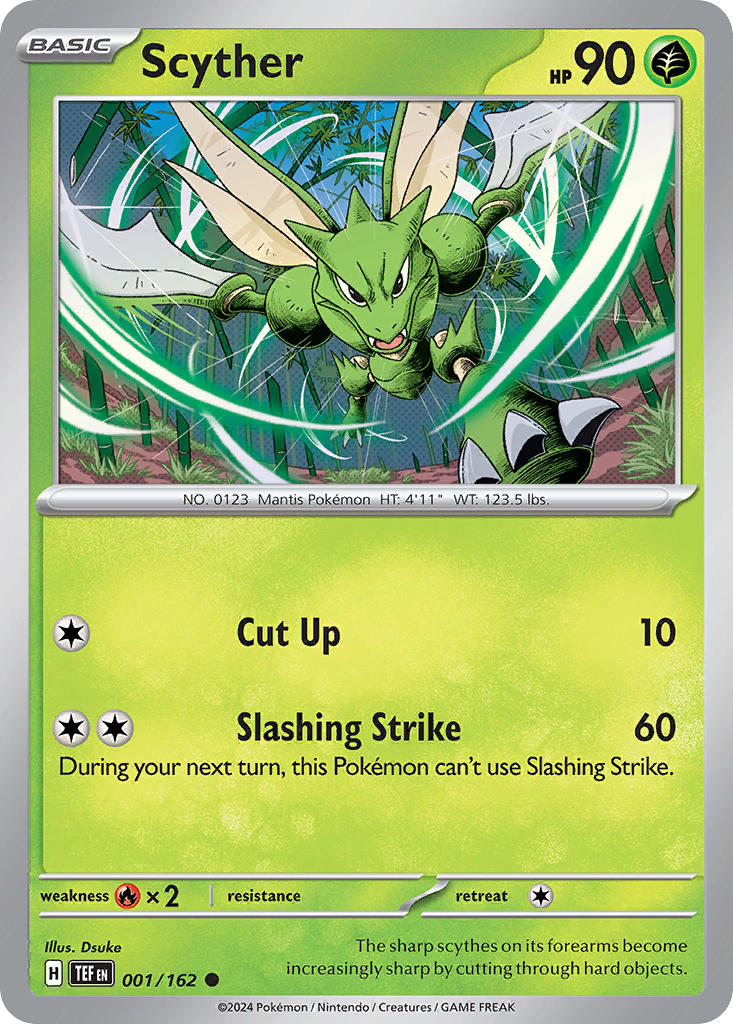
Temporal Forces
Example: Scyther #001/162, Common.
On this card layout, use the lower-left set mark or set code, collector number, and rarity dot. Do not confuse type or energy icons elsewhere on the card for the set identifier.
Set mark/codeMatch each marked zone against the set icon, stamp, and collector number before checking value.
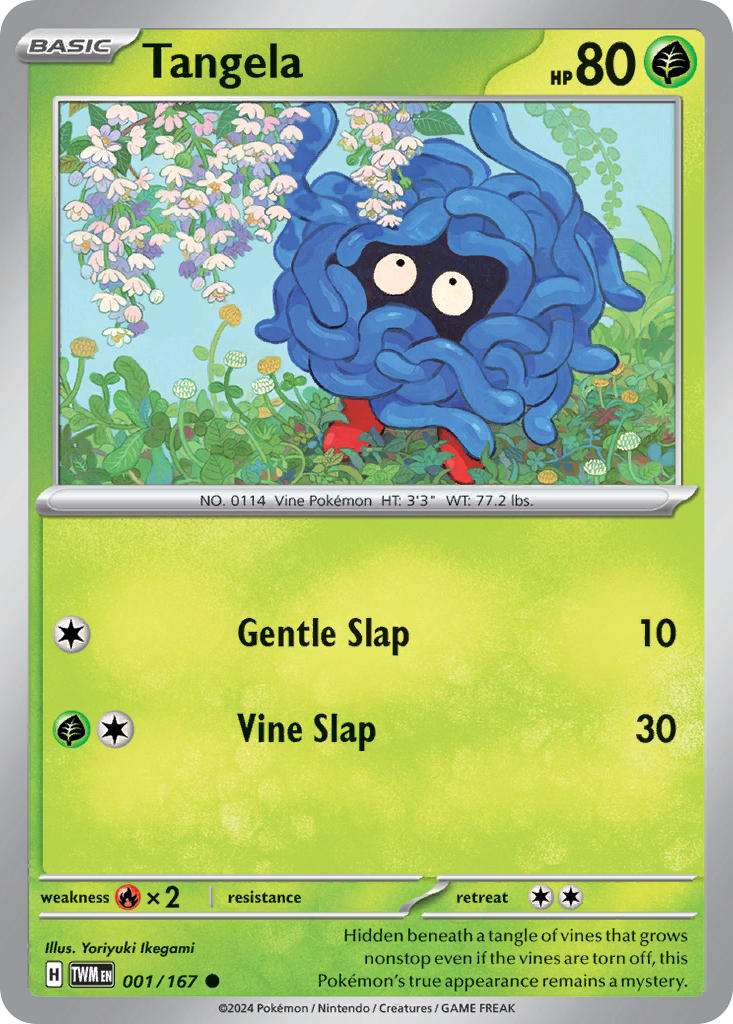
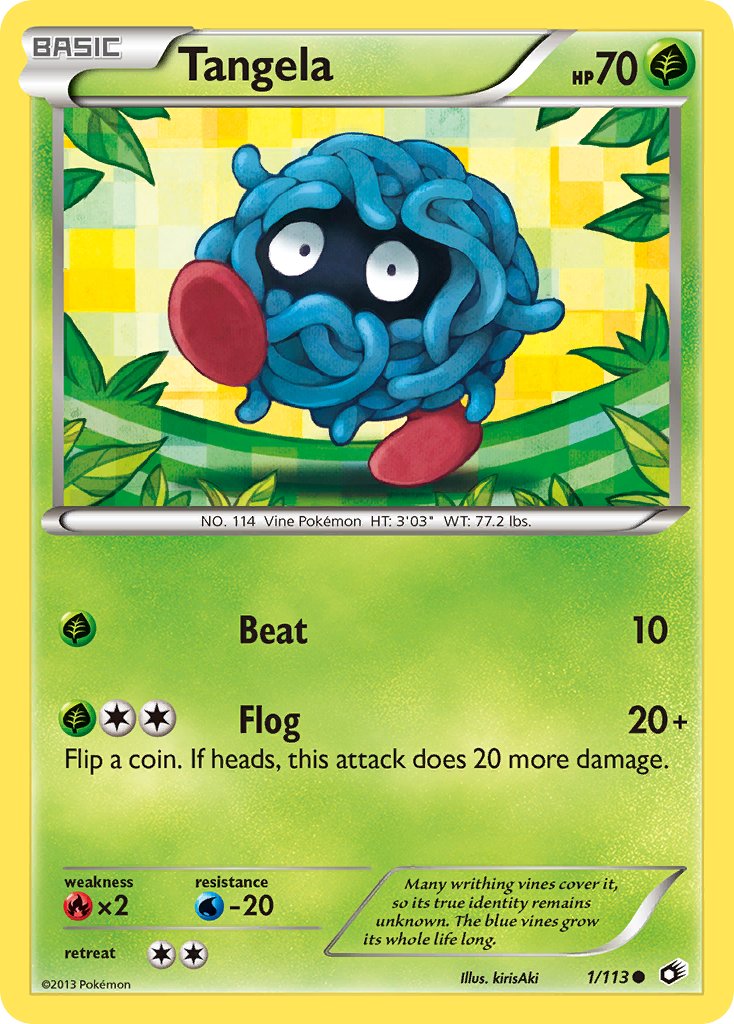
Twilight Masquerade
Example: Tangela #001/167, Common.
On this card layout, use the lower-left set mark or set code, collector number, and rarity dot. Do not confuse type or energy icons elsewhere on the card for the set identifier.
Set mark/codeMatch each marked zone against the set icon, stamp, and collector number before checking value.

Shrouded Fable
Example: Iron Moth #009/064, Uncommon.
On this card layout, use the lower-left set mark or set code, collector number, and rarity dot. Do not confuse type or energy icons elsewhere on the card for the set identifier.
Set mark/codeMatch each marked zone against the set icon, stamp, and collector number before checking value.
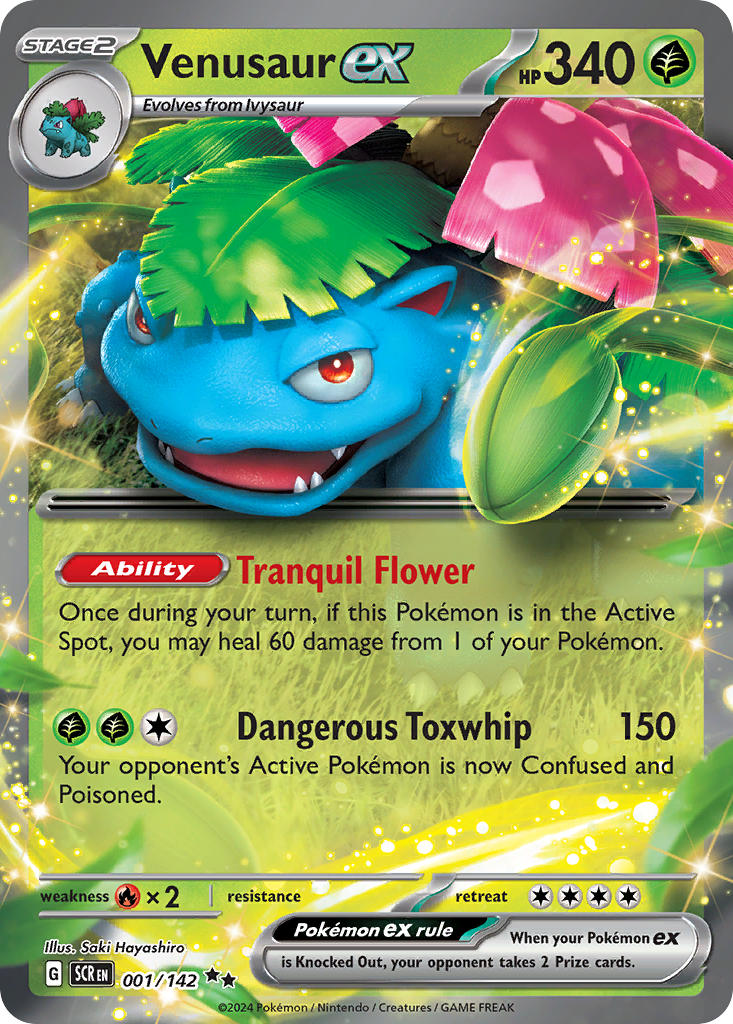
Stellar Crown
Example: Venusaur ex #001/142, Double Rare.
On this card layout, use the lower-left set mark or set code, collector number, and rarity dot. Do not confuse type or energy icons elsewhere on the card for the set identifier.
Set mark/codeMatch each marked zone against the set icon, stamp, and collector number before checking value.
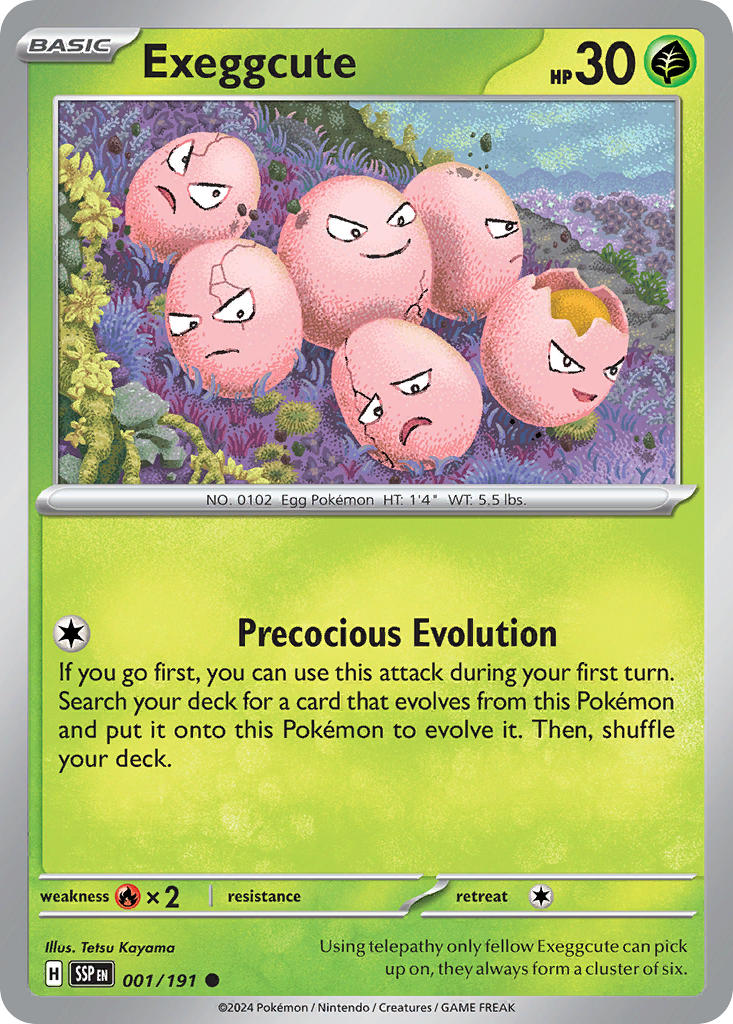
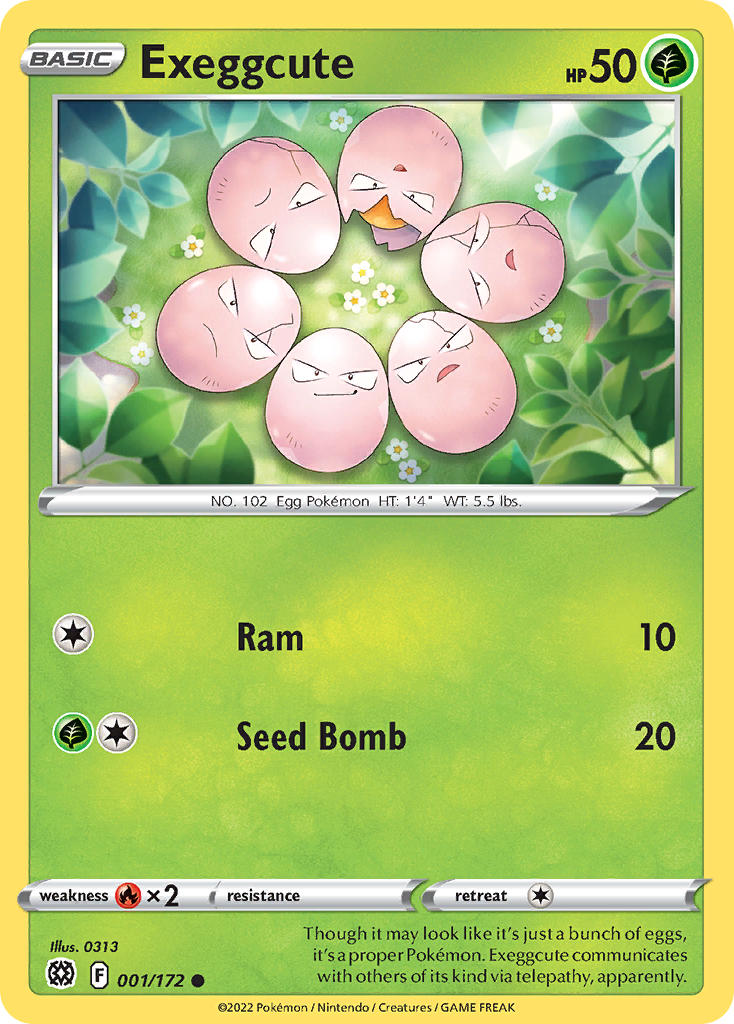
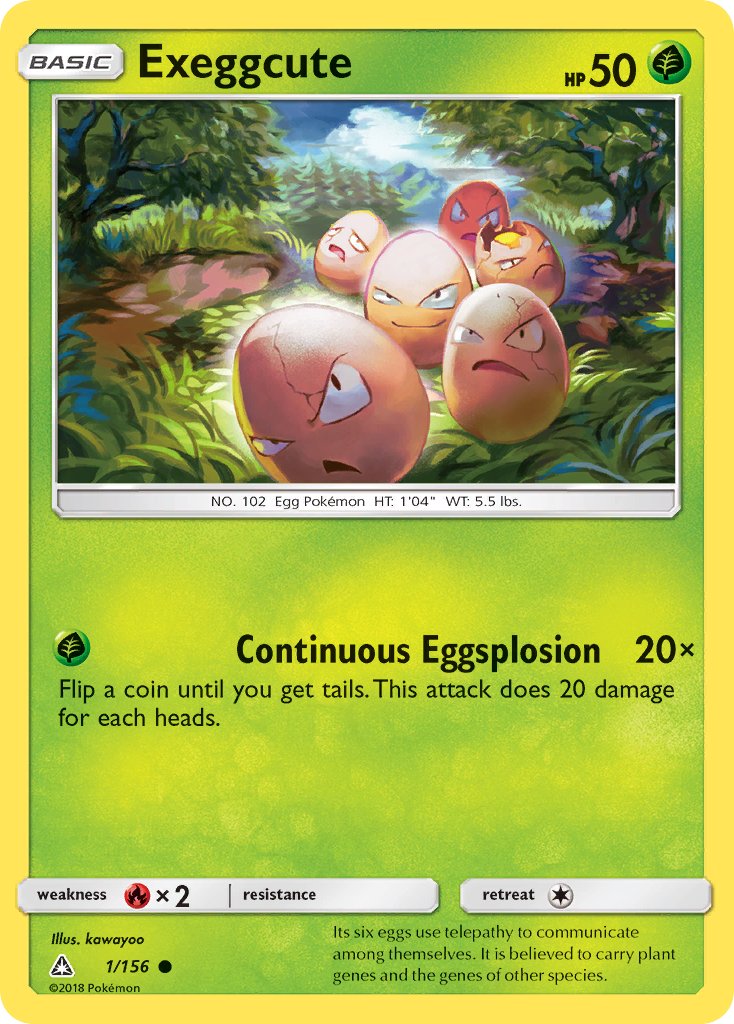
Surging Sparks
Example: Exeggcute #001/191, Common.
On this card layout, use the lower-left set mark or set code, collector number, and rarity dot. Do not confuse type or energy icons elsewhere on the card for the set identifier.
Set mark/codeMatch each marked zone against the set icon, stamp, and collector number before checking value.
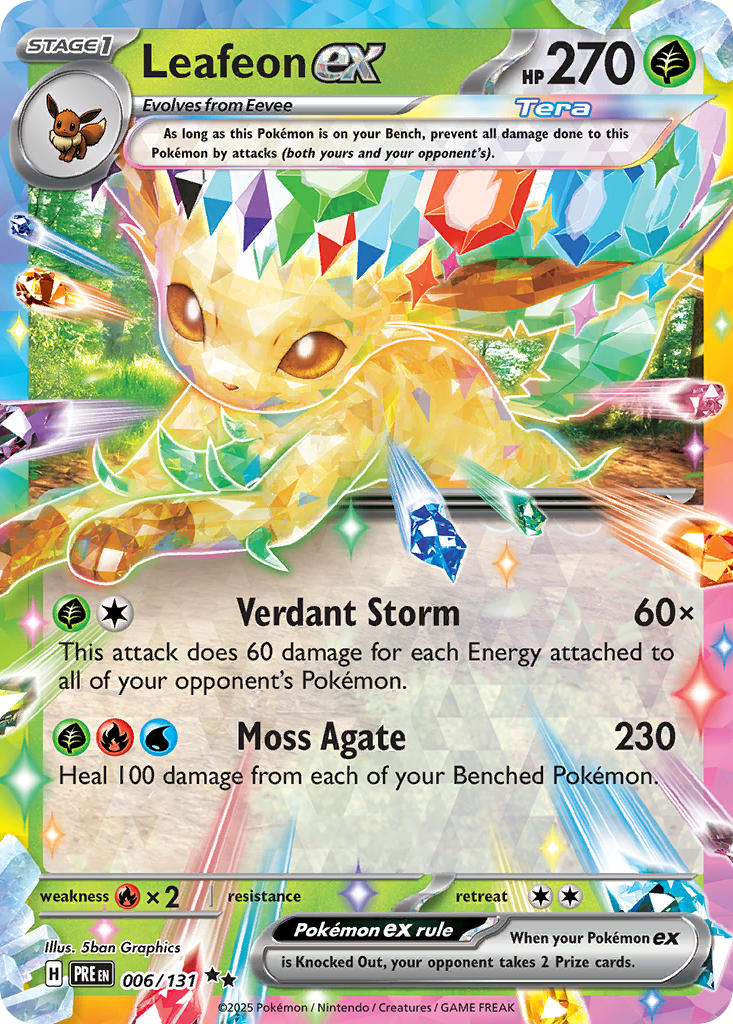
Prismatic Evolutions
Example: Leafeon ex #006/131, Double Rare.
On this card layout, use the lower-left set mark or set code, collector number, and rarity dot. Do not confuse type or energy icons elsewhere on the card for the set identifier.
Set mark/codeMatch each marked zone against the set icon, stamp, and collector number before checking value.
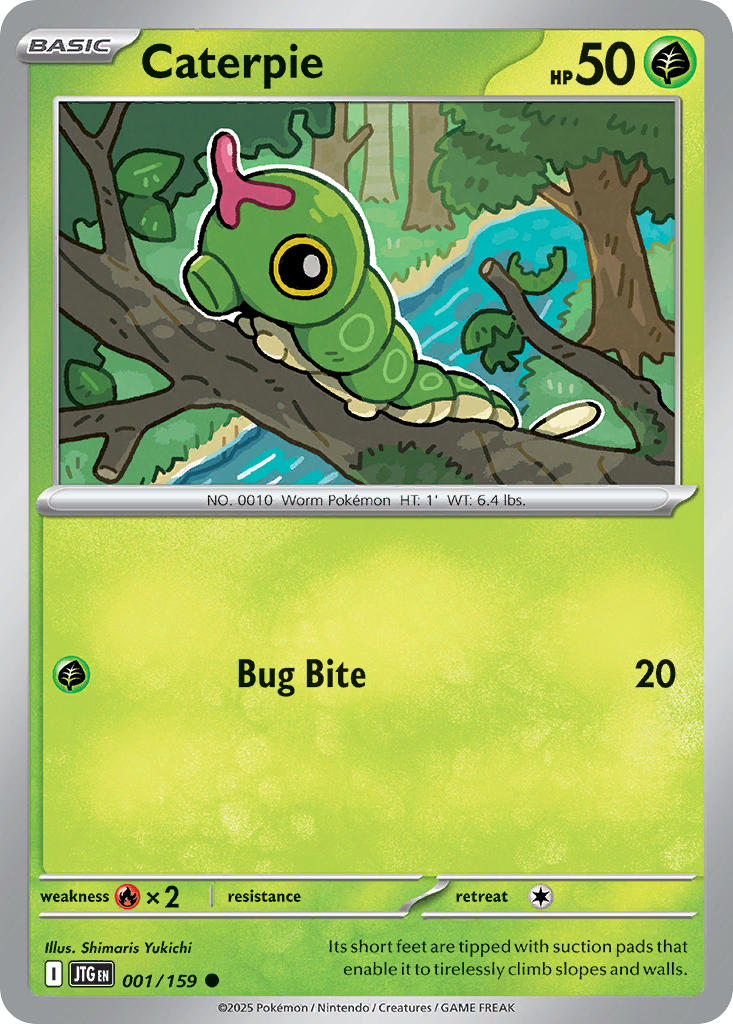
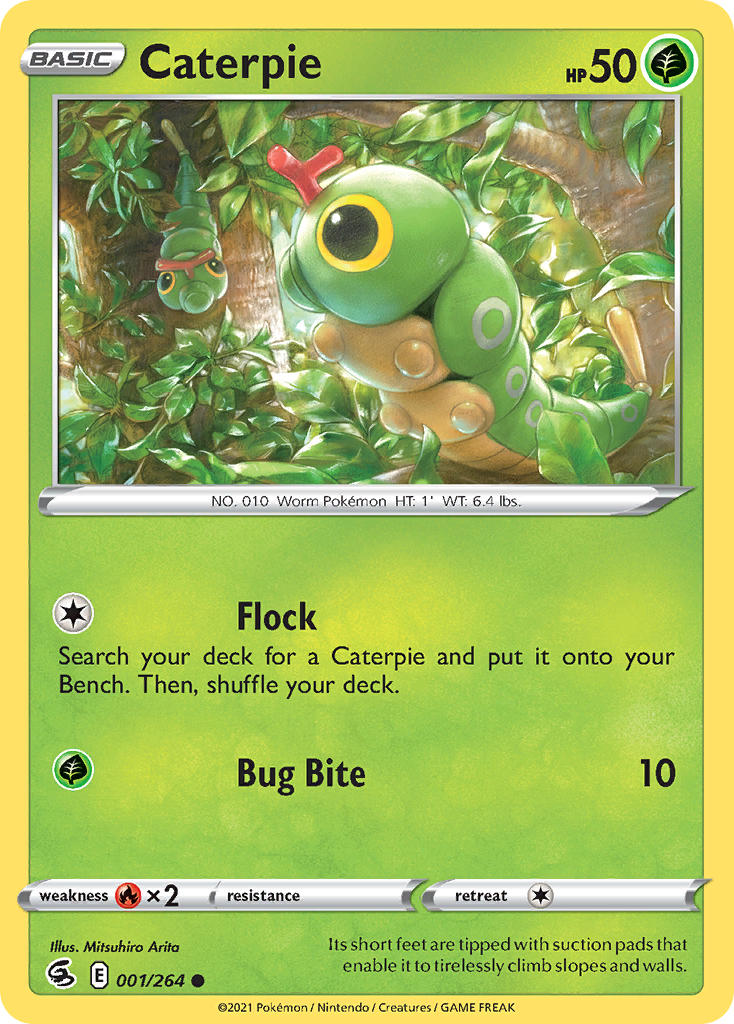
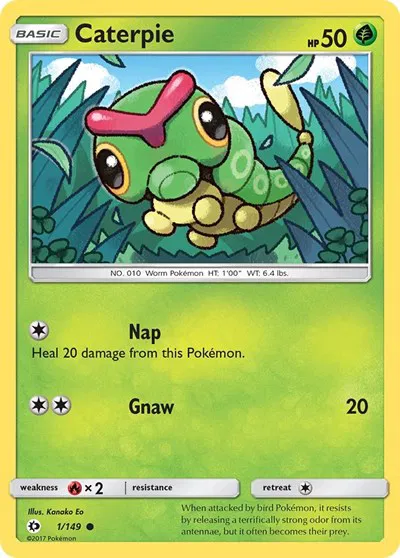
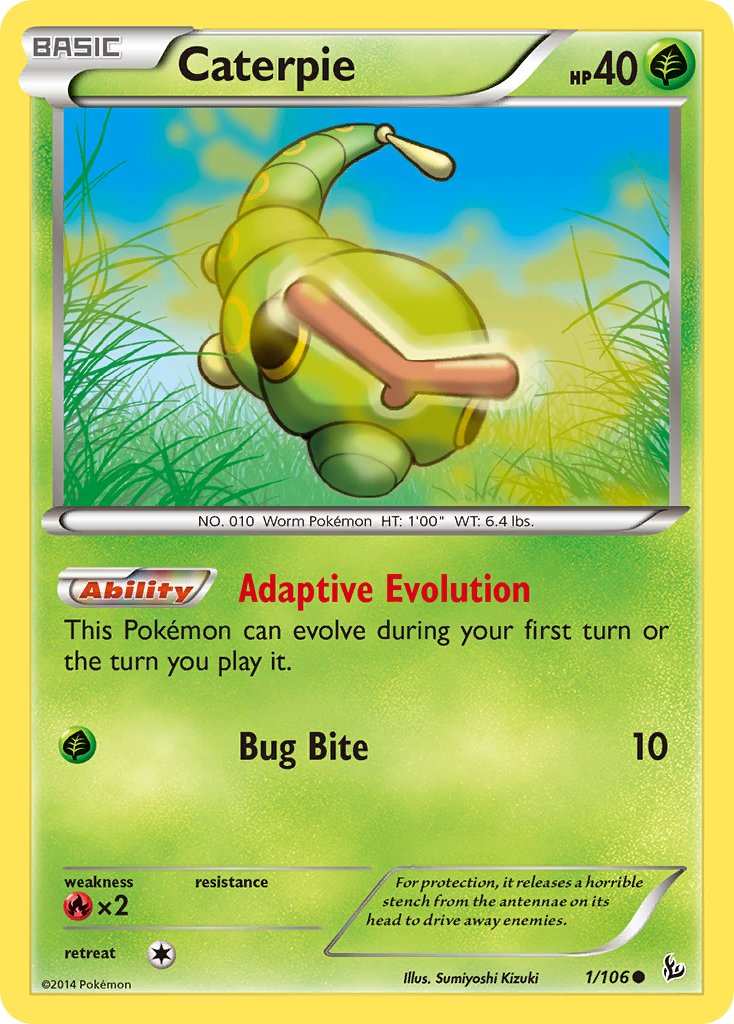
Journey Together
Example: Caterpie #001/159, Common.
On this card layout, use the lower-left set mark or set code, collector number, and rarity dot. Do not confuse type or energy icons elsewhere on the card for the set identifier.
Set mark/codeMatch each marked zone against the set icon, stamp, and collector number before checking value.
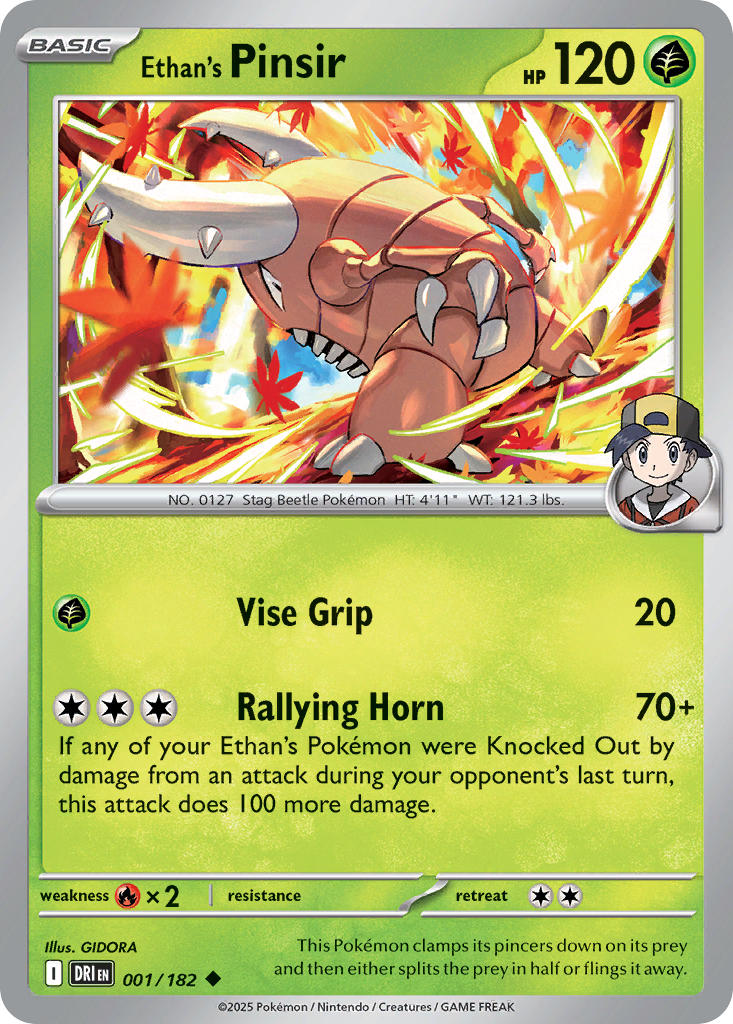
Destined Rivals
Example: Ethan's Pinsir #001/182, Uncommon.
On this card layout, use the lower-left set mark or set code, collector number, and rarity dot. Do not confuse type or energy icons elsewhere on the card for the set identifier.
Set mark/codeMatch each marked zone against the set icon, stamp, and collector number before checking value.
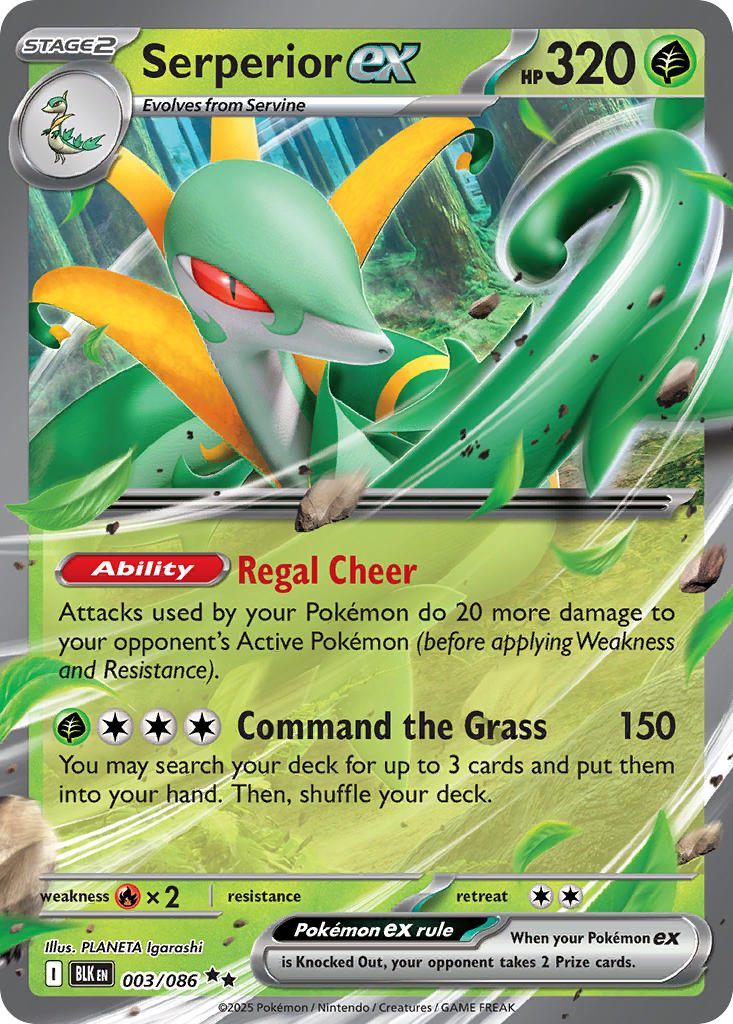
Black Bolt
Example: Serperior ex #003/086, Double Rare.
On this card layout, use the lower-left set mark or set code, collector number, and rarity dot. Do not confuse type or energy icons elsewhere on the card for the set identifier.
Set mark/codeMatch each marked zone against the set icon, stamp, and collector number before checking value.
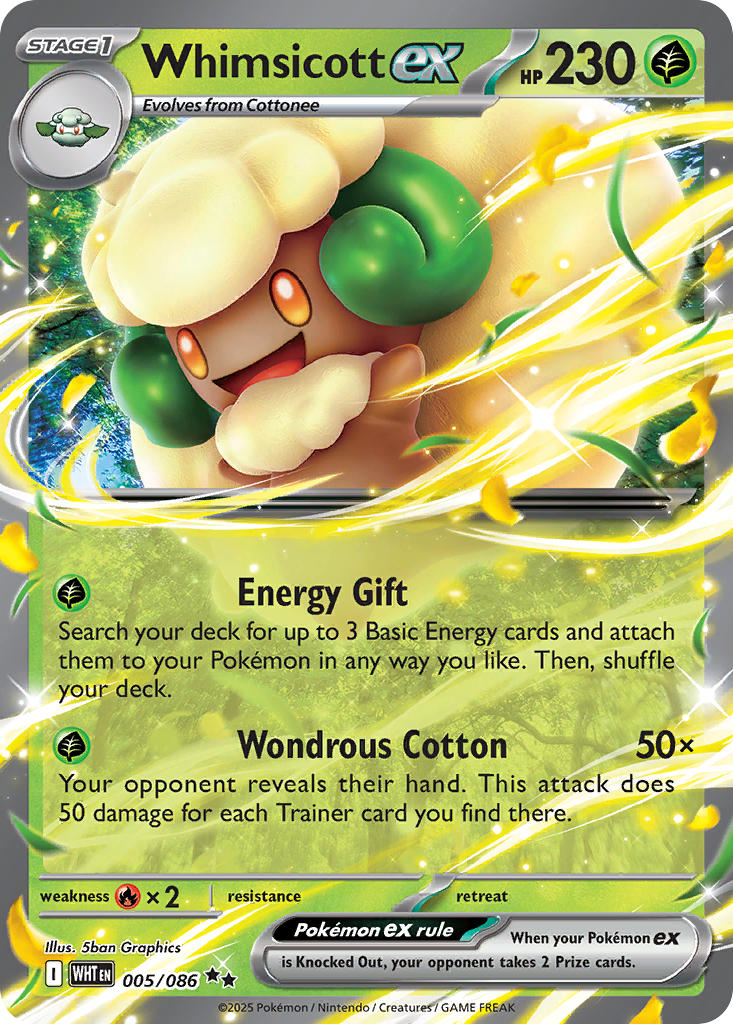
White Flare
Example: Whimsicott ex #005/086, Double Rare.
On this card layout, use the lower-left set mark or set code, collector number, and rarity dot. Do not confuse type or energy icons elsewhere on the card for the set identifier.
Set mark/codeMatch each marked zone against the set icon, stamp, and collector number before checking value.
Sword & Shield
25 sets in this snapshot
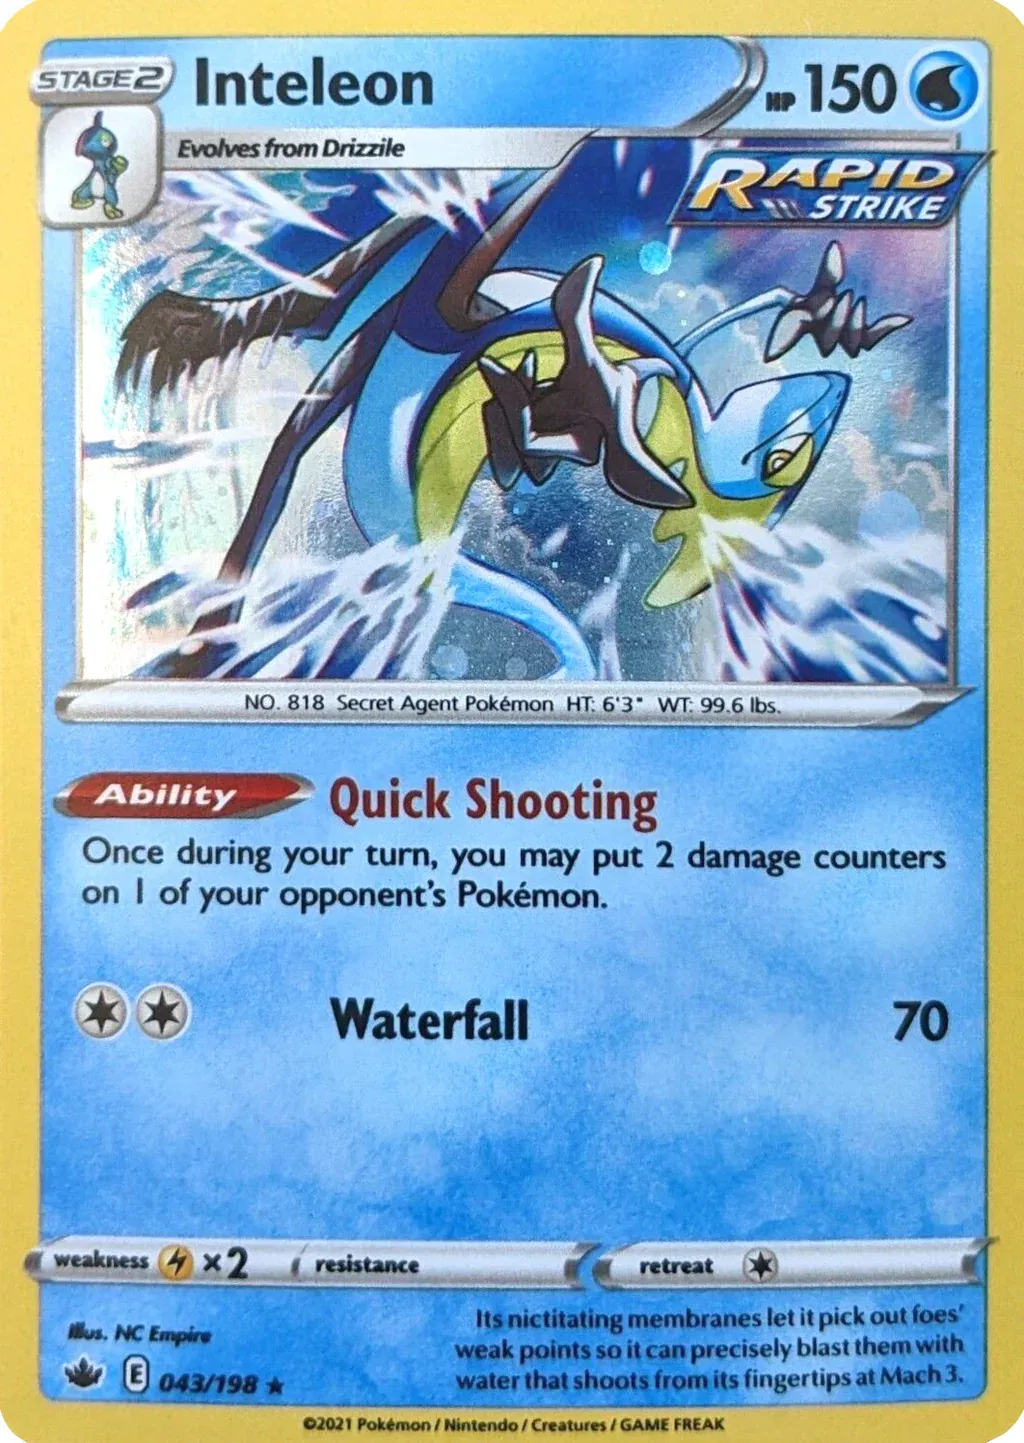
Sword & Shield Promo
Example: Inteleon - 043/198 (Cosmos Holo) #043/198, Holo Rare.
On this promo-style layout, use the lower-left promo/set code and collector number first, then confirm the product or distribution source if the card has one.
Promo codeMatch each marked zone against the set icon, stamp, and collector number before checking value.
Sword & Shield Base Set
Example: Celebi V #001/202, Ultra Rare.
On this card layout, use the lower-left set mark or set code, collector number, and rarity dot. Do not confuse type or energy icons elsewhere on the card for the set identifier.
Set mark/codeMatch each marked zone against the set icon, stamp, and collector number before checking value.
Rebel Clash
Example: Caterpie #001/192, Common.
On this card layout, use the lower-left set mark or set code, collector number, and rarity dot. Do not confuse type or energy icons elsewhere on the card for the set identifier.
Set mark/codeMatch each marked zone against the set icon, stamp, and collector number before checking value.

Darkness Ablaze
Example: Butterfree V #001/189, Ultra Rare.
On this card layout, use the lower-left set mark or set code, collector number, and rarity dot. Do not confuse type or energy icons elsewhere on the card for the set identifier.
Set mark/codeMatch each marked zone against the set icon, stamp, and collector number before checking value.

Champion's Path
Example: Venusaur V #001/073, Ultra Rare.
On this card layout, use the lower-left set mark or set code, collector number, and rarity dot. Do not confuse type or energy icons elsewhere on the card for the set identifier.
Set mark/codeMatch each marked zone against the set icon, stamp, and collector number before checking value.
Vivid Voltage
Example: Weedle #001/185, Common.
On this card layout, use the lower-left set mark or set code, collector number, and rarity dot. Do not confuse type or energy icons elsewhere on the card for the set identifier.
Set mark/codeMatch each marked zone against the set icon, stamp, and collector number before checking value.

Shining Fates
Example: Yanma #001/072, Common.
On this card layout, use the lower-left set mark or set code, collector number, and rarity dot. Do not confuse type or energy icons elsewhere on the card for the set identifier.
Set mark/codeMatch each marked zone against the set icon, stamp, and collector number before checking value.
Shining Fates: Shiny Vault
Example: Alcremie #SV058/SV122, Shiny Holo Rare.
On this card layout, use the lower-left set mark or set code, collector number, and rarity dot. Do not confuse type or energy icons elsewhere on the card for the set identifier.
Set mark/codeMatch each marked zone against the set icon, stamp, and collector number before checking value.
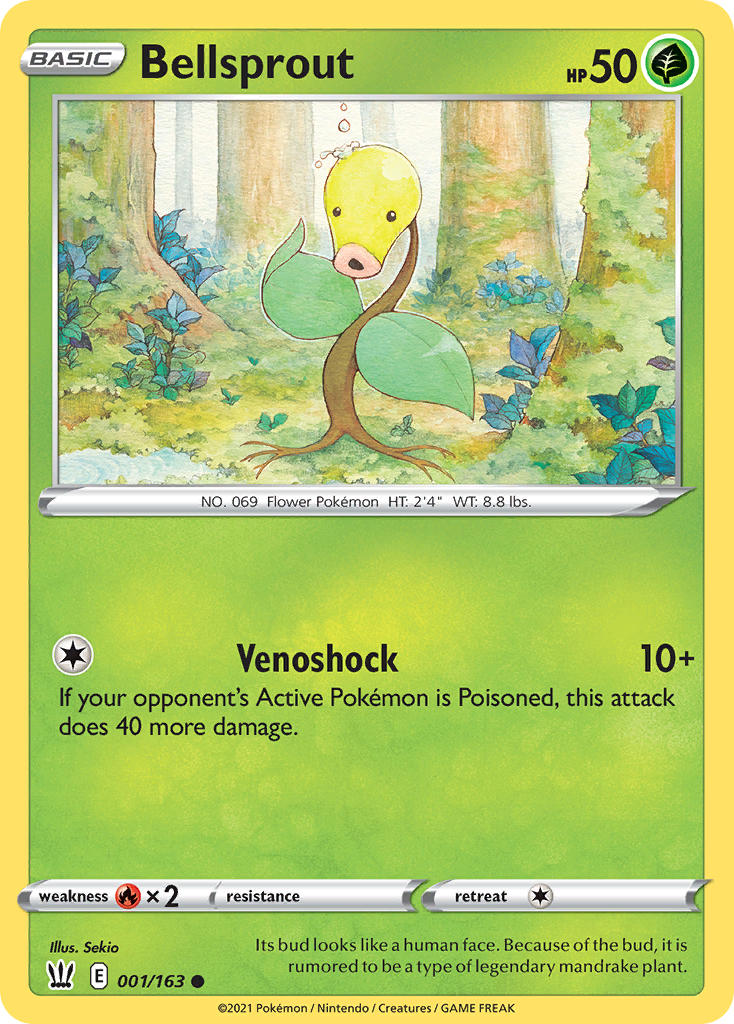
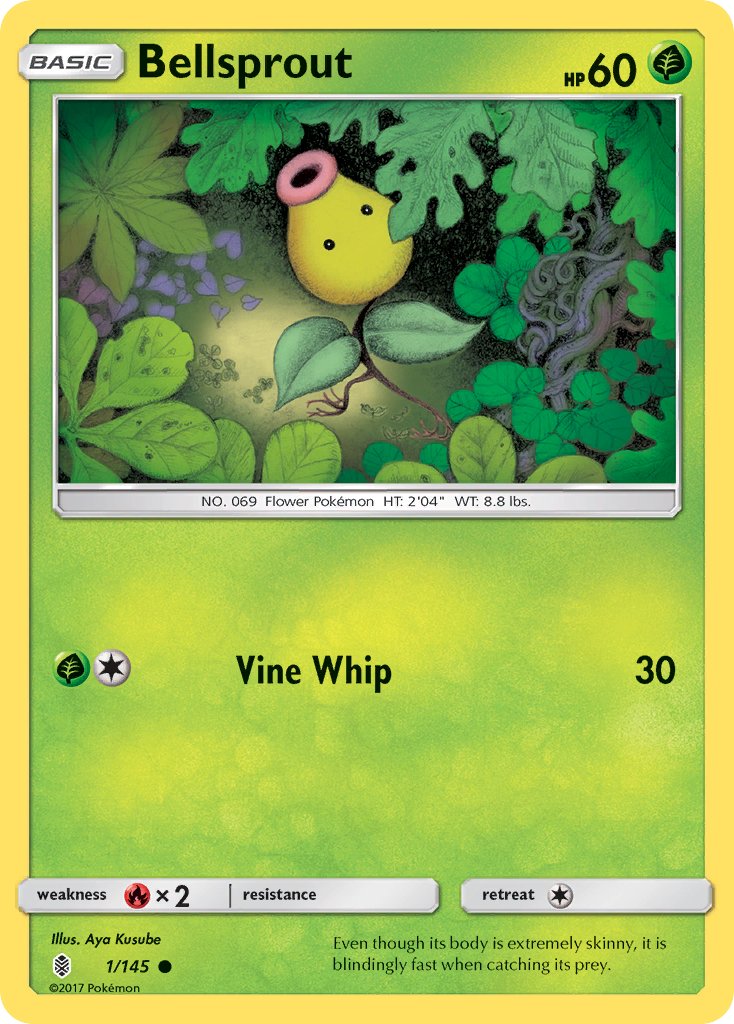
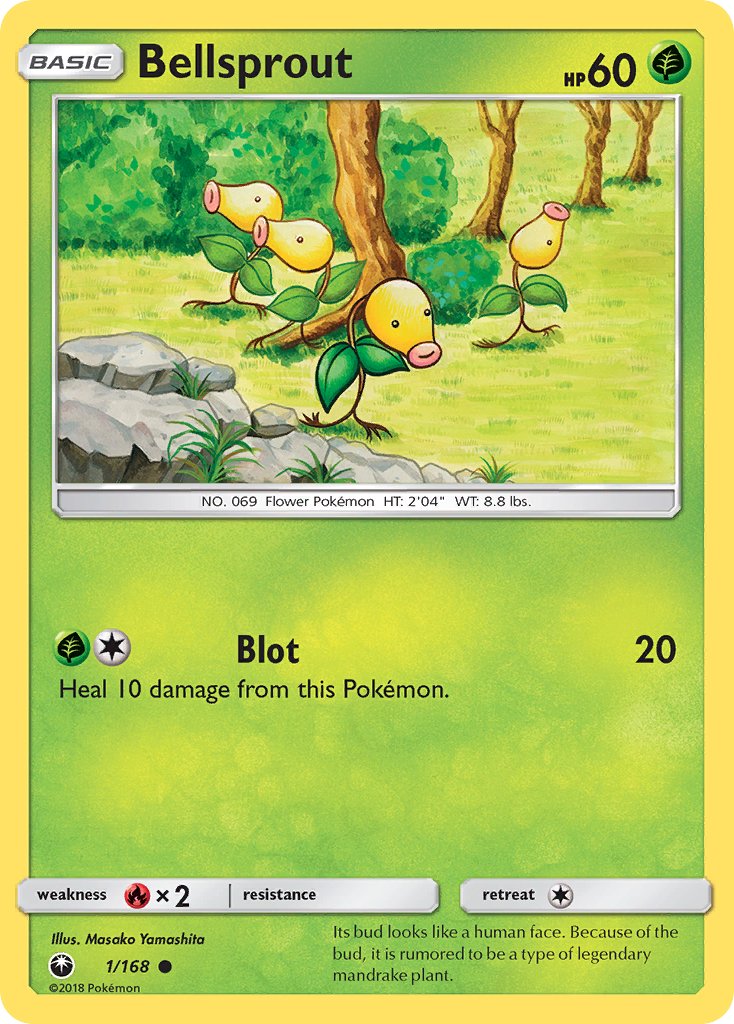
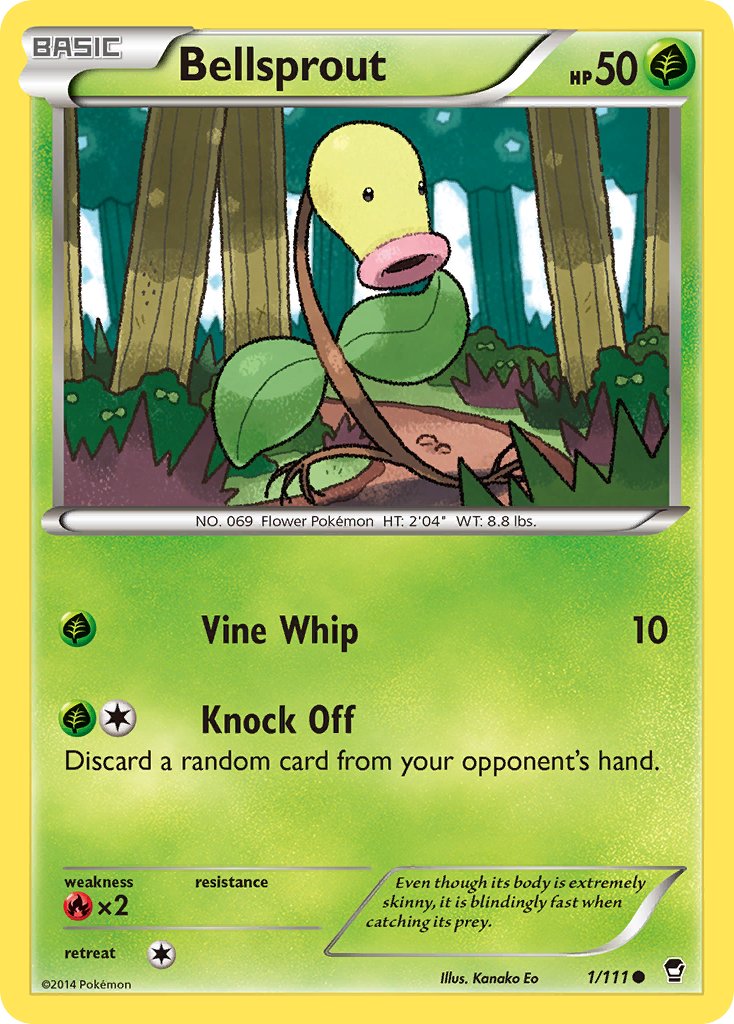
Battle Styles
Example: Bellsprout #001/163, Common.
On this card layout, use the lower-left set mark or set code, collector number, and rarity dot. Do not confuse type or energy icons elsewhere on the card for the set identifier.
Set mark/codeMatch each marked zone against the set icon, stamp, and collector number before checking value.
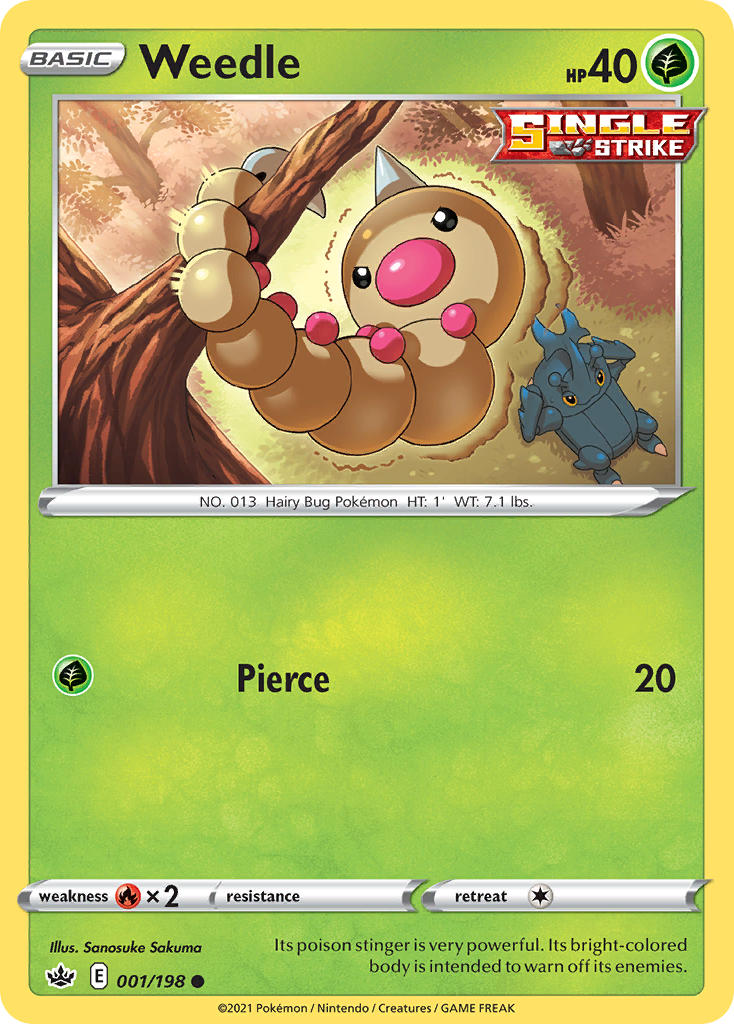
Chilling Reign
Example: Weedle #001/198, Common.
On this card layout, use the lower-left set mark or set code, collector number, and rarity dot. Do not confuse type or energy icons elsewhere on the card for the set identifier.
Set mark/codeMatch each marked zone against the set icon, stamp, and collector number before checking value.
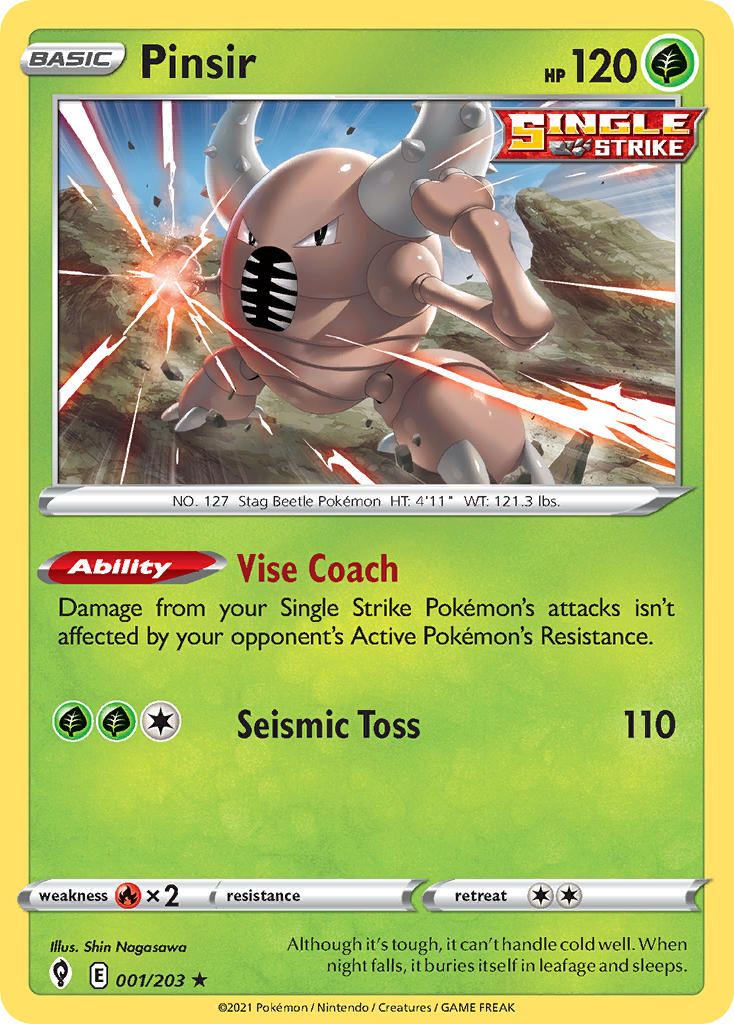
Evolving Skies
Example: Pinsir #001/203, Rare.
On this card layout, use the lower-left set mark or set code, collector number, and rarity dot. Do not confuse type or energy icons elsewhere on the card for the set identifier.
Set mark/codeMatch each marked zone against the set icon, stamp, and collector number before checking value.
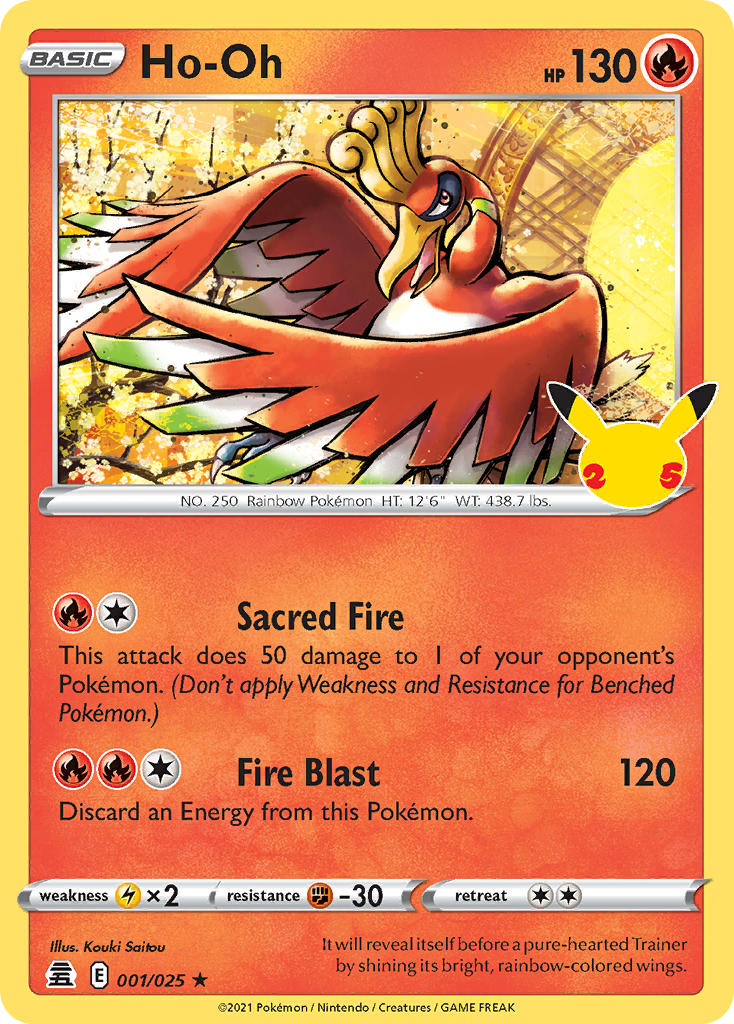
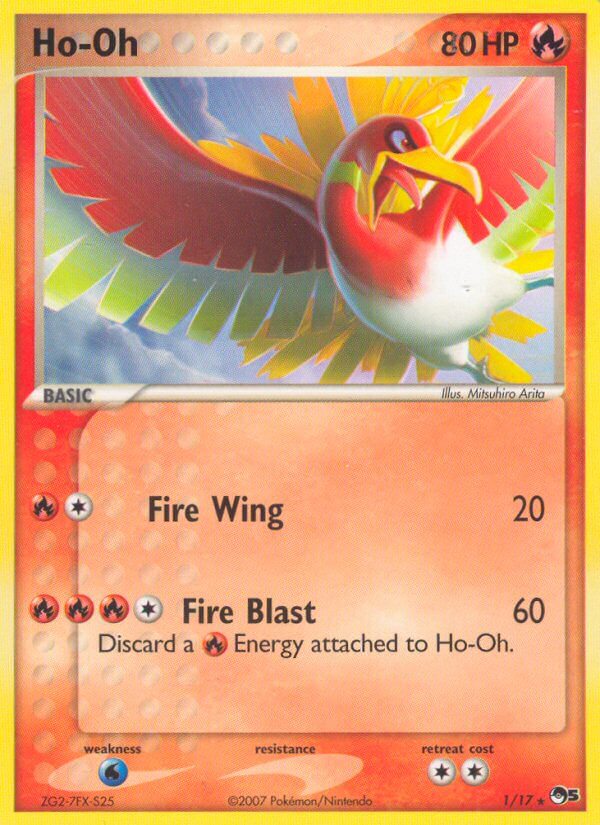
Celebrations
Example: Ho-oh #001/025, Holo Rare.
On this card layout, use the lower-left set mark or set code, collector number, and rarity dot. Do not confuse type or energy icons elsewhere on the card for the set identifier.
Set mark/codeMatch each marked zone against the set icon, stamp, and collector number before checking value.
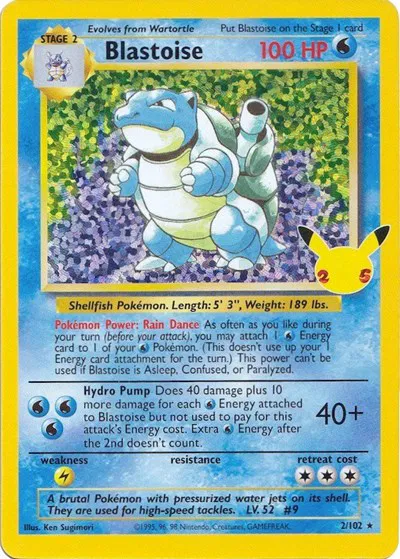
Celebrations: Classic Collection
Example: Blastoise #2/102, Classic Collection.
On this card layout, use the lower-left set mark or set code, collector number, and rarity dot. Do not confuse type or energy icons elsewhere on the card for the set identifier.
Set mark/codeMatch each marked zone against the set icon, stamp, and collector number before checking value.
Fusion Strike
Example: Caterpie #001/264, Common.
On this card layout, use the lower-left set mark or set code, collector number, and rarity dot. Do not confuse type or energy icons elsewhere on the card for the set identifier.
Set mark/codeMatch each marked zone against the set icon, stamp, and collector number before checking value.
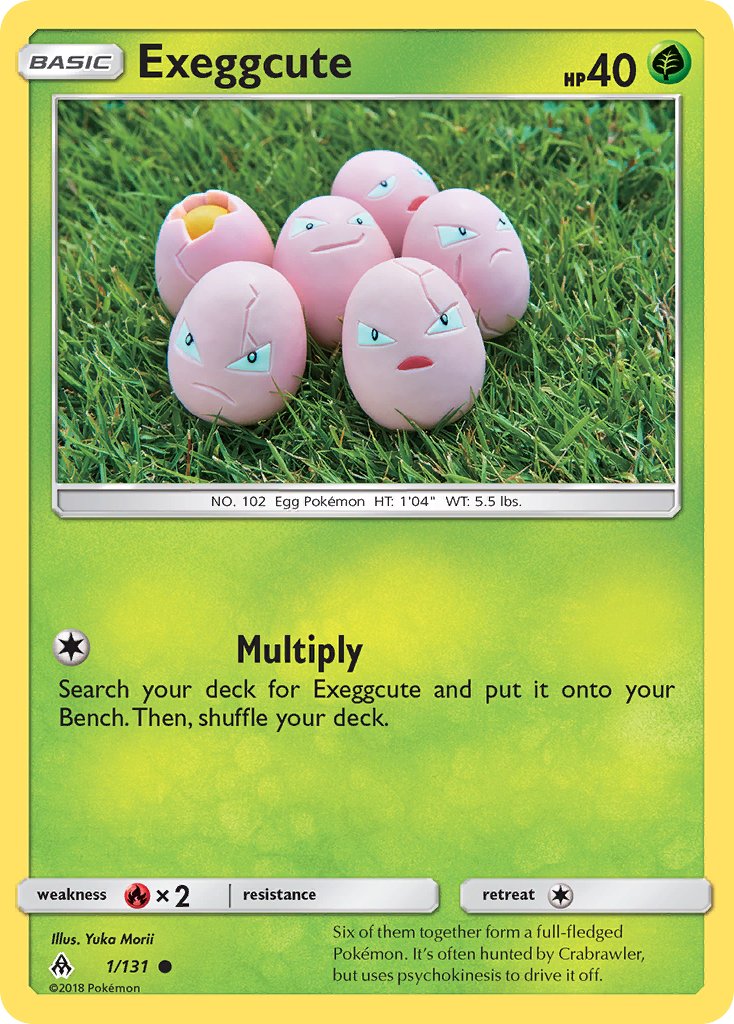
Brilliant Stars
Example: Exeggcute #001/172, Common.
On this card layout, use the lower-left set mark or set code, collector number, and rarity dot. Do not confuse type or energy icons elsewhere on the card for the set identifier.
Set mark/codeMatch each marked zone against the set icon, stamp, and collector number before checking value.

Brilliant Stars Trainer Gallery
Example: Acerola's Premonition #TG24/TG30, Ultra Rare.
Trainer Gallery and Galarian Gallery cards use the lower-left TG/GG collector number and set code area. Match that gallery code before treating the card like the main-set slot.
Set mark/codeMatch each marked zone against the set icon, stamp, and collector number before checking value.
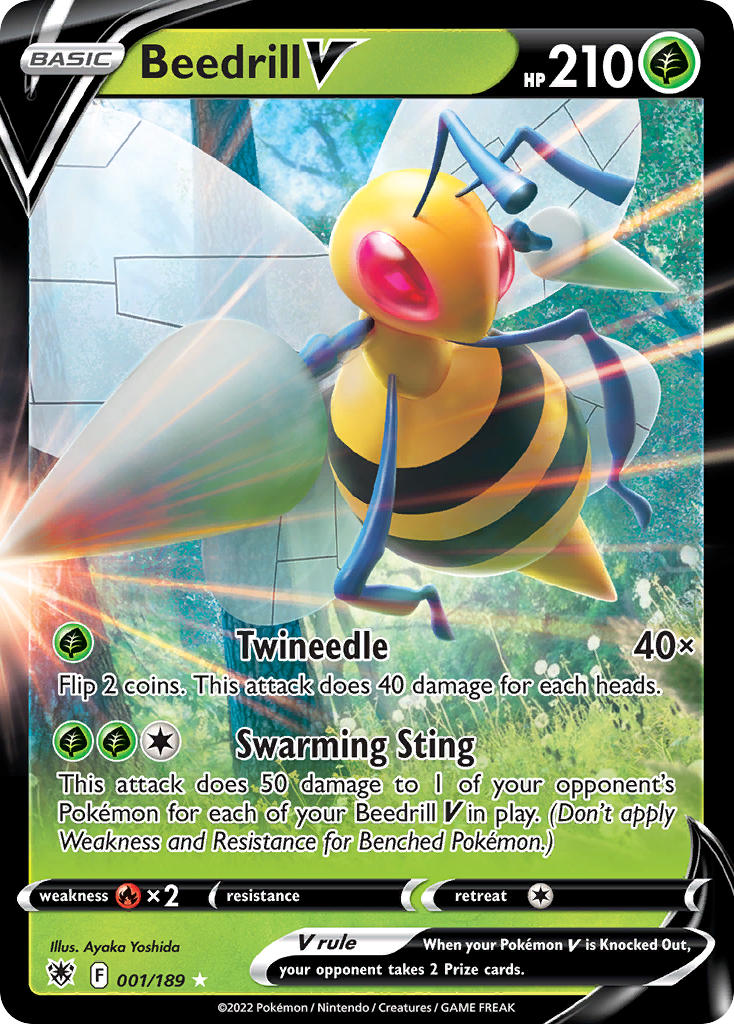
Astral Radiance
Example: Beedrill V #001/189, Holo Rare.
On this card layout, use the lower-left set mark or set code, collector number, and rarity dot. Do not confuse type or energy icons elsewhere on the card for the set identifier.
Set mark/codeMatch each marked zone against the set icon, stamp, and collector number before checking value.

Astral Radiance Trainer Gallery
Example: Abomasnow #TG01/TG30, Ultra Rare.
Trainer Gallery and Galarian Gallery cards use the lower-left TG/GG collector number and set code area. Match that gallery code before treating the card like the main-set slot.
Set mark/codeMatch each marked zone against the set icon, stamp, and collector number before checking value.
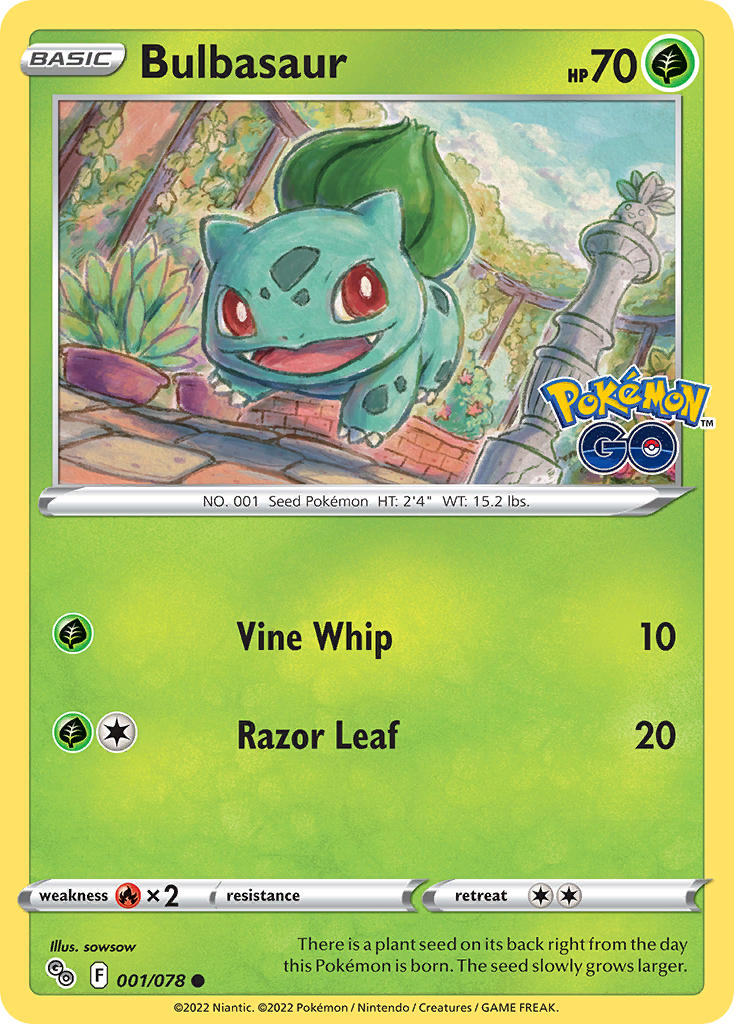
Pokemon Go
Example: Bulbasaur #001/078, Common.
On this card layout, use the lower-left set mark or set code, collector number, and rarity dot. Do not confuse type or energy icons elsewhere on the card for the set identifier.
Set mark/codeMatch each marked zone against the set icon, stamp, and collector number before checking value.
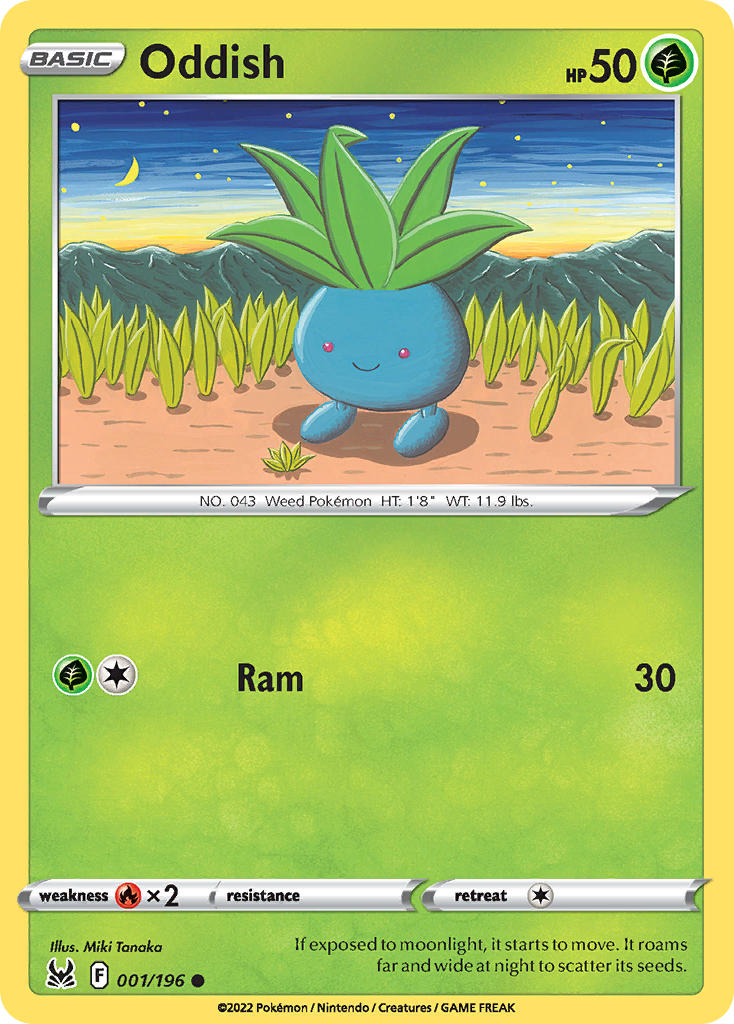
Lost Origin
Example: Oddish #001/196, Common.
On this card layout, use the lower-left set mark or set code, collector number, and rarity dot. Do not confuse type or energy icons elsewhere on the card for the set identifier.
Set mark/codeMatch each marked zone against the set icon, stamp, and collector number before checking value.
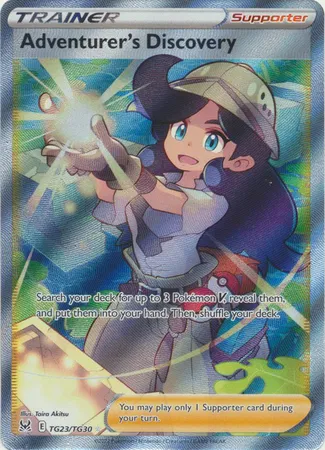
Lost Origin Trainer Gallery
Example: Adventurer's Discovery #TG23/TG30, Ultra Rare.
Trainer Gallery and Galarian Gallery cards use the lower-left TG/GG collector number and set code area. Match that gallery code before treating the card like the main-set slot.
Set mark/codeMatch each marked zone against the set icon, stamp, and collector number before checking value.
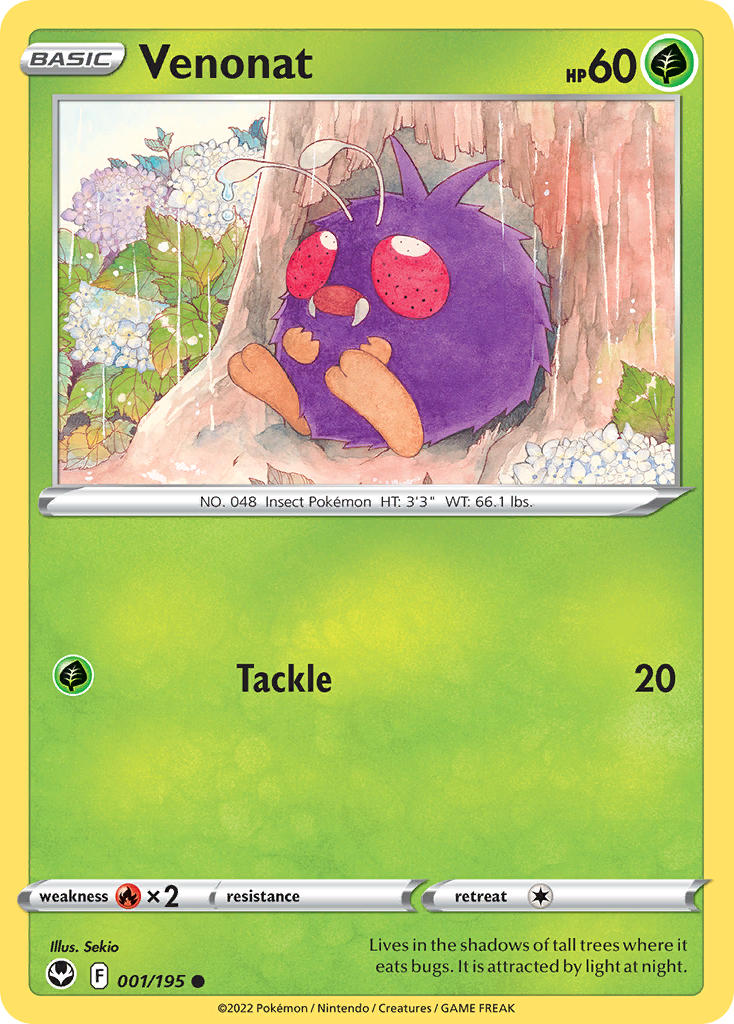
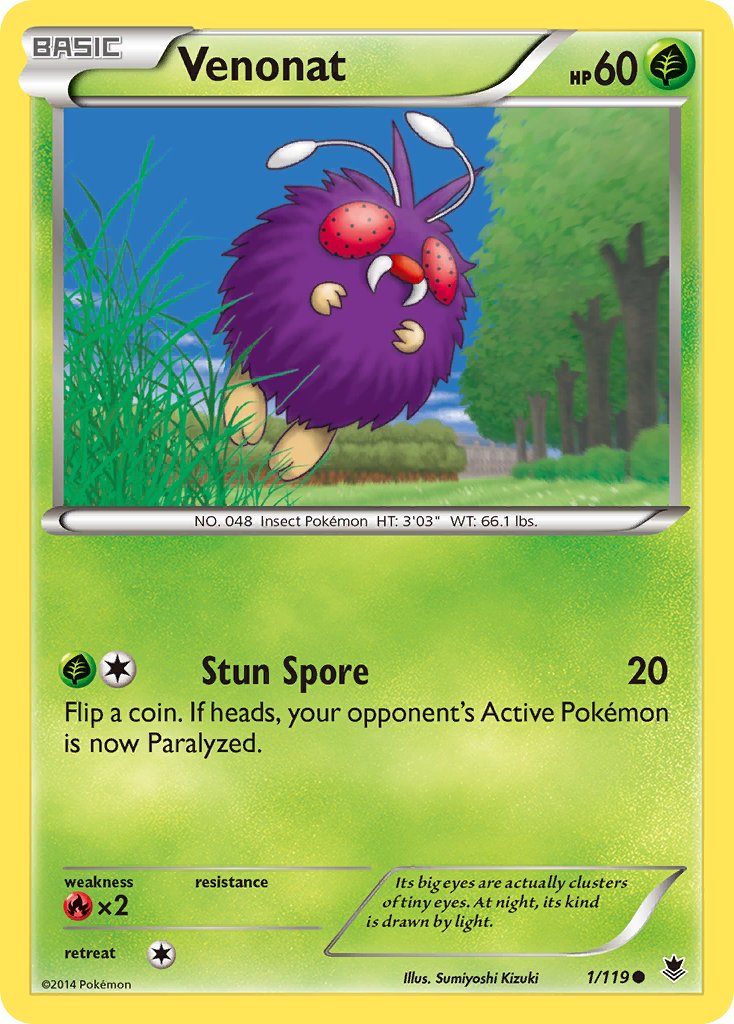
Silver Tempest
Example: Venonat #001/195, Common.
On this card layout, use the lower-left set mark or set code, collector number, and rarity dot. Do not confuse type or energy icons elsewhere on the card for the set identifier.
Set mark/codeMatch each marked zone against the set icon, stamp, and collector number before checking value.
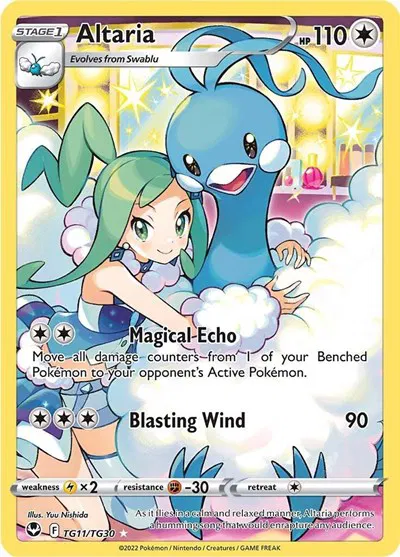
Silver Tempest Trainer Gallery
Example: Altaria #TG11/TG30, Ultra Rare.
Trainer Gallery and Galarian Gallery cards use the lower-left TG/GG collector number and set code area. Match that gallery code before treating the card like the main-set slot.
Set mark/codeMatch each marked zone against the set icon, stamp, and collector number before checking value.
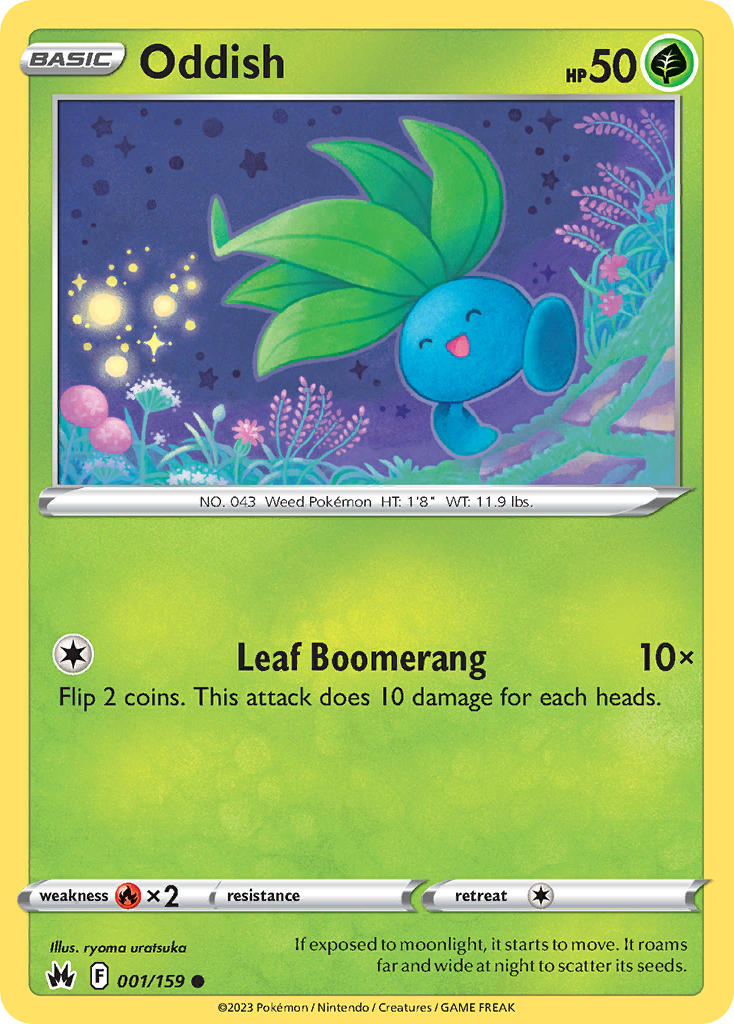
Crown Zenith
Example: Oddish #001/159, Common.
On this card layout, use the lower-left set mark or set code, collector number, and rarity dot. Do not confuse type or energy icons elsewhere on the card for the set identifier.
Set mark/codeMatch each marked zone against the set icon, stamp, and collector number before checking value.

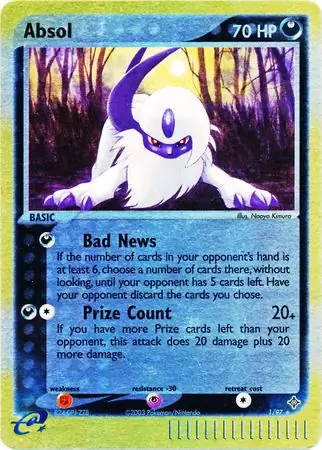
Crown Zenith: Galarian Gallery
Example: Absol #GG16/GG70, Holo Rare.
Trainer Gallery and Galarian Gallery cards use the lower-left TG/GG collector number and set code area. Match that gallery code before treating the card like the main-set slot.
Set mark/codeMatch each marked zone against the set icon, stamp, and collector number before checking value.
Sun & Moon
18 sets in this snapshot
Sun & Moon Base Set
Example: Caterpie #1, Common.
On this card layout, use the lower-left set mark or set code, collector number, and rarity dot. Do not confuse type or energy icons elsewhere on the card for the set identifier.
Set mark/codeMatch each marked zone against the set icon, stamp, and collector number before checking value.

Sun & Moon Promo
Example: Fennekin - 15/131 (Toys R' Us Promo) #15/131, Promo.
This example is a stamped product or distribution card. Use the visible stamp first, then lock the identity with the card number and card-number area.
source set stampPromo codeMatch each marked zone against the set icon, stamp, and collector number before checking value.
Guardians Rising
Example: Bellsprout #1/145, Common.
On this card layout, use the lower-left set mark or set code, collector number, and rarity dot. Do not confuse type or energy icons elsewhere on the card for the set identifier.
Set mark/codeMatch each marked zone against the set icon, stamp, and collector number before checking value.

Burning Shadows
Example: Caterpie #1/147, Common.
On this card layout, use the lower-left set mark or set code, collector number, and rarity dot. Do not confuse type or energy icons elsewhere on the card for the set identifier.
Set mark/codeMatch each marked zone against the set icon, stamp, and collector number before checking value.
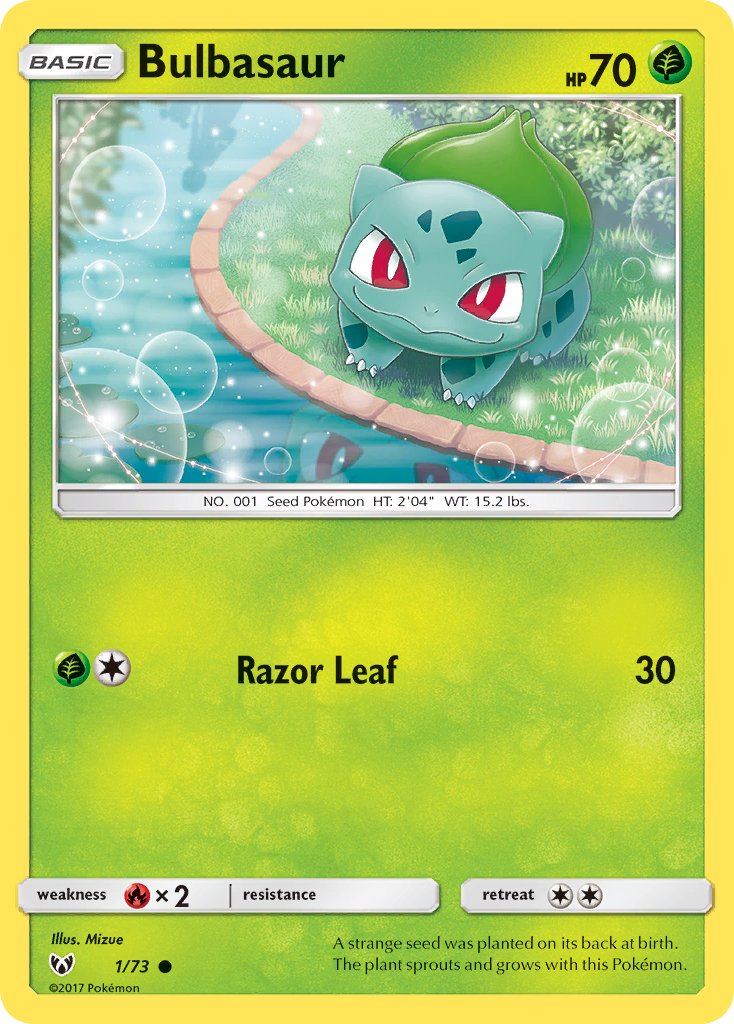
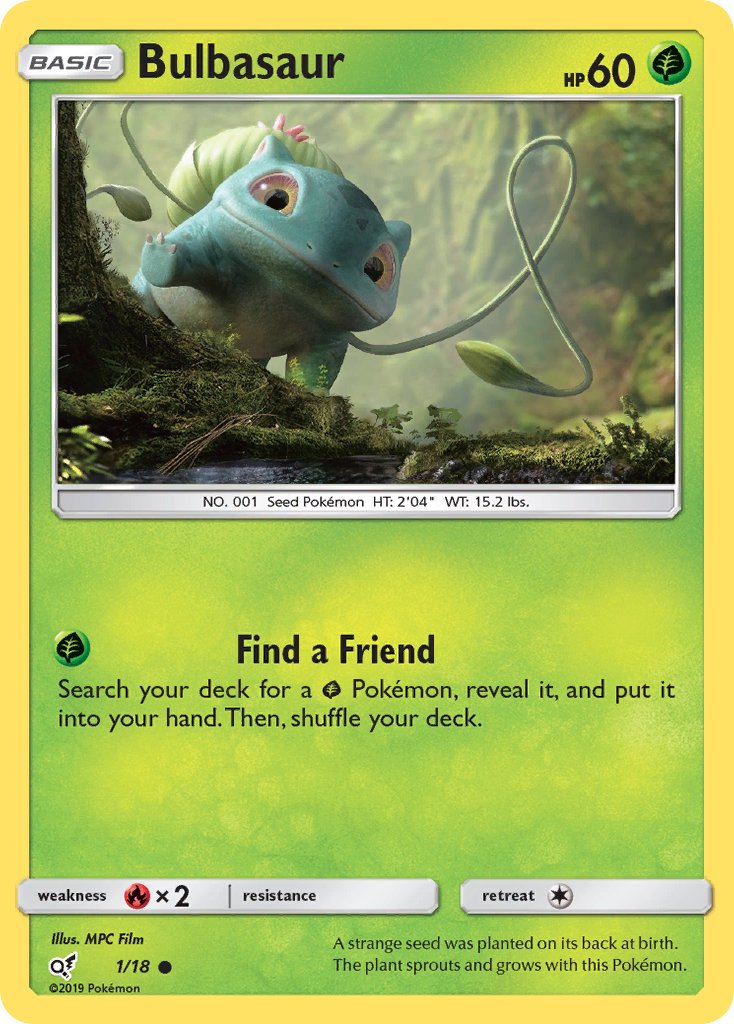
Shining Legends
Example: Bulbasaur #1, Common.
On this card layout, use the lower-left set mark or set code, collector number, and rarity dot. Do not confuse type or energy icons elsewhere on the card for the set identifier.
Set mark/codeMatch each marked zone against the set icon, stamp, and collector number before checking value.
Crimson Invasion
Example: Weedle #1/111, Common.
On this card layout, use the lower-left set mark or set code, collector number, and rarity dot. Do not confuse type or energy icons elsewhere on the card for the set identifier.
Set mark/codeMatch each marked zone against the set icon, stamp, and collector number before checking value.
Ultra Prism
Example: Exeggcute #1/156, Common.
On this card layout, use the lower-left set mark or set code, collector number, and rarity dot. Do not confuse type or energy icons elsewhere on the card for the set identifier.
Set mark/codeMatch each marked zone against the set icon, stamp, and collector number before checking value.
Forbidden Light
Example: Exeggcute #1, Common.
On this card layout, use the lower-left set mark or set code, collector number, and rarity dot. Do not confuse type or energy icons elsewhere on the card for the set identifier.
Set mark/codeMatch each marked zone against the set icon, stamp, and collector number before checking value.
Celestial Storm
Example: Bellsprout #1, Common.
On this card layout, use the lower-left set mark or set code, collector number, and rarity dot. Do not confuse type or energy icons elsewhere on the card for the set identifier.
Set mark/codeMatch each marked zone against the set icon, stamp, and collector number before checking value.
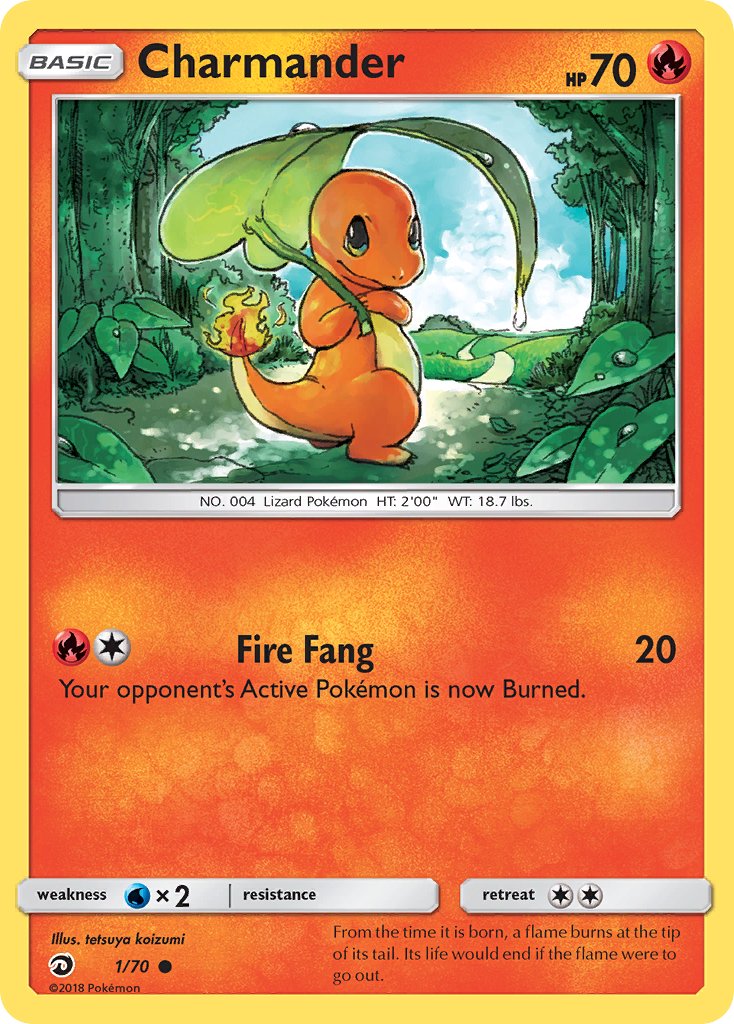
Dragon Majesty
Example: Charmander #1, Common.
On this card layout, use the lower-left set mark or set code, collector number, and rarity dot. Do not confuse type or energy icons elsewhere on the card for the set identifier.
Set mark/codeMatch each marked zone against the set icon, stamp, and collector number before checking value.
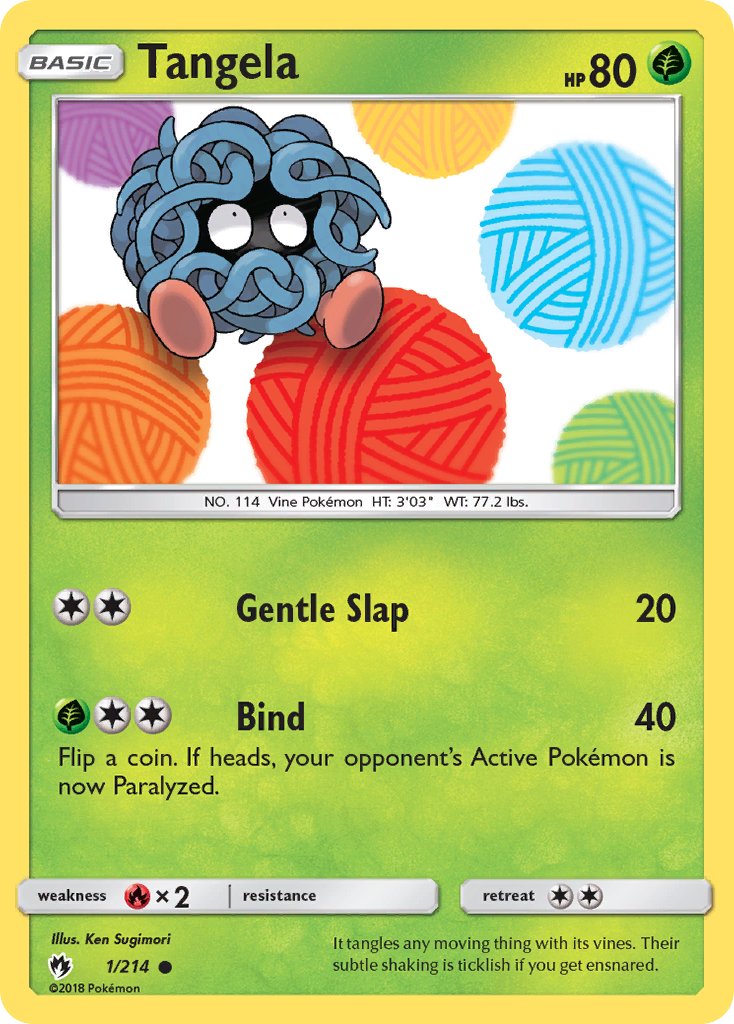
Lost Thunder
Example: Tangela #1, Common.
On this card layout, use the lower-left set mark or set code, collector number, and rarity dot. Do not confuse type or energy icons elsewhere on the card for the set identifier.
Set mark/codeMatch each marked zone against the set icon, stamp, and collector number before checking value.
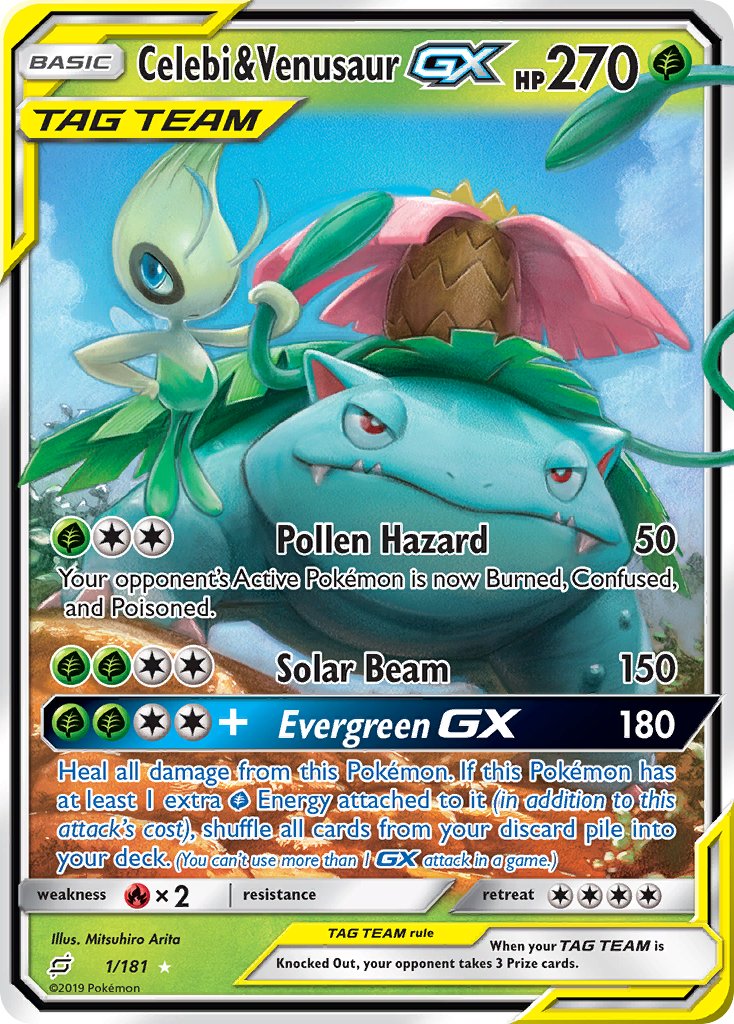
Team Up
Example: Celebi & Venusaur GX #1, Ultra Rare.
On this card layout, use the lower-left set mark or set code, collector number, and rarity dot. Do not confuse type or energy icons elsewhere on the card for the set identifier.
Set mark/codeMatch each marked zone against the set icon, stamp, and collector number before checking value.
Detective Pikachu
Example: Bulbasaur (Holo Common) #1, Common.
On this card layout, use the lower-left set mark or set code, collector number, and rarity dot. Do not confuse type or energy icons elsewhere on the card for the set identifier.
Set mark/codeMatch each marked zone against the set icon, stamp, and collector number before checking value.
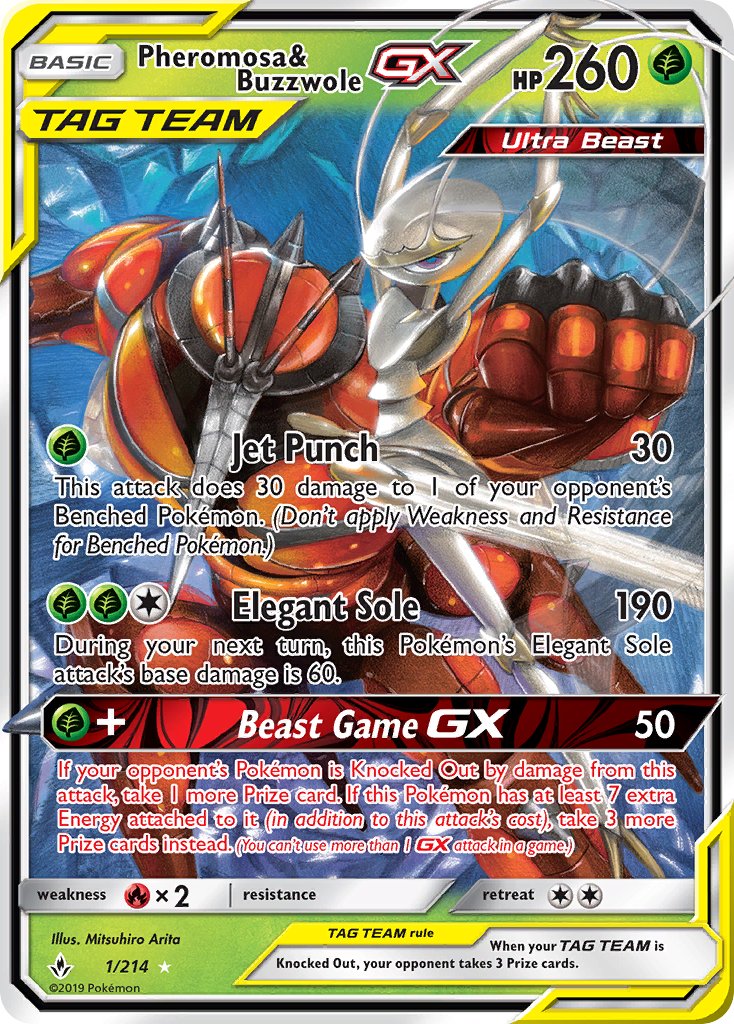
Unbroken Bonds
Example: Pheromosa & Buzzwole GX #1, Ultra Rare.
On this card layout, use the lower-left set mark or set code, collector number, and rarity dot. Do not confuse type or energy icons elsewhere on the card for the set identifier.
Set mark/codeMatch each marked zone against the set icon, stamp, and collector number before checking value.
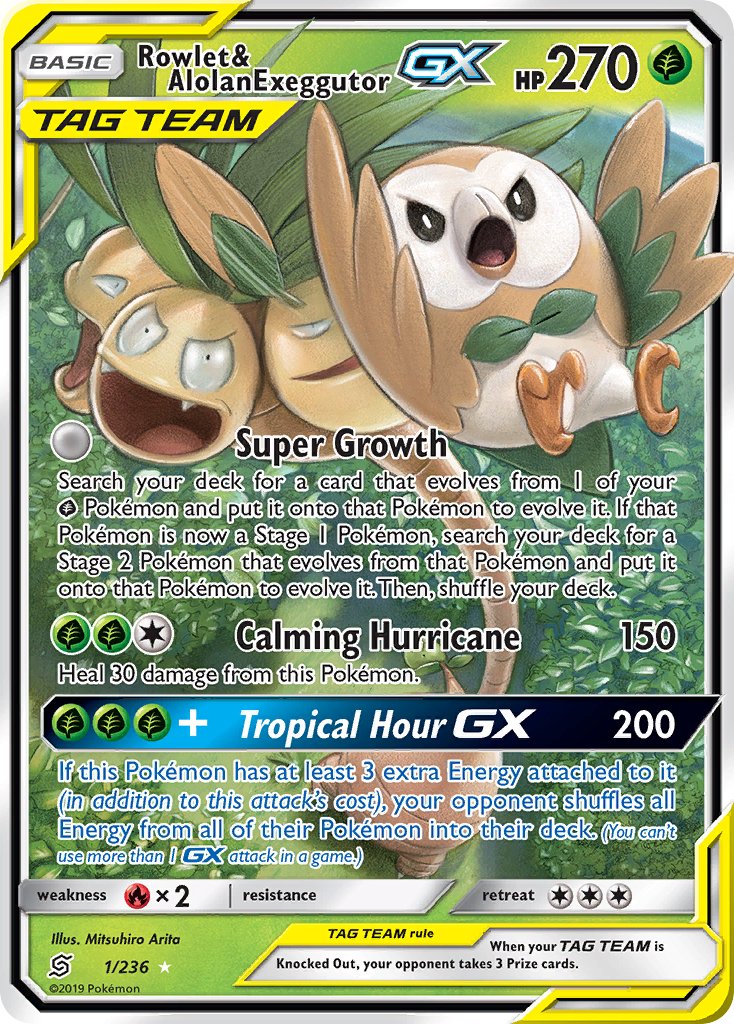
Unified Minds
Example: Rowlet & Alolan Exeggutor GX #1/236, Ultra Rare.
On this card layout, use the lower-left set mark or set code, collector number, and rarity dot. Do not confuse type or energy icons elsewhere on the card for the set identifier.
Set mark/codeMatch each marked zone against the set icon, stamp, and collector number before checking value.
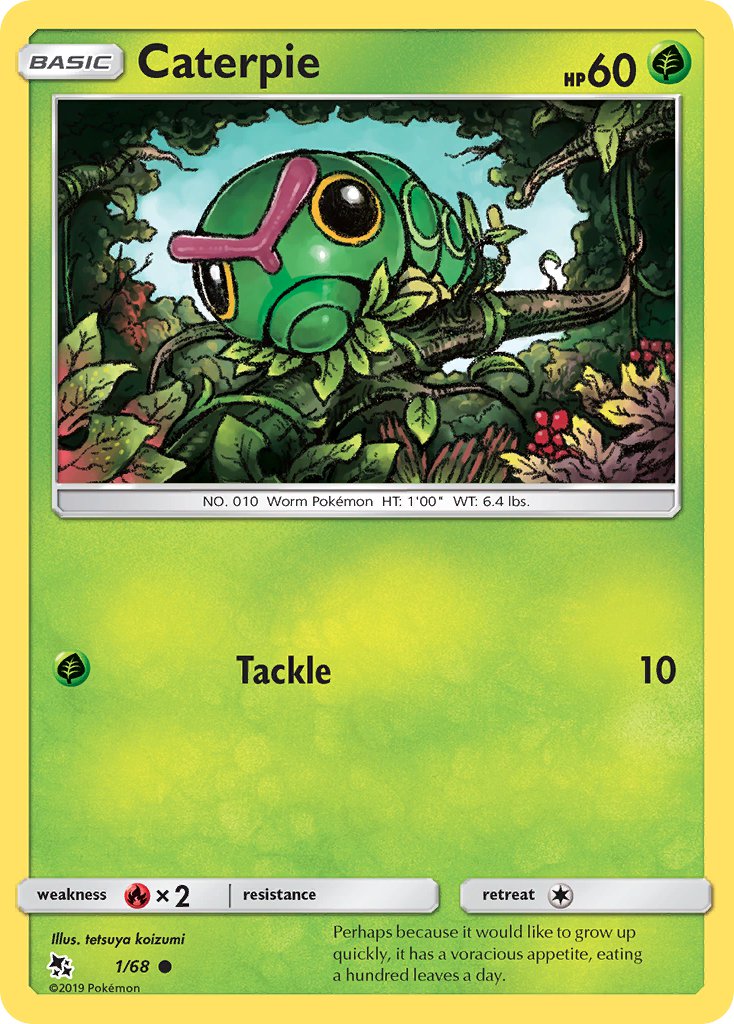
Hidden Fates
Example: Caterpie #1/68, Common.
On this card layout, use the lower-left set mark or set code, collector number, and rarity dot. Do not confuse type or energy icons elsewhere on the card for the set identifier.
Set mark/codeMatch each marked zone against the set icon, stamp, and collector number before checking value.

Hidden Fates: Shiny Vault
Example: Aether Foundation Employee #SV81/SV94, Shiny Holo Rare.
On this card layout, use the lower-left set mark or set code, collector number, and rarity dot. Do not confuse type or energy icons elsewhere on the card for the set identifier.
Set mark/codeMatch each marked zone against the set icon, stamp, and collector number before checking value.
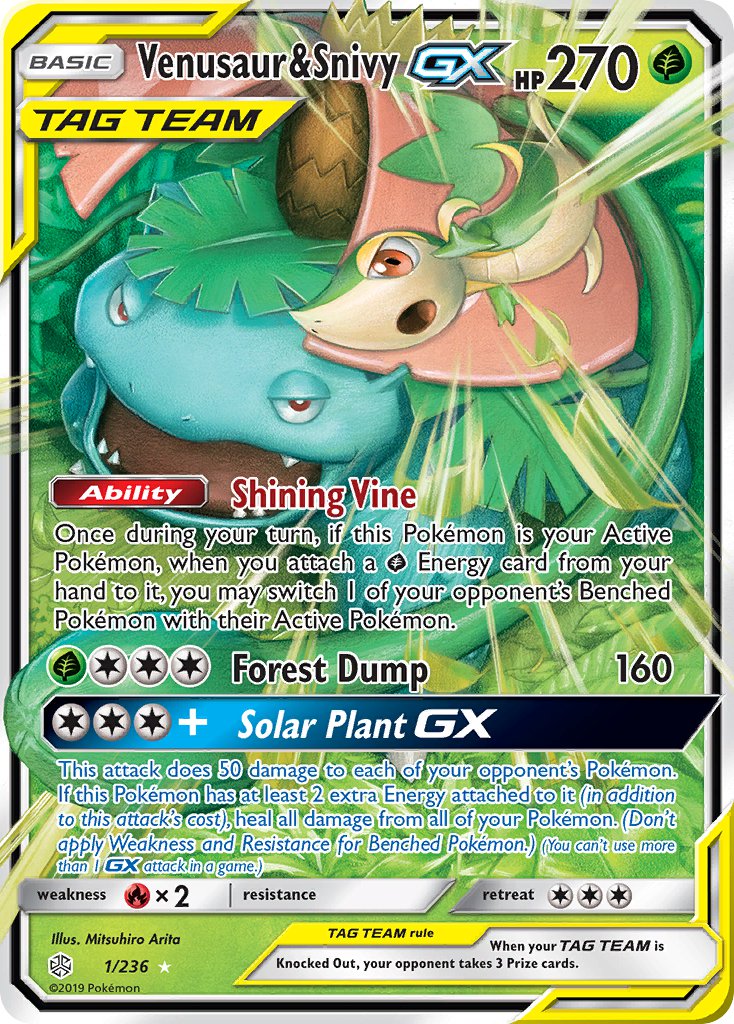
Cosmic Eclipse
Example: Venusaur & Snivy GX #1/236, Ultra Rare.
On this card layout, use the lower-left set mark or set code, collector number, and rarity dot. Do not confuse type or energy icons elsewhere on the card for the set identifier.
Set mark/codeMatch each marked zone against the set icon, stamp, and collector number before checking value.
XY
17 sets in this snapshot
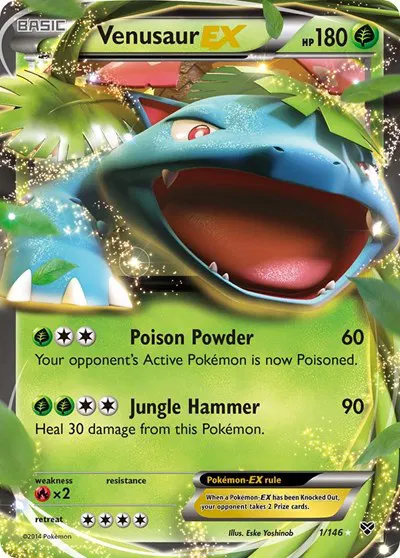
XY Base Set
Example: Venusaur EX #1, Ultra Rare.
On this era, the expansion mark and collector number sit near the lower-right card identity line. Match that mark and number before using a price page.
Set mark/numberMatch each marked zone against the set icon, stamp, and collector number before checking value.

XY Promos
Example: Absol #XY178, Promo.
On this promo-era layout, the promo mark or expansion mark and number sit near the lower-right identity line. Confirm any stamped product source separately.
Promo mark/numberMatch each marked zone against the set icon, stamp, and collector number before checking value.
Flashfire
Example: Caterpie #1, Common.
On this era, the expansion mark and collector number sit near the lower-right card identity line. Match that mark and number before using a price page.
Set mark/numberMatch each marked zone against the set icon, stamp, and collector number before checking value.
Furious Fists
Example: Bellsprout #1, Common.
On this era, the expansion mark and collector number sit near the lower-right card identity line. Match that mark and number before using a price page.
Set mark/numberMatch each marked zone against the set icon, stamp, and collector number before checking value.
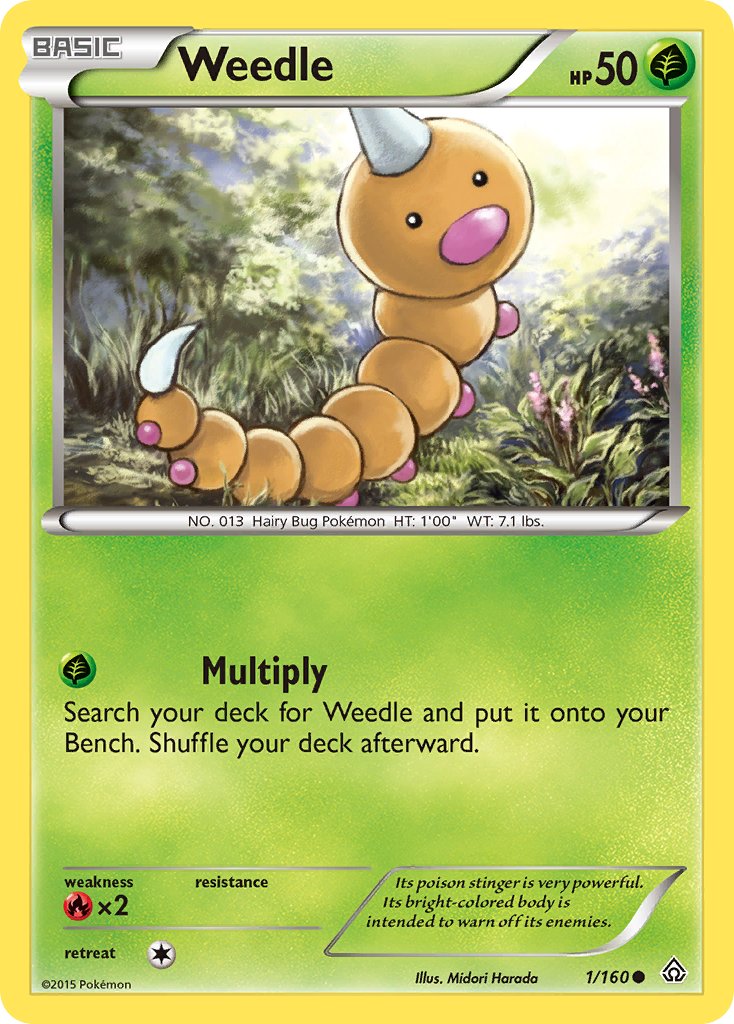
Kalos Starter Set
Example: Weedle #1, Common.
On this era, the expansion mark and collector number sit near the lower-right card identity line. Match that mark and number before using a price page.
Set mark/numberMatch each marked zone against the set icon, stamp, and collector number before checking value.
Phantom Forces
Example: Venonat #1, Common.
On this era, the expansion mark and collector number sit near the lower-right card identity line. Match that mark and number before using a price page.
Set mark/numberMatch each marked zone against the set icon, stamp, and collector number before checking value.
Primal Clash
Example: Weedle #1, Common.
On this era, the expansion mark and collector number sit near the lower-right card identity line. Match that mark and number before using a price page.
Set mark/numberMatch each marked zone against the set icon, stamp, and collector number before checking value.
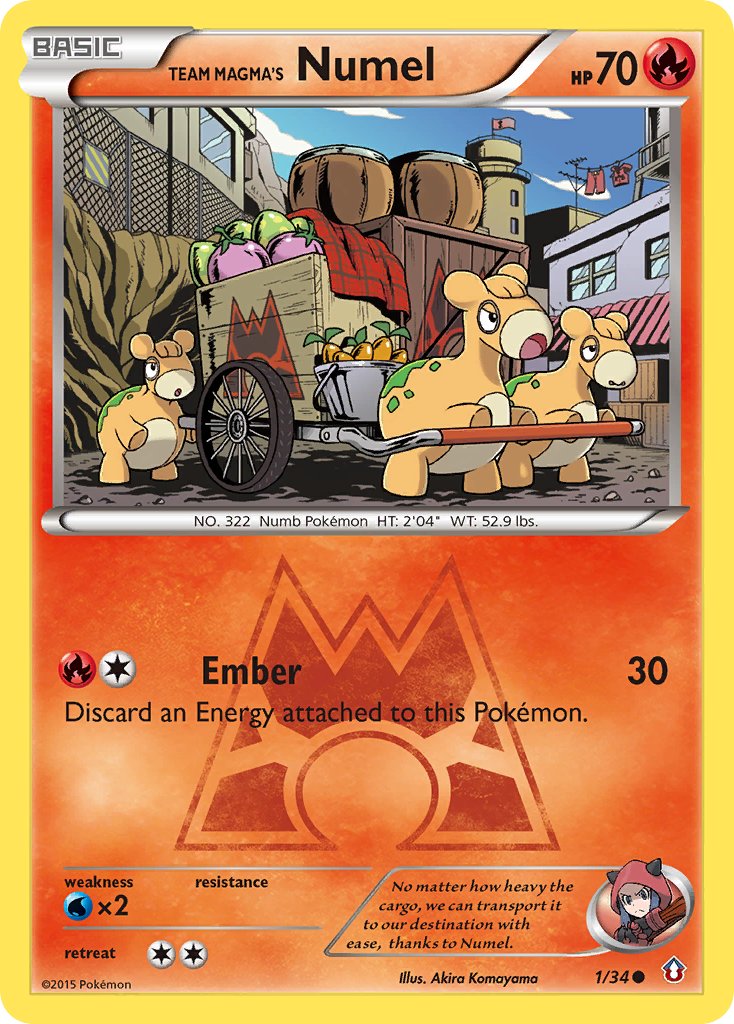
Double Crisis
Example: Team Magma's Numel #1, Common.
On this era, the expansion mark and collector number sit near the lower-right card identity line. Match that mark and number before using a price page.
Set mark/numberMatch each marked zone against the set icon, stamp, and collector number before checking value.
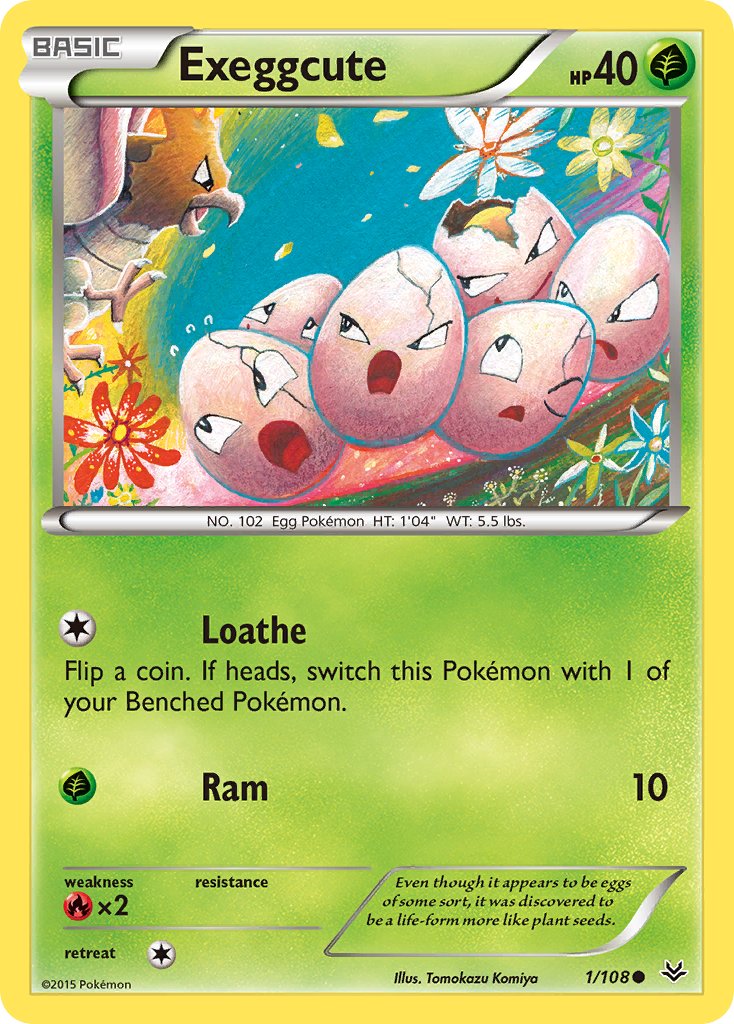
Roaring Skies
Example: Exeggcute #1, Common.
On this era, the expansion mark and collector number sit near the lower-right card identity line. Match that mark and number before using a price page.
Set mark/numberMatch each marked zone against the set icon, stamp, and collector number before checking value.
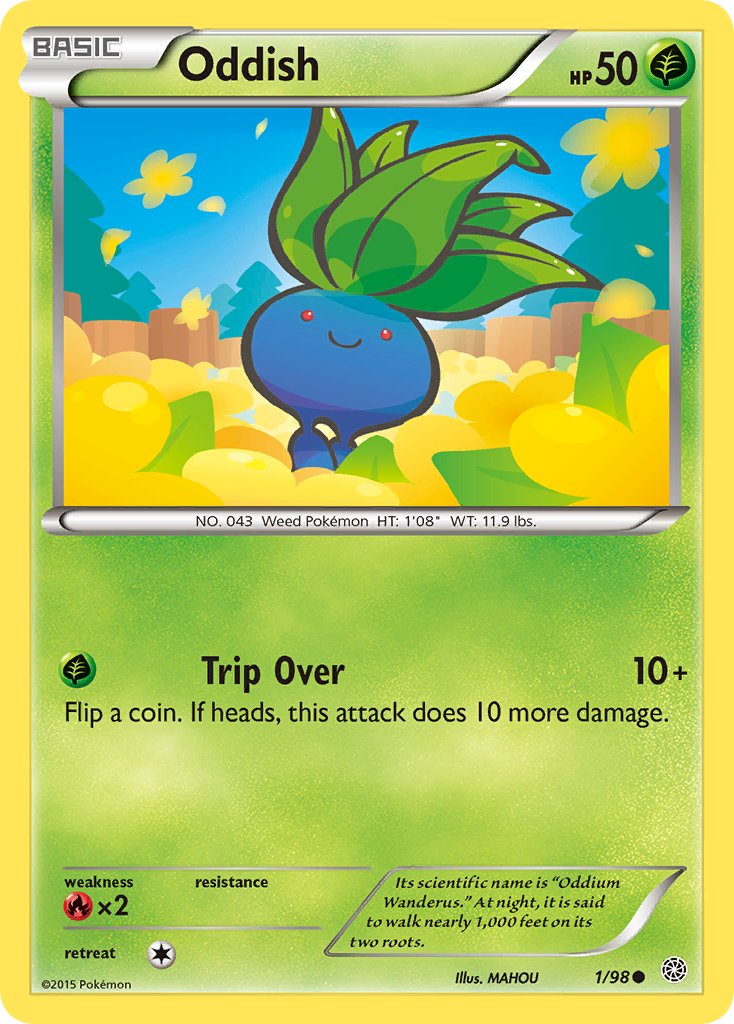
Ancient Origins
Example: Oddish #1, Common.
On this era, the expansion mark and collector number sit near the lower-right card identity line. Match that mark and number before using a price page.
Set mark/numberMatch each marked zone against the set icon, stamp, and collector number before checking value.
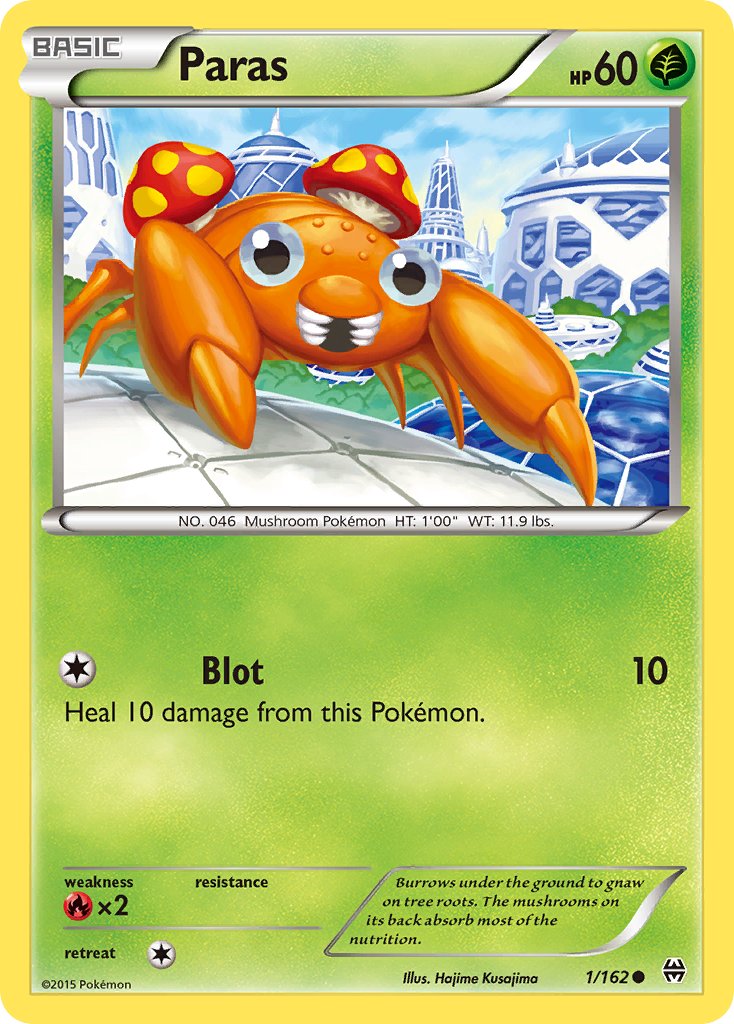
BREAKthrough
Example: Paras #1, Common.
On this era, the expansion mark and collector number sit near the lower-right card identity line. Match that mark and number before using a price page.
Set mark/numberMatch each marked zone against the set icon, stamp, and collector number before checking value.
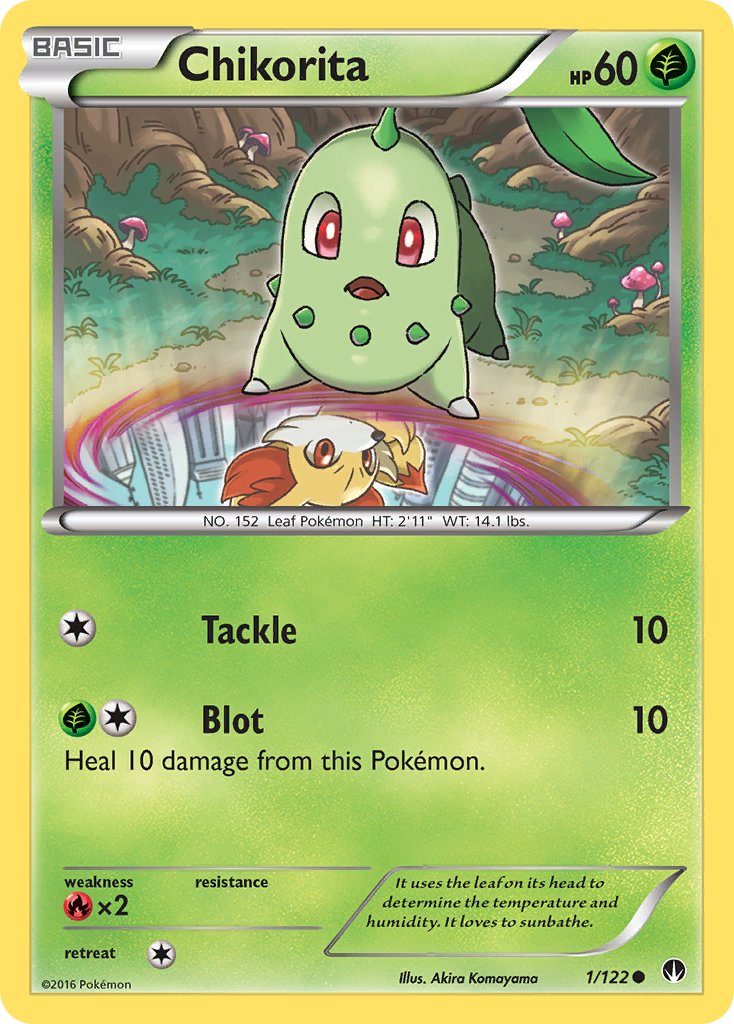
BREAKpoint
Example: Chikorita #1, Common.
On this era, the expansion mark and collector number sit near the lower-right card identity line. Match that mark and number before using a price page.
Set mark/numberMatch each marked zone against the set icon, stamp, and collector number before checking value.
Generations
Example: Venusaur EX #1, Ultra Rare.
On this era, the expansion mark and collector number sit near the lower-right card identity line. Match that mark and number before using a price page.
Set mark/numberMatch each marked zone against the set icon, stamp, and collector number before checking value.
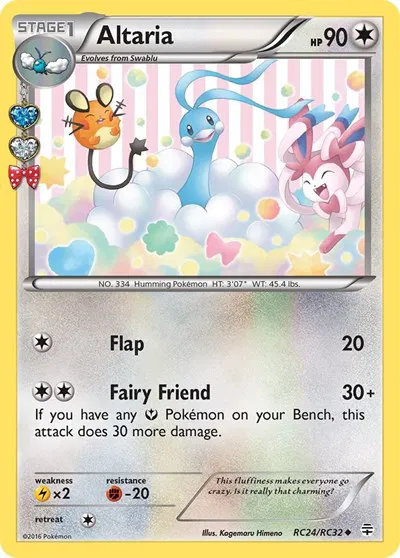
Generations: Radiant Collection
Example: Altaria #RC24, Uncommon.
On this era, the expansion mark and collector number sit near the lower-right card identity line. Match that mark and number before using a price page.
Set mark/numberMatch each marked zone against the set icon, stamp, and collector number before checking value.
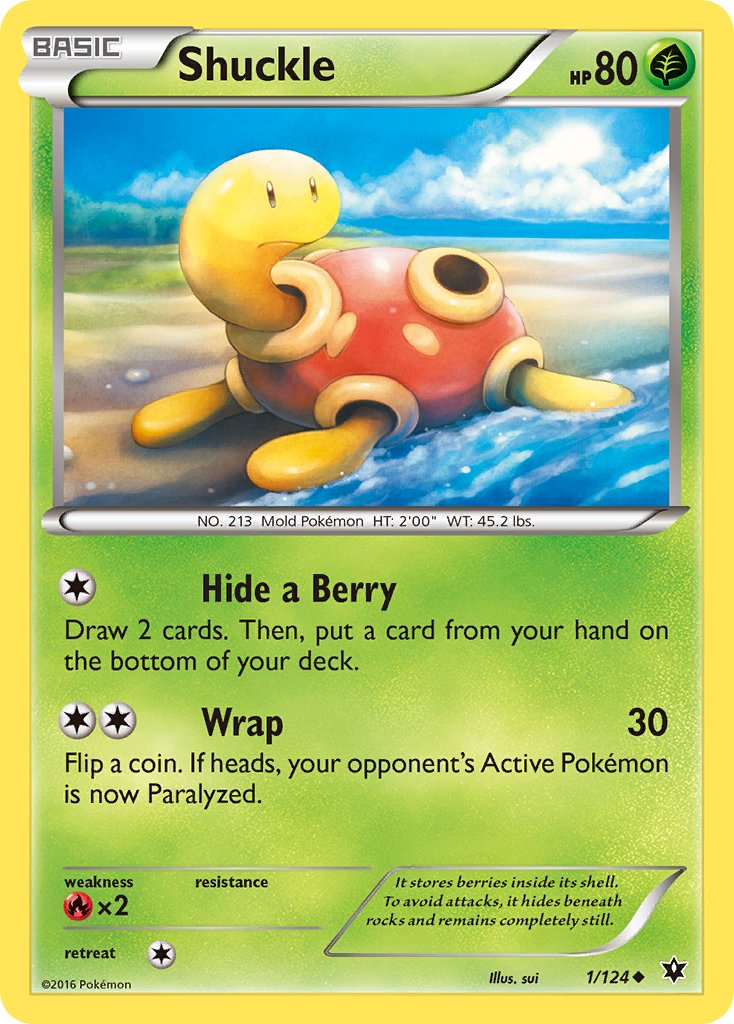
Fates Collide
Example: Shuckle #1, Uncommon.
On this era, the expansion mark and collector number sit near the lower-right card identity line. Match that mark and number before using a price page.
Set mark/numberMatch each marked zone against the set icon, stamp, and collector number before checking value.
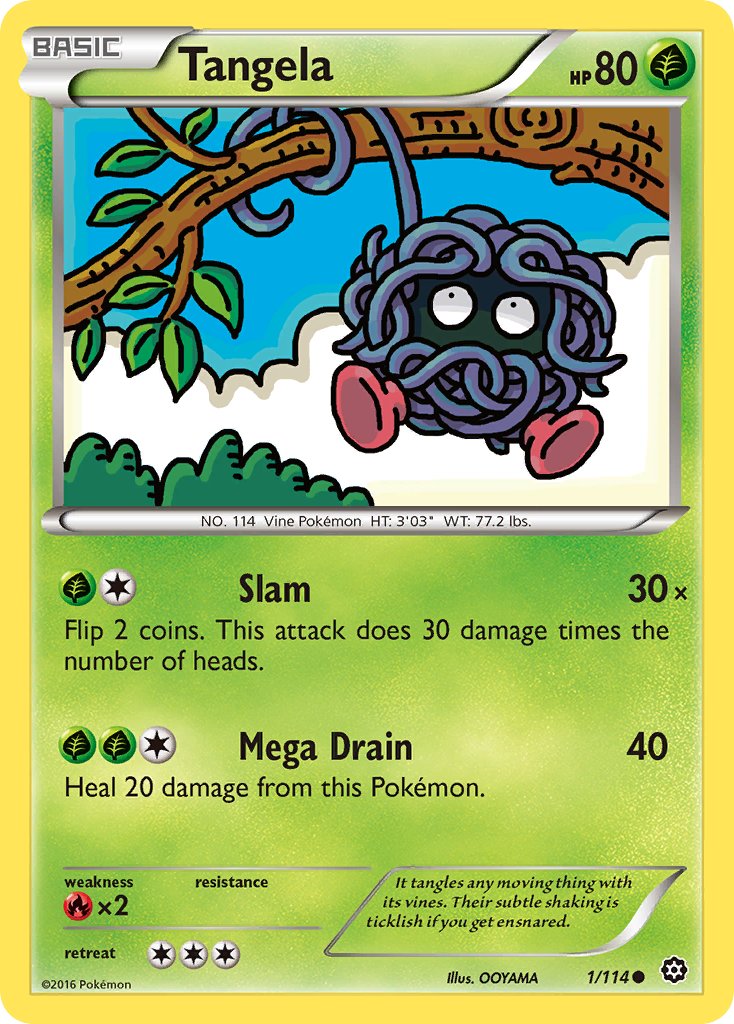
Steam Siege
Example: Tangela #1, Common.
On this era, the expansion mark and collector number sit near the lower-right card identity line. Match that mark and number before using a price page.
Set mark/numberMatch each marked zone against the set icon, stamp, and collector number before checking value.
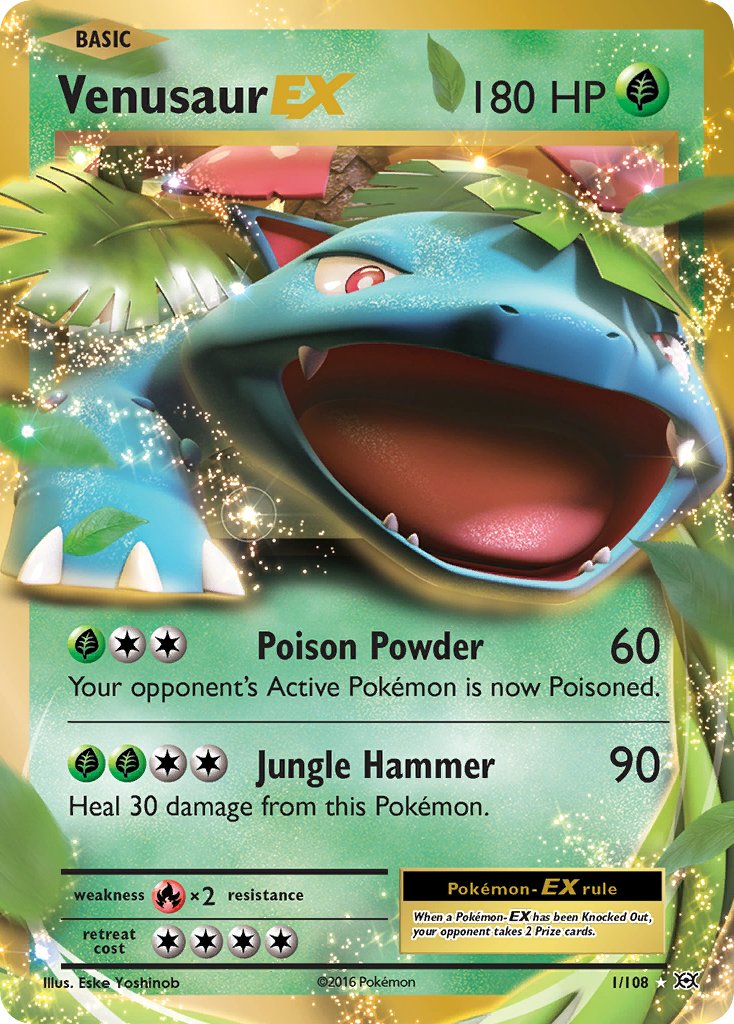
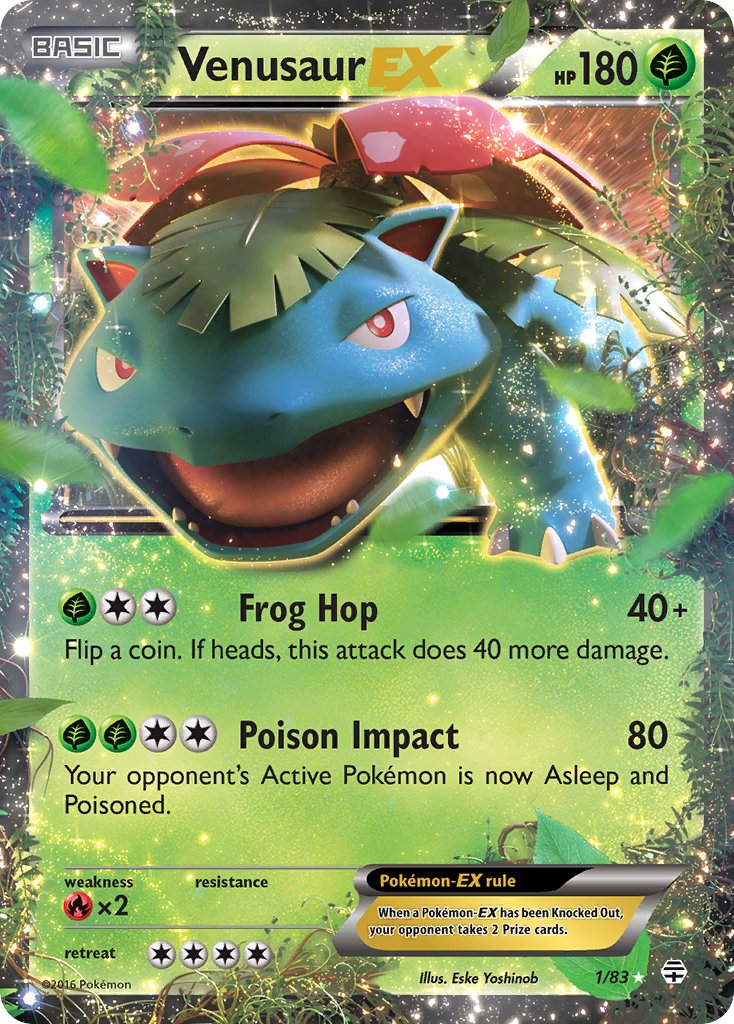
Evolutions
Example: Venusaur EX #1/108, Ultra Rare.
On this era, the expansion mark and collector number sit near the lower-right card identity line. Match that mark and number before using a price page.
Set mark/numberMatch each marked zone against the set icon, stamp, and collector number before checking value.
Black & White
14 sets in this snapshot
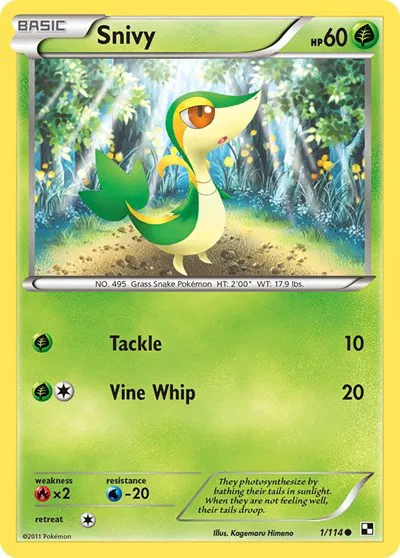
Black and White
Example: Snivy #1, Common.
On this era, the expansion mark and collector number sit near the lower-right card identity line. Match that mark and number before using a price page.
Set mark/numberMatch each marked zone against the set icon, stamp, and collector number before checking value.
Black and White Promos
Example: Arcanine (Prerelease) #12, Rare.
This example is a stamped product or distribution card. Use the visible stamp first, then lock the identity with the card number and card-number area.
source set stampPromo mark/numberMatch each marked zone against the set icon, stamp, and collector number before checking value.
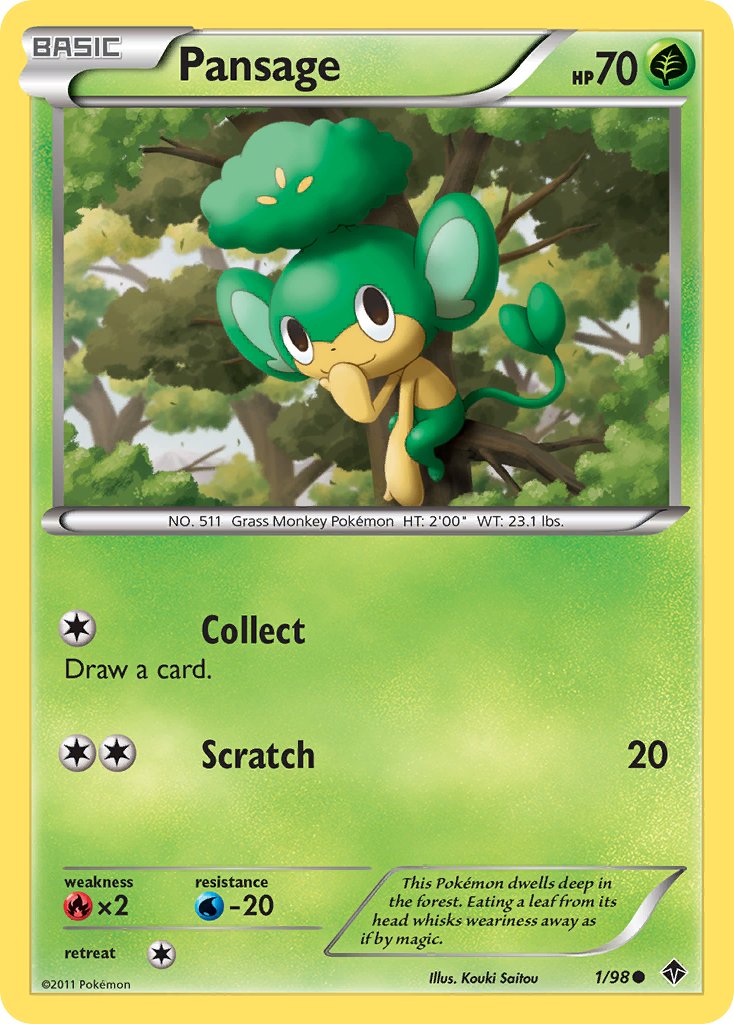
Emerging Powers
Example: Pansage #1, Common.
On this era, the expansion mark and collector number sit near the lower-right card identity line. Match that mark and number before using a price page.
Set mark/numberMatch each marked zone against the set icon, stamp, and collector number before checking value.
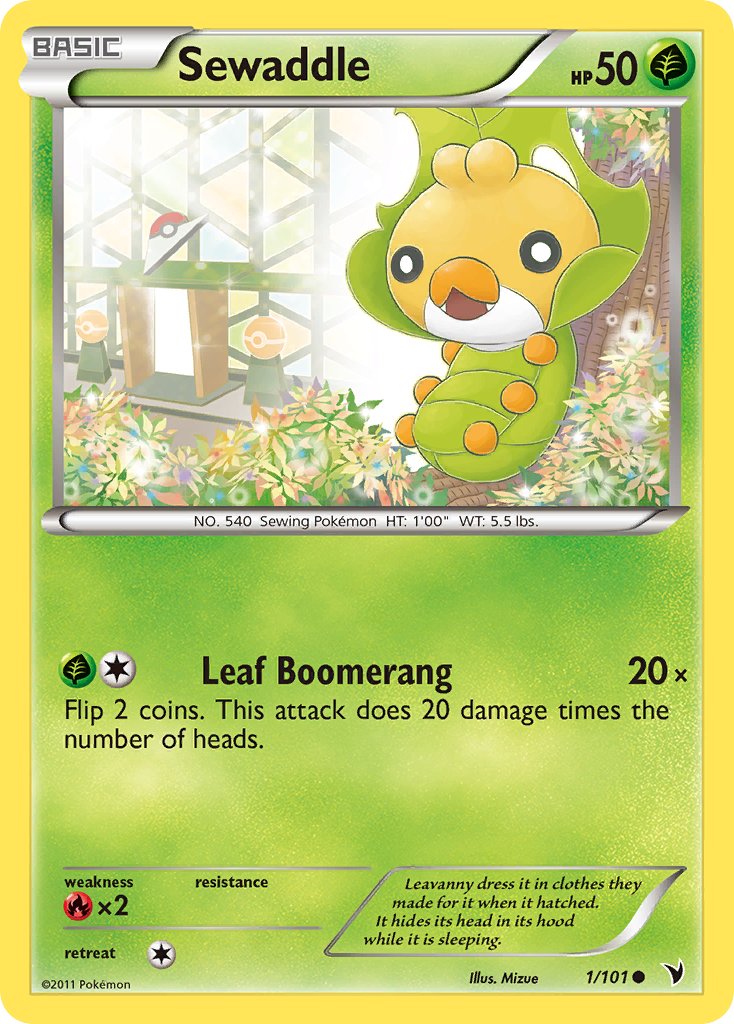
Noble Victories
Example: Sewaddle #1, Common.
On this era, the expansion mark and collector number sit near the lower-right card identity line. Match that mark and number before using a price page.
Set mark/numberMatch each marked zone against the set icon, stamp, and collector number before checking value.
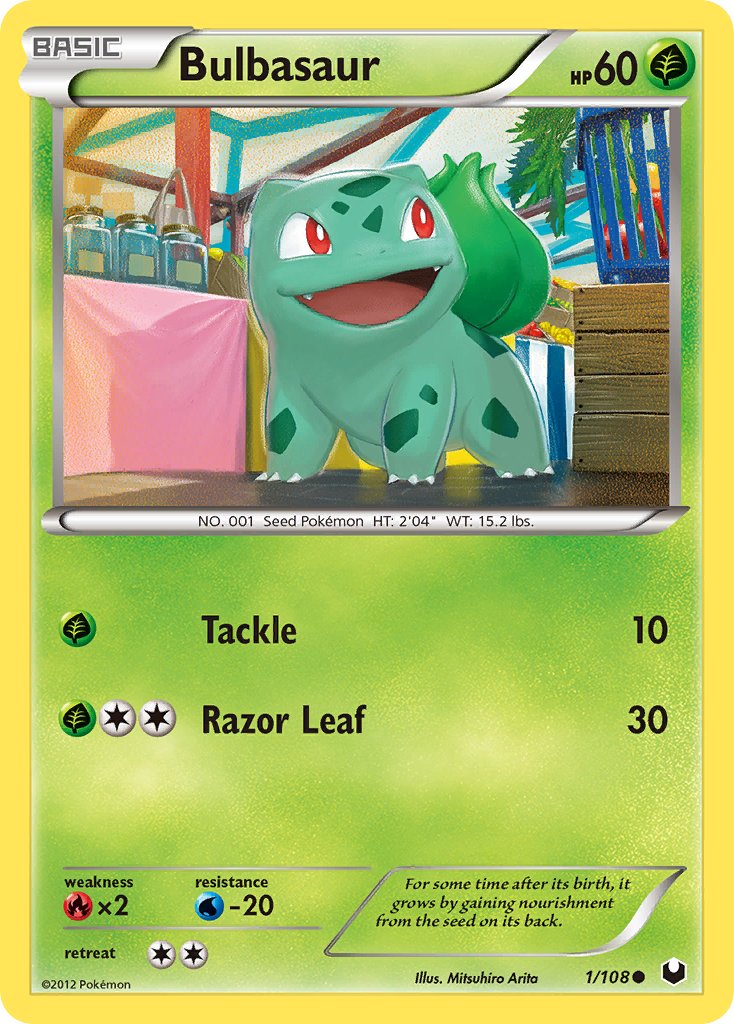
Dark Explorers
Example: Bulbasaur #1, Common.
On this era, the expansion mark and collector number sit near the lower-right card identity line. Match that mark and number before using a price page.
Set mark/numberMatch each marked zone against the set icon, stamp, and collector number before checking value.
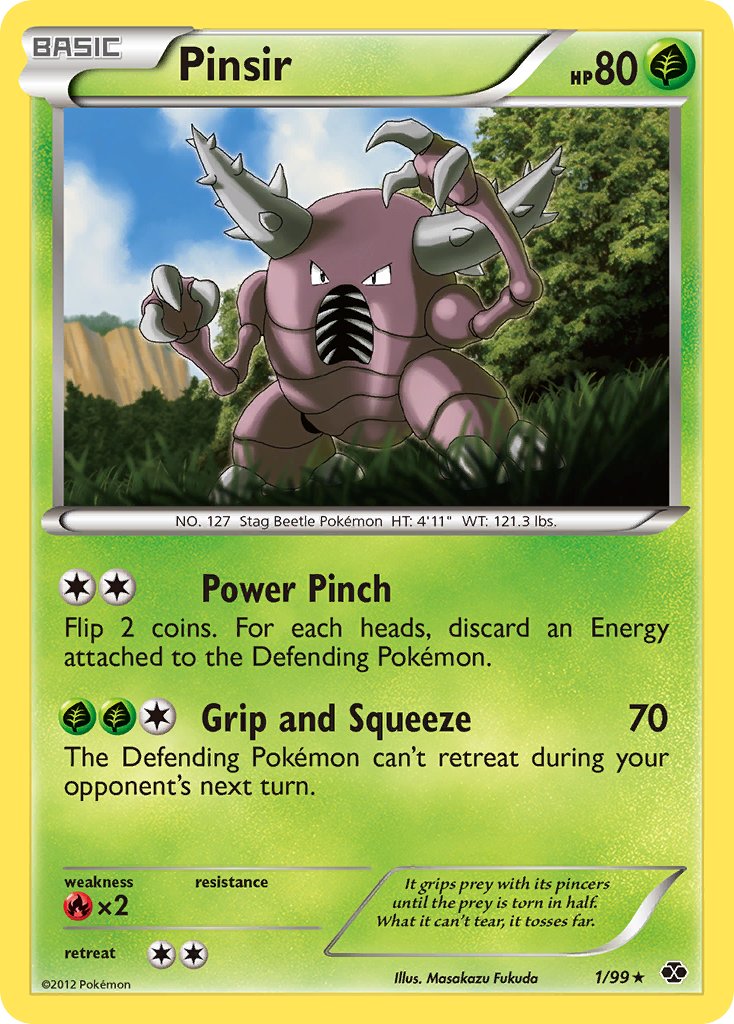
Next Destinies
Example: Pinsir #1, Rare.
On this era, the expansion mark and collector number sit near the lower-right card identity line. Match that mark and number before using a price page.
Set mark/numberMatch each marked zone against the set icon, stamp, and collector number before checking value.
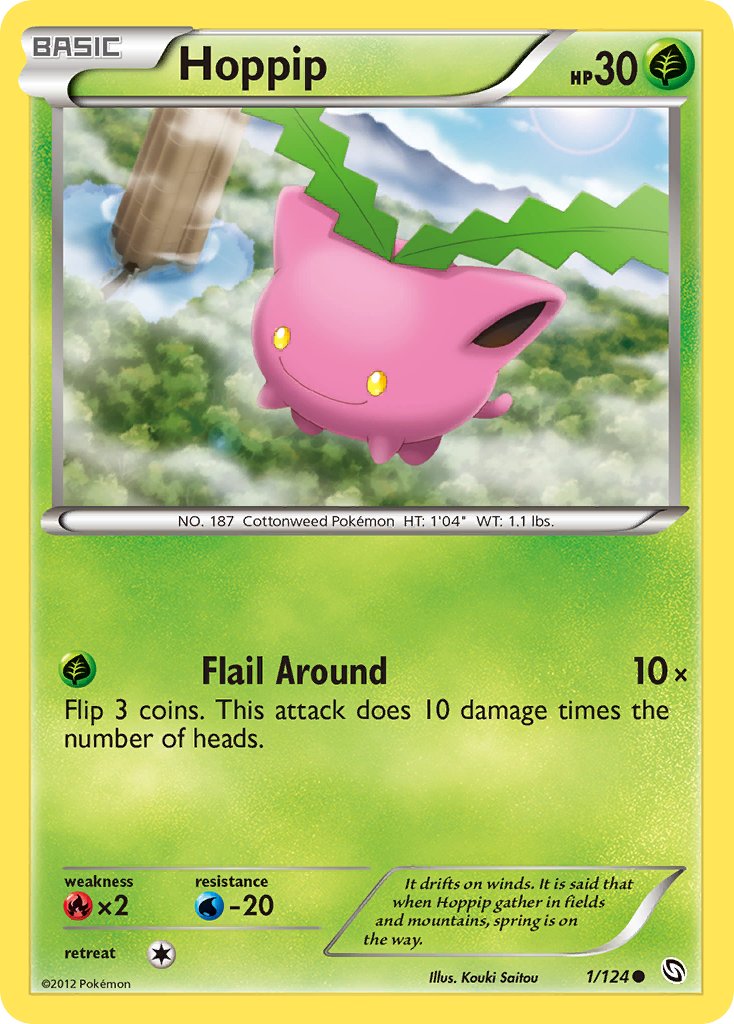
Dragons Exalted
Example: Hoppip #1, Common.
On this era, the expansion mark and collector number sit near the lower-right card identity line. Match that mark and number before using a price page.
Set mark/numberMatch each marked zone against the set icon, stamp, and collector number before checking value.

Dragon Vault
Example: Dratini #1, Holo Rare.
On this era, the expansion mark and collector number sit near the lower-right card identity line. Match that mark and number before using a price page.
Set mark/numberMatch each marked zone against the set icon, stamp, and collector number before checking value.
Boundaries Crossed
Example: Oddish #1, Common.
On this era, the expansion mark and collector number sit near the lower-right card identity line. Match that mark and number before using a price page.
Set mark/numberMatch each marked zone against the set icon, stamp, and collector number before checking value.
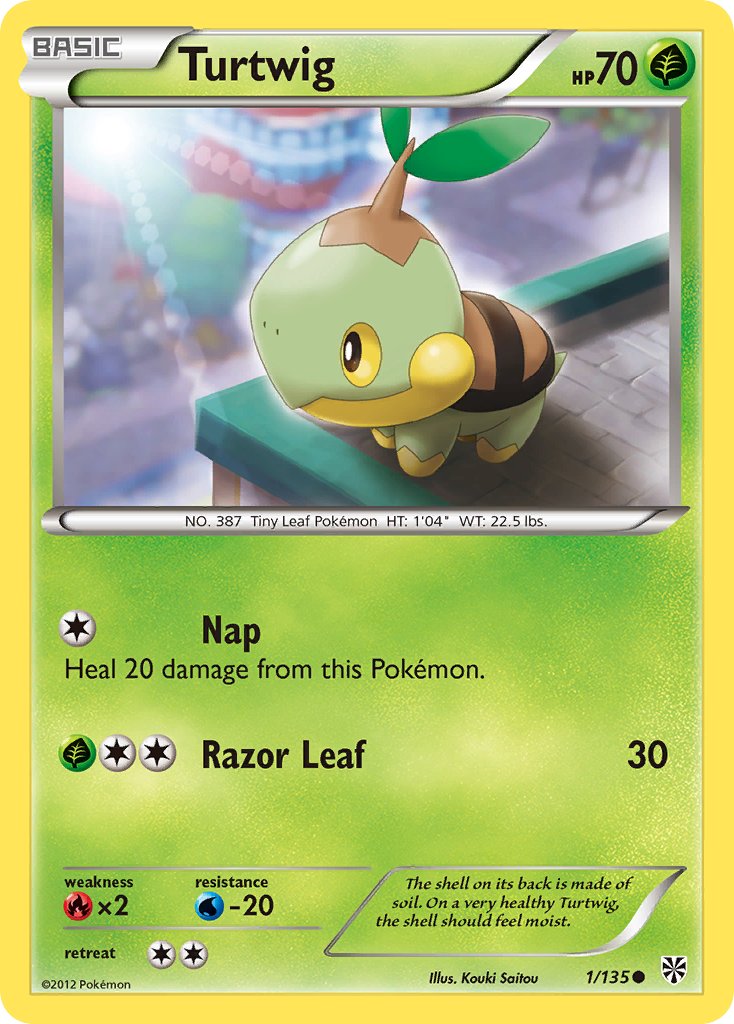
Plasma Storm
Example: Turtwig #1, Common.
On this era, the expansion mark and collector number sit near the lower-right card identity line. Match that mark and number before using a price page.
Set mark/numberMatch each marked zone against the set icon, stamp, and collector number before checking value.
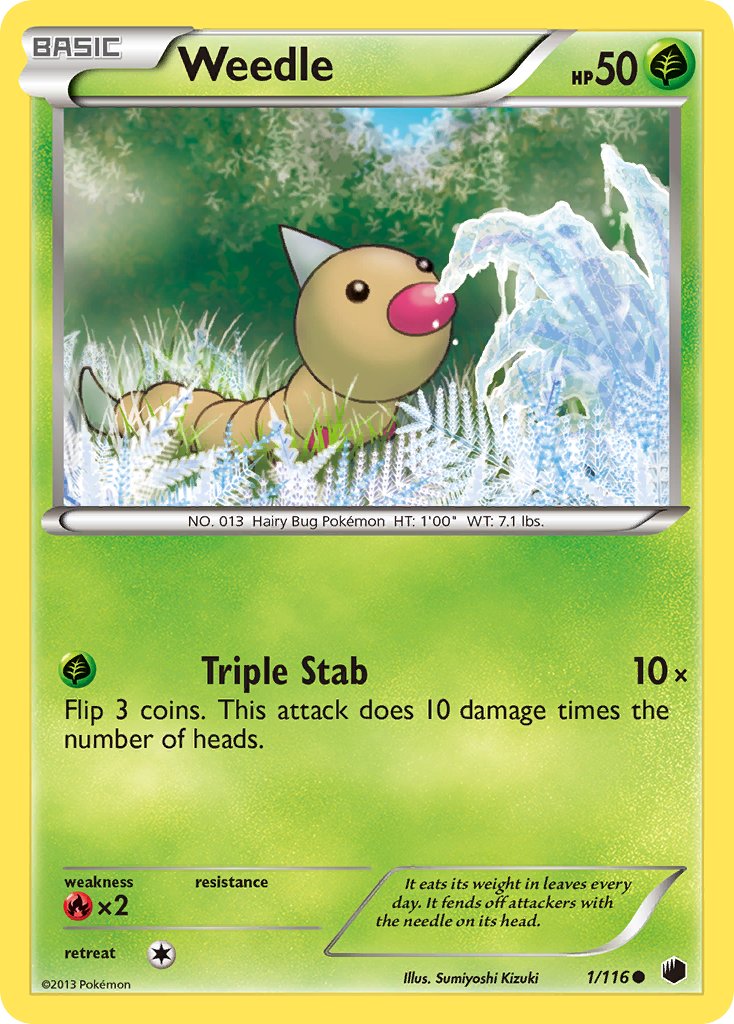
Plasma Freeze
Example: Weedle #1, Common.
On this era, the expansion mark and collector number sit near the lower-right card identity line. Match that mark and number before using a price page.
Set mark/numberMatch each marked zone against the set icon, stamp, and collector number before checking value.

Plasma Blast
Example: Surskit #1, Common.
On this era, the expansion mark and collector number sit near the lower-right card identity line. Match that mark and number before using a price page.
Set mark/numberMatch each marked zone against the set icon, stamp, and collector number before checking value.
Legendary Treasures
Example: Tangela #1, Common.
On this era, the expansion mark and collector number sit near the lower-right card identity line. Match that mark and number before using a price page.
Set mark/numberMatch each marked zone against the set icon, stamp, and collector number before checking value.
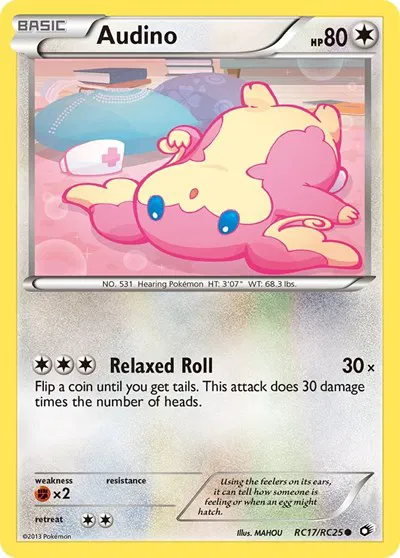
Legendary Treasures: Radiant Collections
Example: Audino #RC17, Common.
On this era, the expansion mark and collector number sit near the lower-right card identity line. Match that mark and number before using a price page.
Set mark/numberMatch each marked zone against the set icon, stamp, and collector number before checking value.
HeartGold & SoulSilver
6 sets in this snapshot
HGSS Promos
Example: Celebi (NonMovie Exclusive) #3/102, Promo.
On this promo-era layout, the promo mark or expansion mark and number sit near the lower-right identity line. Confirm any stamped product source separately.
Promo mark/numberMatch each marked zone against the set icon, stamp, and collector number before checking value.
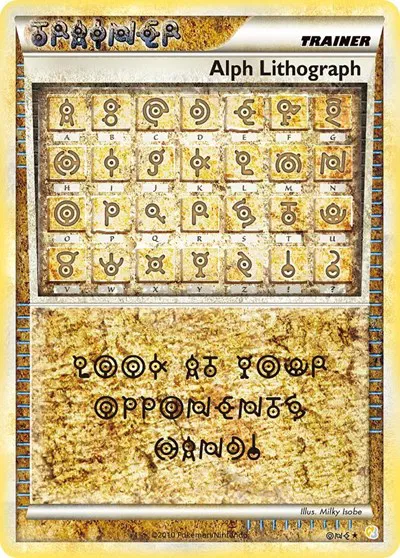
HeartGold SoulSilver
Example: Alph Lithograph #1, Ultra Rare.
On this era, the expansion mark and collector number sit near the lower-right card identity line. Match that mark and number before using a price page.
Set mark/numberMatch each marked zone against the set icon, stamp, and collector number before checking value.
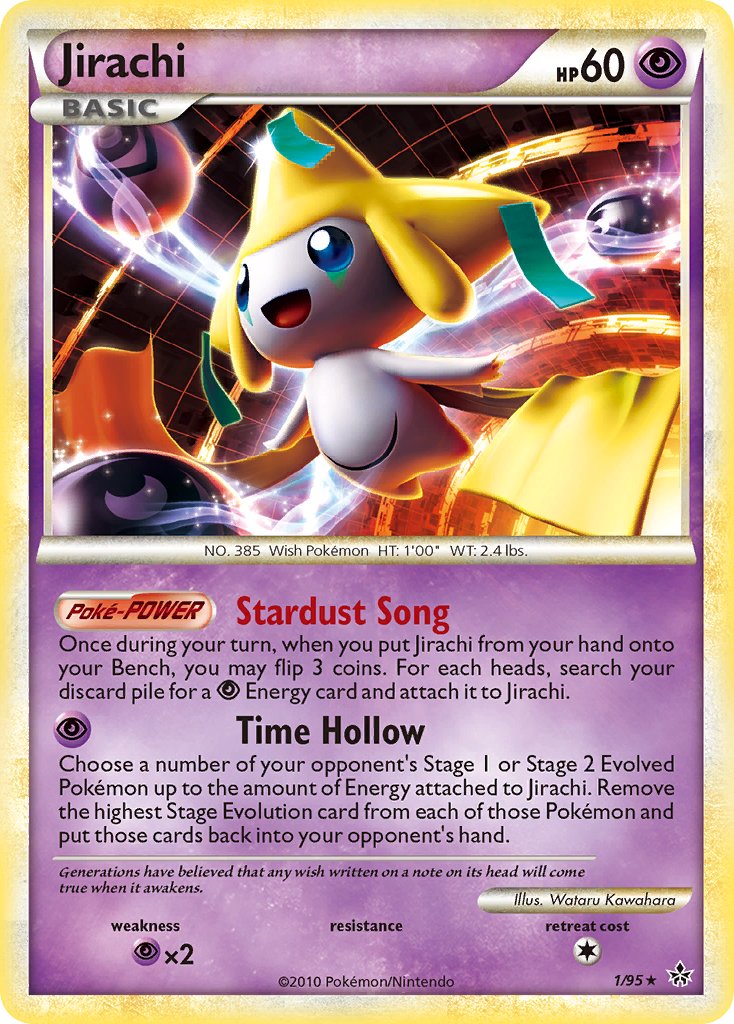
Unleashed
Example: Jirachi #1, Holo Rare.
On this era, the expansion mark and collector number sit near the lower-right card identity line. Match that mark and number before using a price page.
Set mark/numberMatch each marked zone against the set icon, stamp, and collector number before checking value.
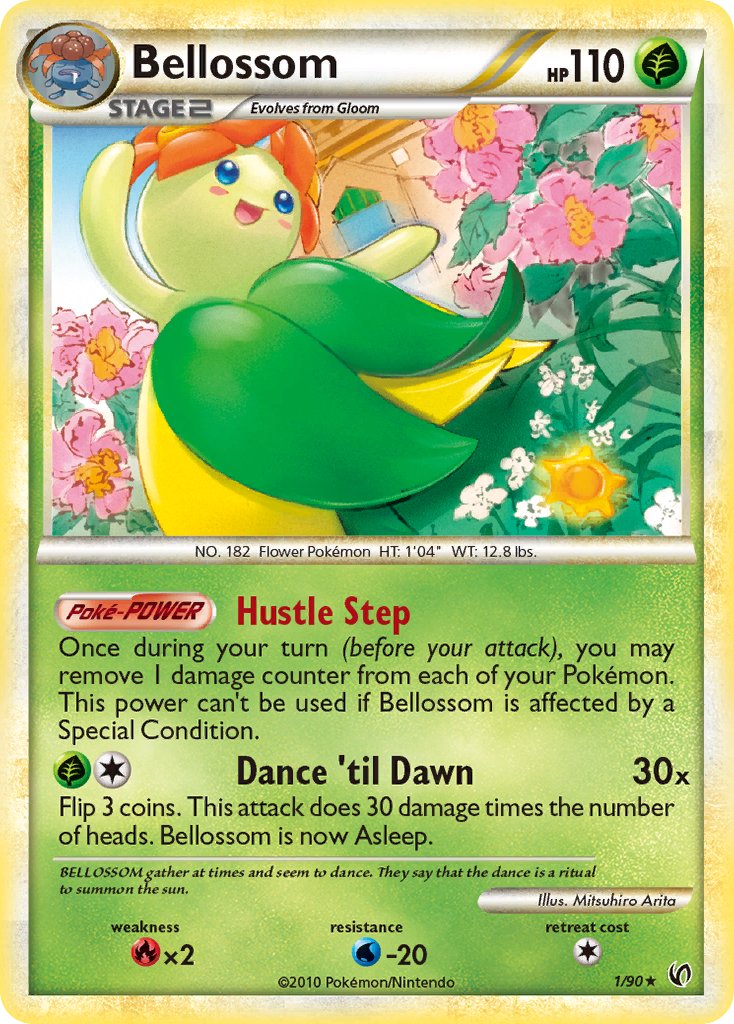
Undaunted
Example: Bellossom #1, Holo Rare.
On this era, the expansion mark and collector number sit near the lower-right card identity line. Match that mark and number before using a price page.
Set mark/numberMatch each marked zone against the set icon, stamp, and collector number before checking value.
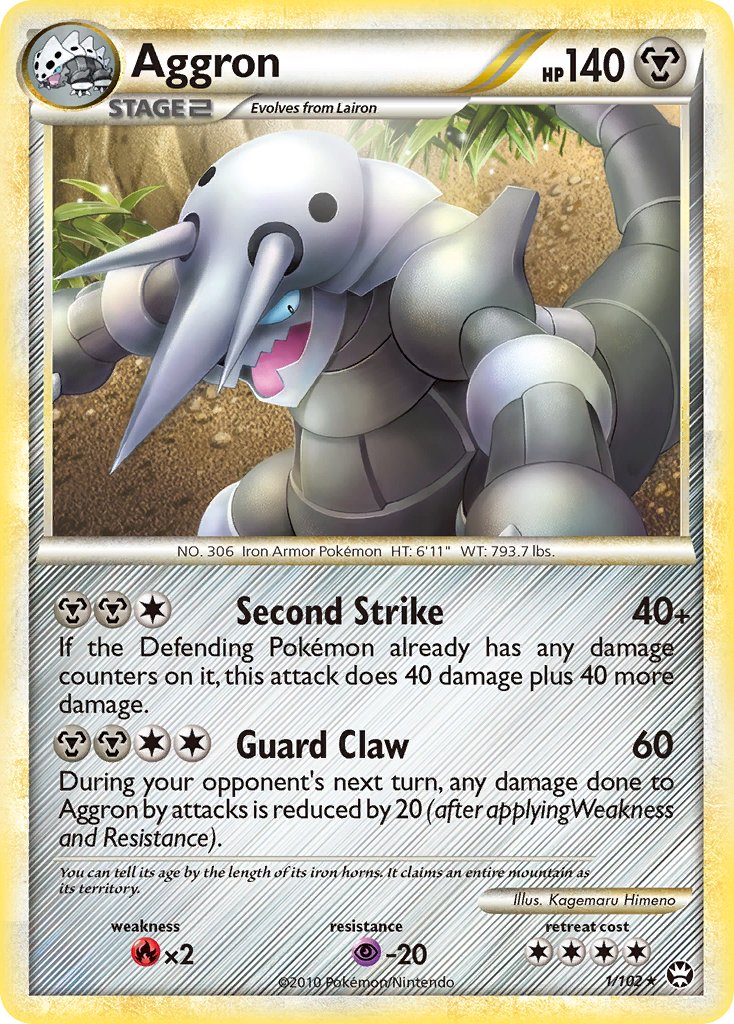
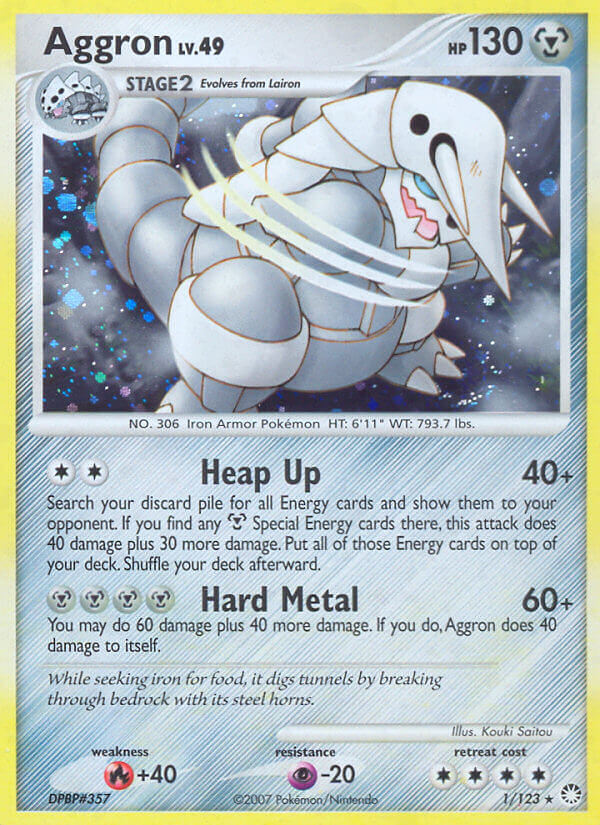
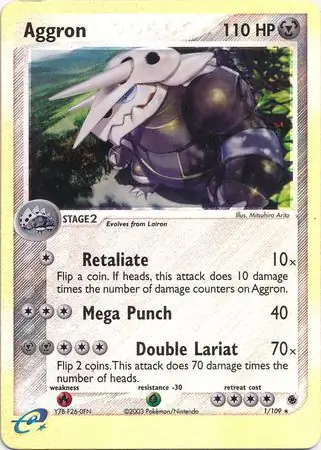
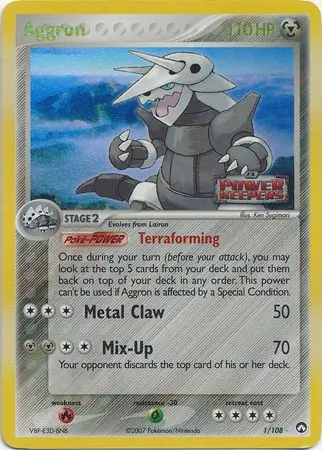
Triumphant
Example: Aggron #1, Holo Rare.
On this era, the expansion mark and collector number sit near the lower-right card identity line. Match that mark and number before using a price page.
Set mark/numberMatch each marked zone against the set icon, stamp, and collector number before checking value.
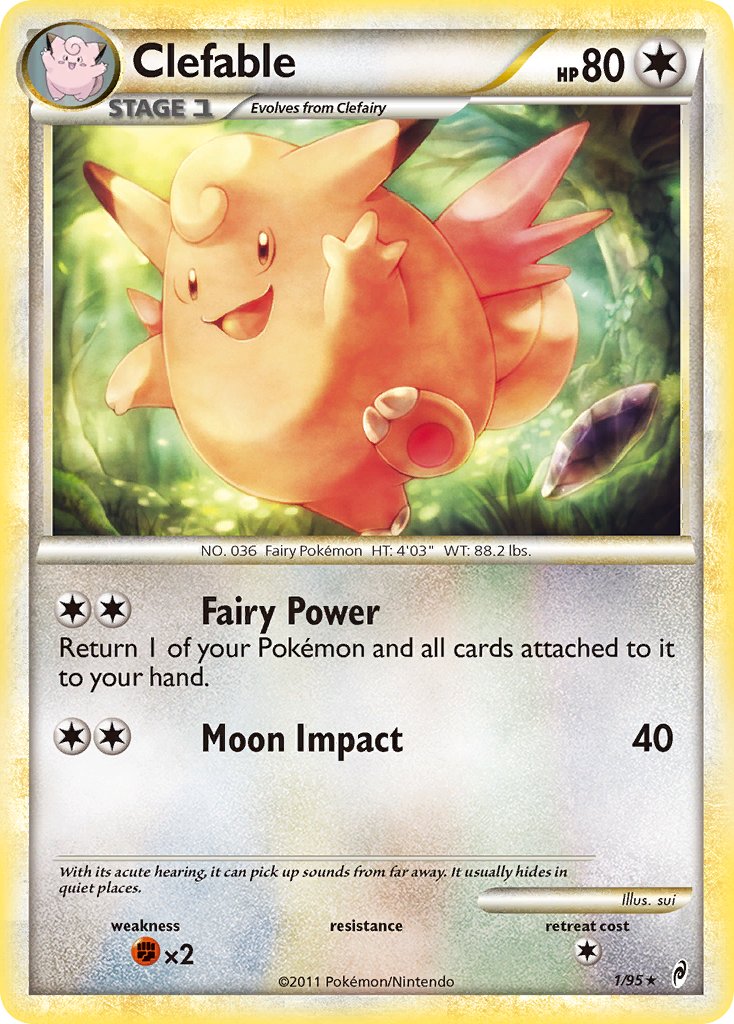
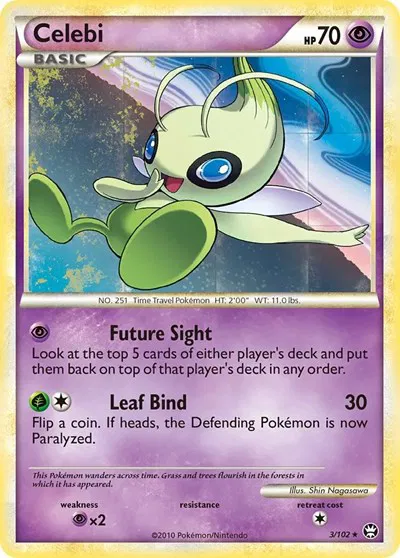
Call of Legends
Example: Clefable #1, Holo Rare.
On this era, the expansion mark and collector number sit near the lower-right card identity line. Match that mark and number before using a price page.
Set mark/numberMatch each marked zone against the set icon, stamp, and collector number before checking value.
Platinum
4 sets in this snapshot
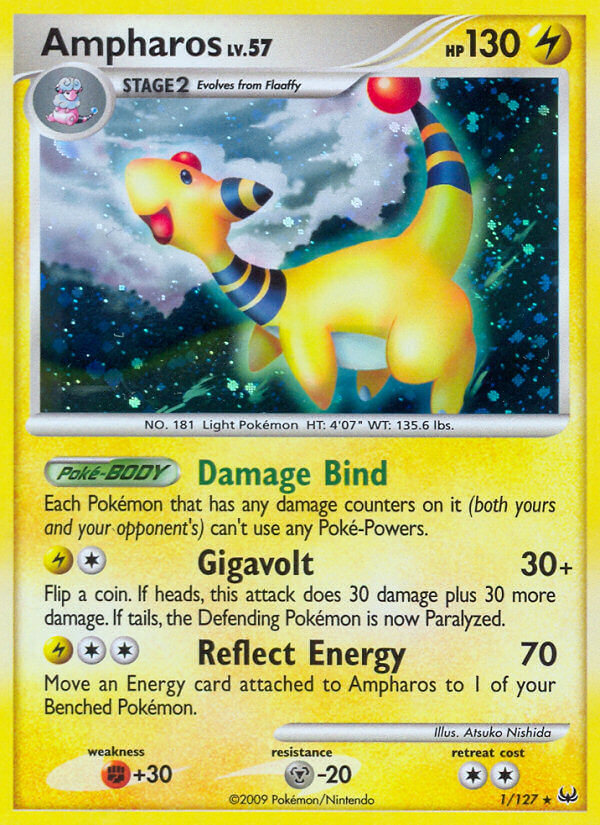
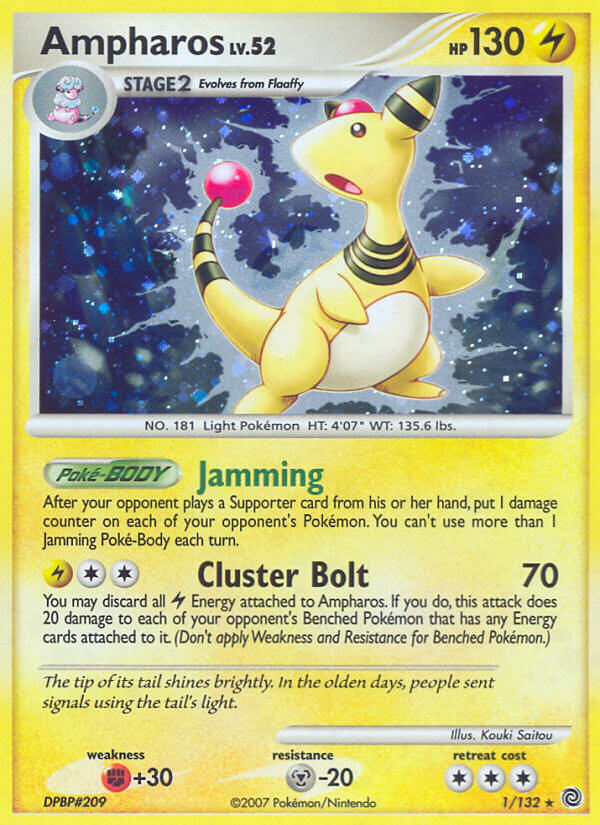
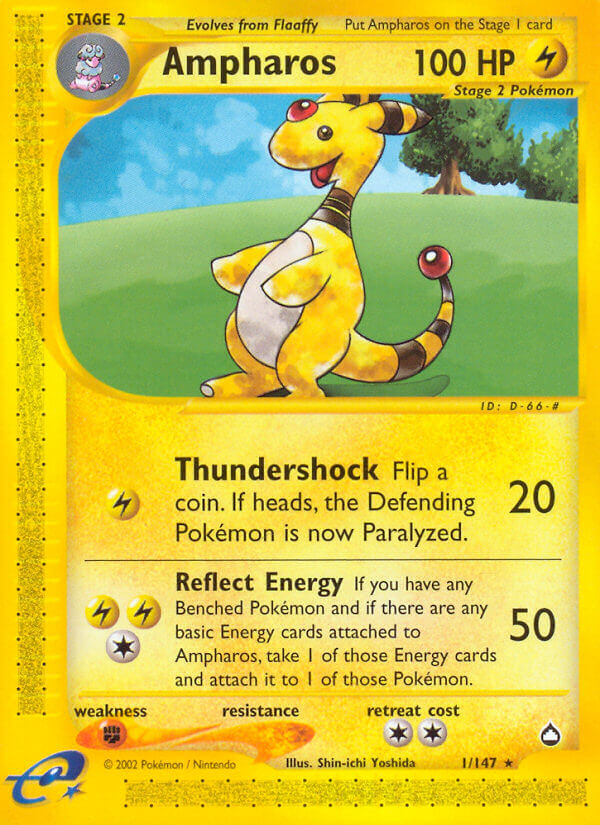
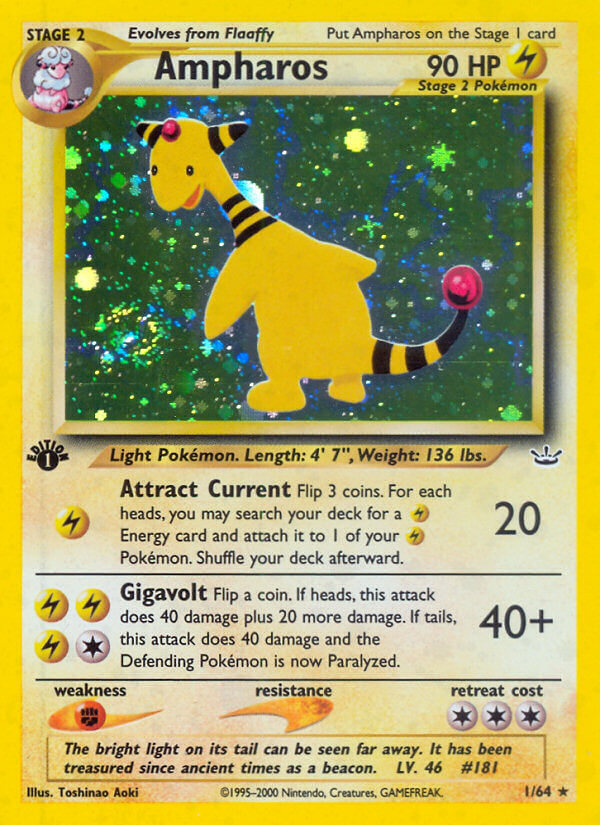
Platinum
Example: Ampharos #1, Holo Rare.
On this era, the expansion mark and collector number sit near the lower-right card identity line. Match that mark and number before using a price page.
Set mark/numberMatch each marked zone against the set icon, stamp, and collector number before checking value.
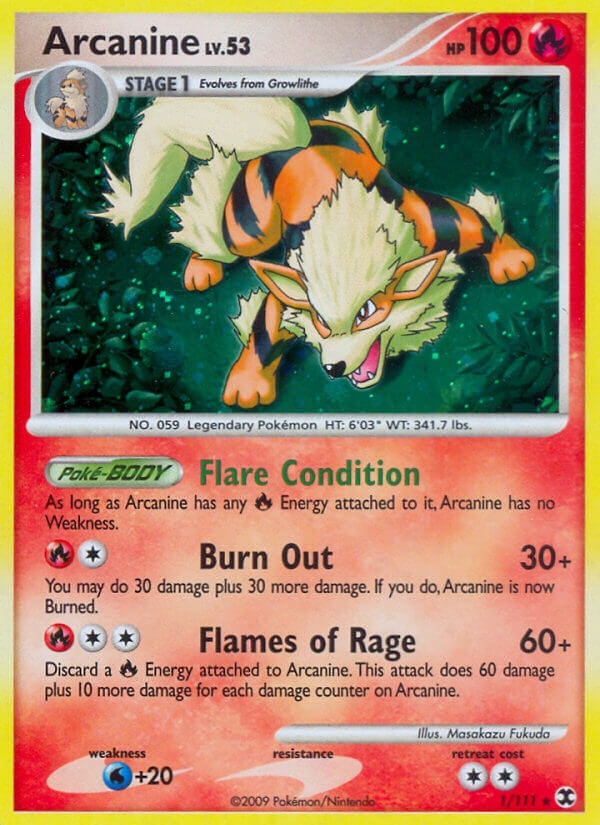
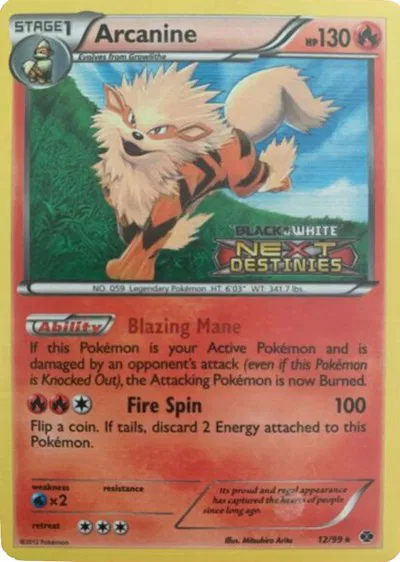
Rising Rivals
Example: Arcanine #1, Holo Rare.
On this era, the expansion mark and collector number sit near the lower-right card identity line. Match that mark and number before using a price page.
Set mark/numberMatch each marked zone against the set icon, stamp, and collector number before checking value.

Supreme Victors
Example: Absol G #1, Holo Rare.
On this era, the expansion mark and collector number sit near the lower-right card identity line. Match that mark and number before using a price page.
Set mark/numberMatch each marked zone against the set icon, stamp, and collector number before checking value.
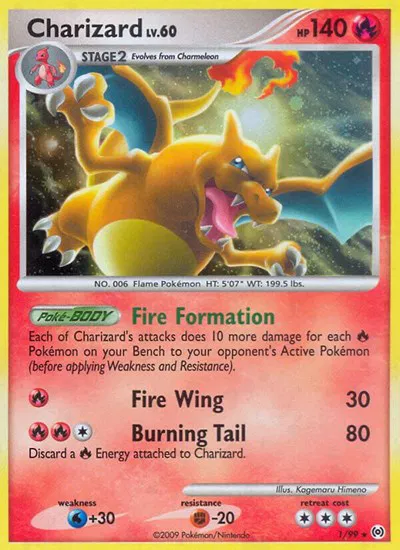
Platinum Arceus
Example: Charizard #1/99, Holo Rare.
On this era, the expansion mark and collector number sit near the lower-right card identity line. Match that mark and number before using a price page.
Set mark/numberMatch each marked zone against the set icon, stamp, and collector number before checking value.
Diamond & Pearl
8 sets in this snapshot
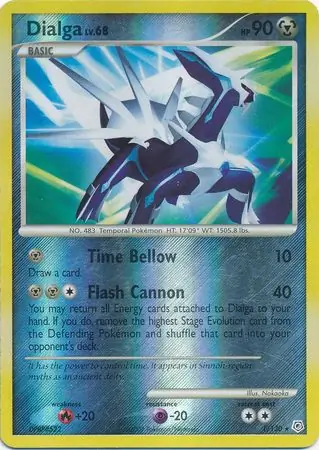
Diamond and Pearl
Example: Dialga #1, Holo Rare.
On this era, the expansion mark and collector number sit near the lower-right card identity line. Match that mark and number before using a price page.
Set mark/numberMatch each marked zone against the set icon, stamp, and collector number before checking value.
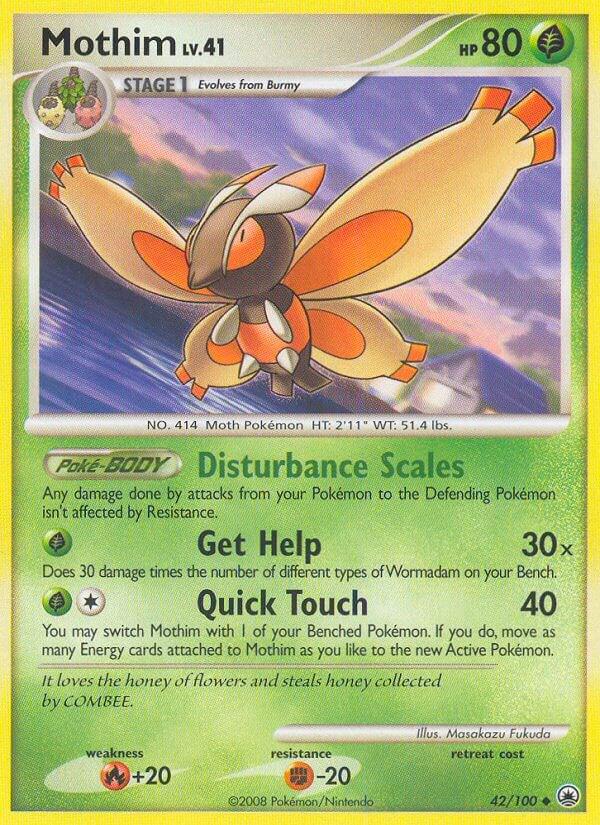
Diamond and Pearl Promos
Example: Mothim (Prerelease) #42, Promo.
On this promo-era layout, the promo mark or expansion mark and number sit near the lower-right identity line. Confirm any stamped product source separately.
Promo mark/numberMatch each marked zone against the set icon, stamp, and collector number before checking value.
Mysterious Treasures
Example: Aggron #1, Holo Rare.
On this era, the expansion mark and collector number sit near the lower-right card identity line. Match that mark and number before using a price page.
Set mark/numberMatch each marked zone against the set icon, stamp, and collector number before checking value.
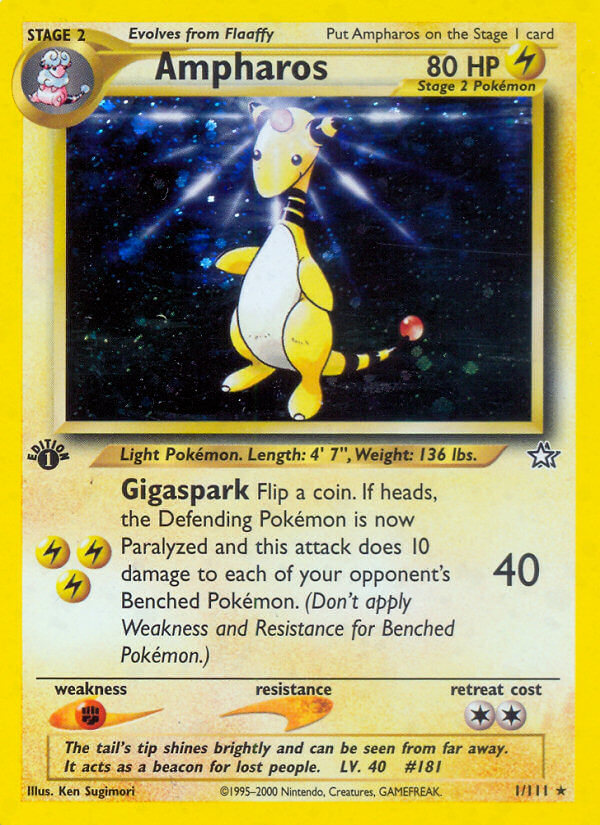
Secret Wonders
Example: Ampharos #1, Holo Rare.
On this era, the expansion mark and collector number sit near the lower-right card identity line. Match that mark and number before using a price page.
Set mark/numberMatch each marked zone against the set icon, stamp, and collector number before checking value.
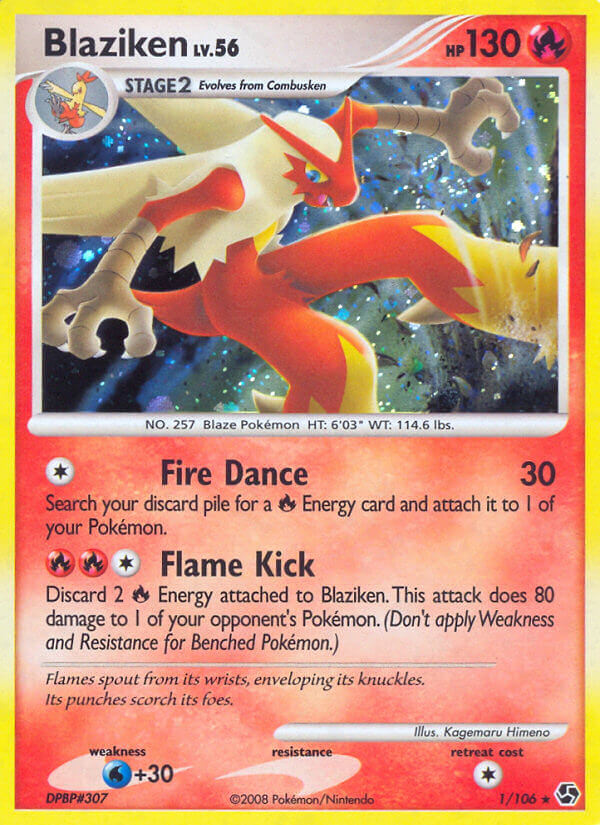
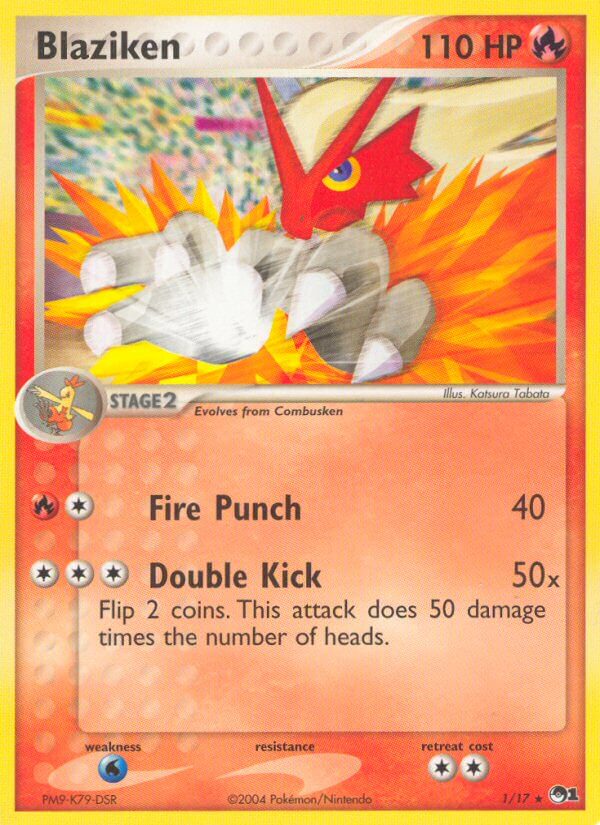
Great Encounters
Example: Blaziken #1, Holo Rare.
On this era, the expansion mark and collector number sit near the lower-right card identity line. Match that mark and number before using a price page.
Set mark/numberMatch each marked zone against the set icon, stamp, and collector number before checking value.

Majestic Dawn
Example: Articuno #1, Holo Rare.
On this era, the expansion mark and collector number sit near the lower-right card identity line. Match that mark and number before using a price page.
Set mark/numberMatch each marked zone against the set icon, stamp, and collector number before checking value.
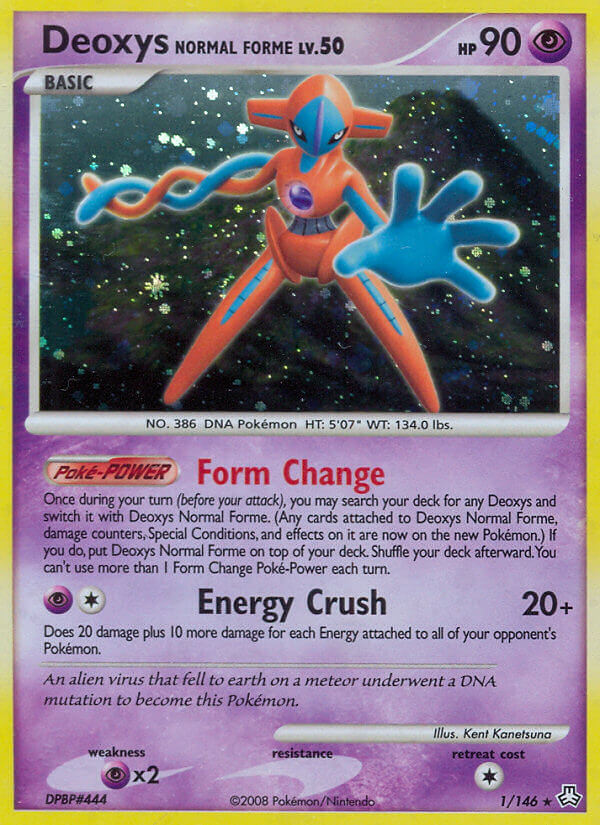
Legends Awakened
Example: Deoxys Normal Forme #1, Holo Rare.
On this era, the expansion mark and collector number sit near the lower-right card identity line. Match that mark and number before using a price page.
Set mark/numberMatch each marked zone against the set icon, stamp, and collector number before checking value.
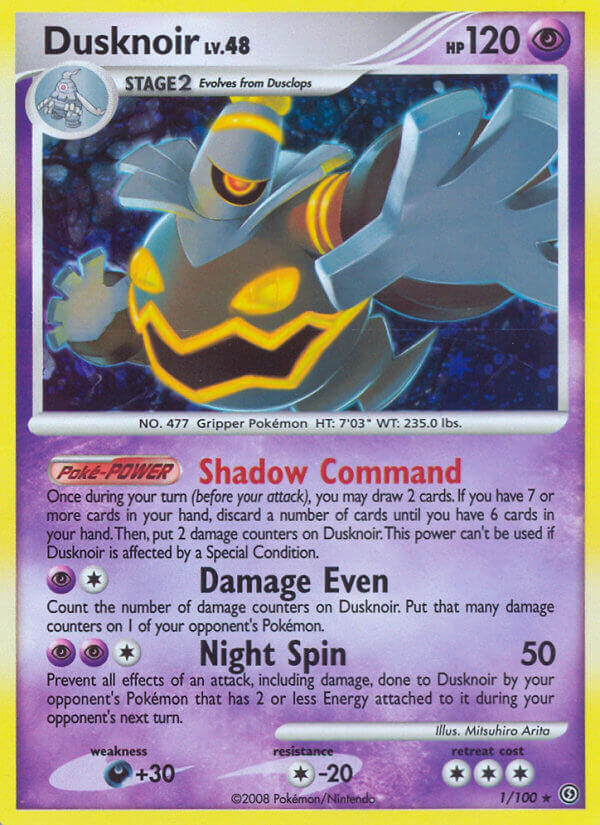
Stormfront
Example: Dusknoir #1, Holo Rare.
On this era, the expansion mark and collector number sit near the lower-right card identity line. Match that mark and number before using a price page.
Set mark/numberMatch each marked zone against the set icon, stamp, and collector number before checking value.
POP
9 sets in this snapshot
POP Series 1
Example: Blaziken #1, Rare.
On this era, the expansion mark and collector number sit near the lower-right card identity line. Match that mark and number before using a price page.
Set mark/numberMatch each marked zone against the set icon, stamp, and collector number before checking value.

POP Series 2
Example: Entei #1, Rare.
On this era, the expansion mark and collector number sit near the lower-right card identity line. Match that mark and number before using a price page.
Set mark/numberMatch each marked zone against the set icon, stamp, and collector number before checking value.
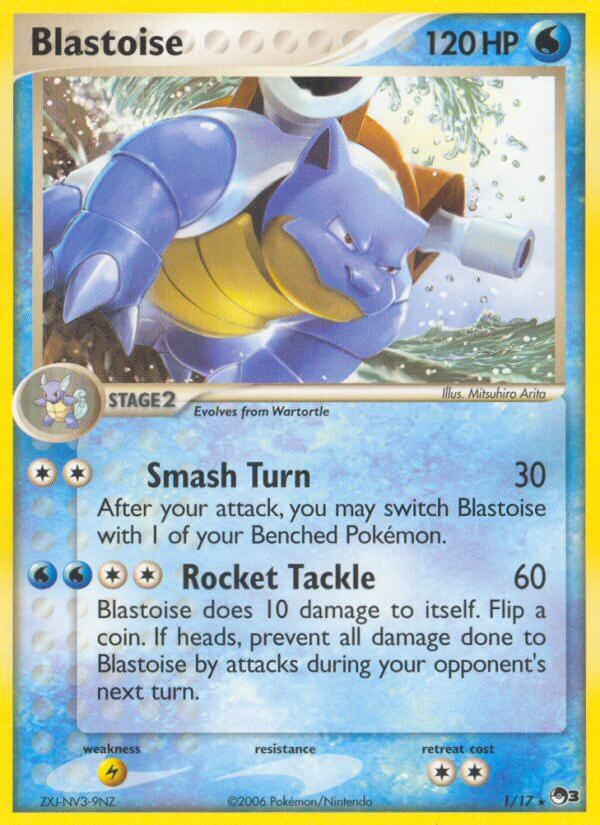
POP Series 3
Example: Blastoise #1, Rare.
On this era, the expansion mark and collector number sit near the lower-right card identity line. Match that mark and number before using a price page.
Set mark/numberMatch each marked zone against the set icon, stamp, and collector number before checking value.
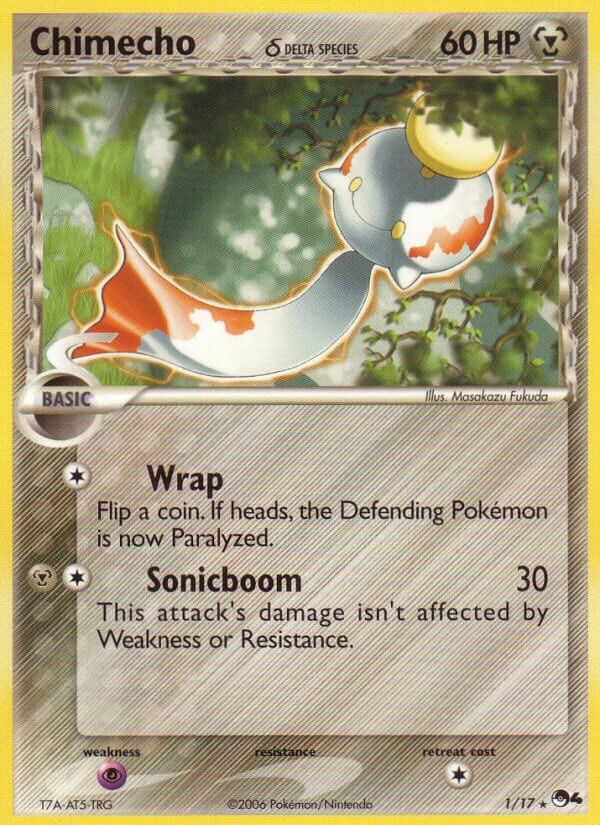
POP Series 4
Example: Chimecho (Delta Species) #1, Rare.
On this era, the expansion mark and collector number sit near the lower-right card identity line. Match that mark and number before using a price page.
Set mark/numberMatch each marked zone against the set icon, stamp, and collector number before checking value.
POP Series 5
Example: Ho-oh #1, Rare.
On this era, the expansion mark and collector number sit near the lower-right card identity line. Match that mark and number before using a price page.
Set mark/numberMatch each marked zone against the set icon, stamp, and collector number before checking value.
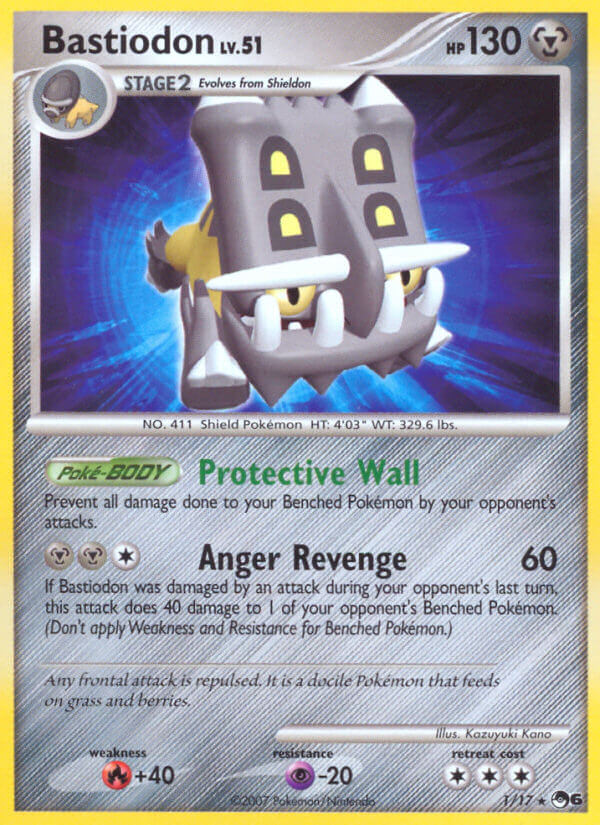
POP Series 6
Example: Bastiodon #1, Rare.
On this era, the expansion mark and collector number sit near the lower-right card identity line. Match that mark and number before using a price page.
Set mark/numberMatch each marked zone against the set icon, stamp, and collector number before checking value.
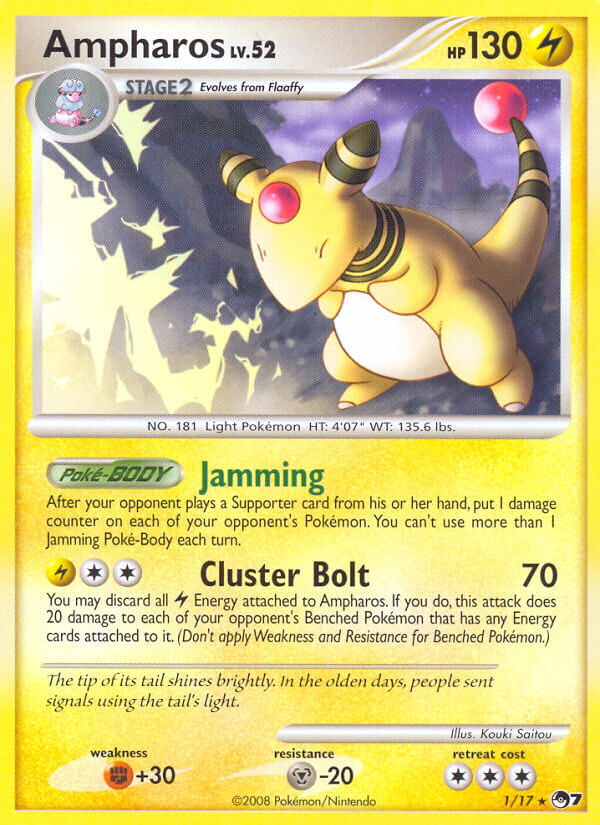
POP Series 7
Example: Ampharos #1, Rare.
On this era, the expansion mark and collector number sit near the lower-right card identity line. Match that mark and number before using a price page.
Set mark/numberMatch each marked zone against the set icon, stamp, and collector number before checking value.
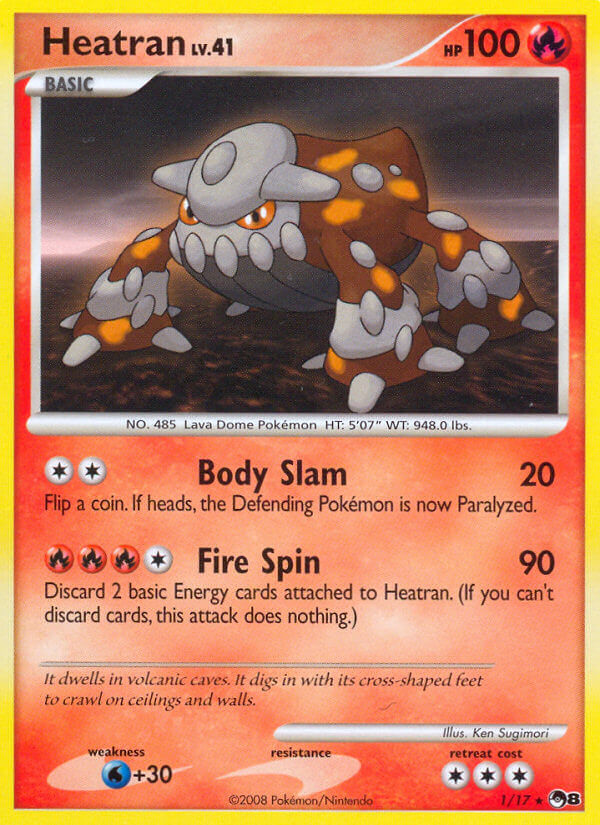
POP Series 8
Example: Heatran #1, Rare.
On this era, the expansion mark and collector number sit near the lower-right card identity line. Match that mark and number before using a price page.
Set mark/numberMatch each marked zone against the set icon, stamp, and collector number before checking value.
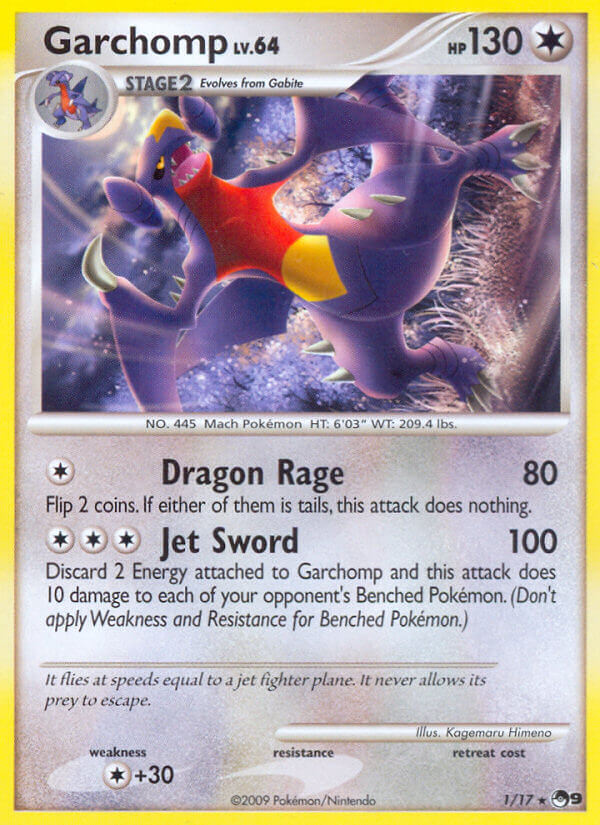
POP Series 9
Example: Garchomp #1, Rare.
On this era, the expansion mark and collector number sit near the lower-right card identity line. Match that mark and number before using a price page.
Set mark/numberMatch each marked zone against the set icon, stamp, and collector number before checking value.
EX
16 sets in this snapshot
EX Ruby & Sapphire
Example: Aggron #1, Holo Rare.
On this era, the expansion mark and collector number sit near the lower-right card identity line. Match that mark and number before using a price page.
Set mark/numberMatch each marked zone against the set icon, stamp, and collector number before checking value.
EX Dragon
Example: Absol #1, Holo Rare.
On this era, the expansion mark and collector number sit near the lower-right card identity line. Match that mark and number before using a price page.
Set mark/numberMatch each marked zone against the set icon, stamp, and collector number before checking value.

EX Sandstorm
Example: Armaldo #1, Holo Rare.
On this era, the expansion mark and collector number sit near the lower-right card identity line. Match that mark and number before using a price page.
Set mark/numberMatch each marked zone against the set icon, stamp, and collector number before checking value.
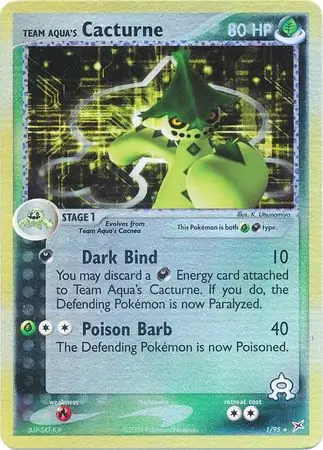
EX Team Magma vs Team Aqua
Example: Team Aqua's Cacturne #1, Holo Rare.
On this era, the expansion mark and collector number sit near the lower-right card identity line. Match that mark and number before using a price page.
Set mark/numberMatch each marked zone against the set icon, stamp, and collector number before checking value.
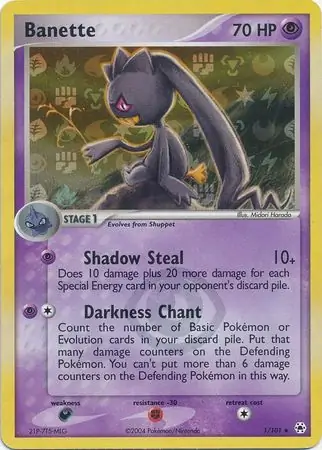
EX Hidden Legends
Example: Banette #1, Holo Rare.
On this era, the expansion mark and collector number sit near the lower-right card identity line. Match that mark and number before using a price page.
Set mark/numberMatch each marked zone against the set icon, stamp, and collector number before checking value.
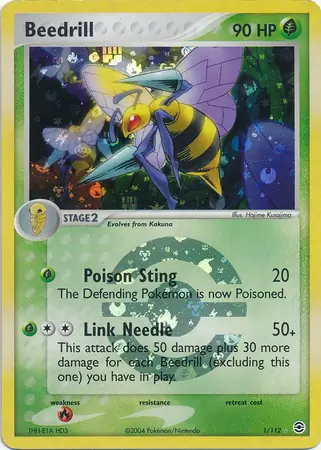
EX FireRed & LeafGreen
Example: Beedrill #1, Holo Rare.
On this era, the expansion mark and collector number sit near the lower-right card identity line. Match that mark and number before using a price page.
Set mark/numberMatch each marked zone against the set icon, stamp, and collector number before checking value.
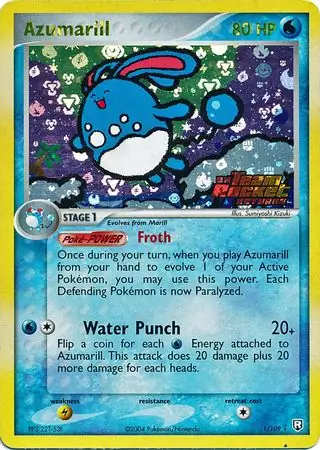
EX Team Rocket Returns
Example: Azumarill #1, Holo Rare.
On this era, the expansion mark and collector number sit near the lower-right card identity line. Match that mark and number before using a price page.
Set mark/numberMatch each marked zone against the set icon, stamp, and collector number before checking value.
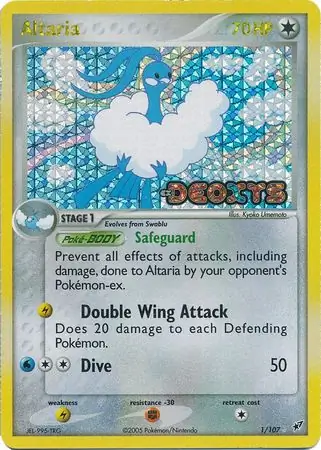
EX Deoxys
Example: Altaria #1, Holo Rare.
On this era, the expansion mark and collector number sit near the lower-right card identity line. Match that mark and number before using a price page.
Set mark/numberMatch each marked zone against the set icon, stamp, and collector number before checking value.
EX Emerald
Example: Blaziken #1, Holo Rare.
On this era, the expansion mark and collector number sit near the lower-right card identity line. Match that mark and number before using a price page.
Set mark/numberMatch each marked zone against the set icon, stamp, and collector number before checking value.
EX Unseen Forces
Example: Ampharos #1/115, Holo Rare.
On this era, the expansion mark and collector number sit near the lower-right card identity line. Match that mark and number before using a price page.
Set mark/numberMatch each marked zone against the set icon, stamp, and collector number before checking value.
EX Delta Species
Example: Beedrill (Delta Species) #1, Holo Rare.
On this era, the expansion mark and collector number sit near the lower-right card identity line. Match that mark and number before using a price page.
Set mark/numberMatch each marked zone against the set icon, stamp, and collector number before checking value.
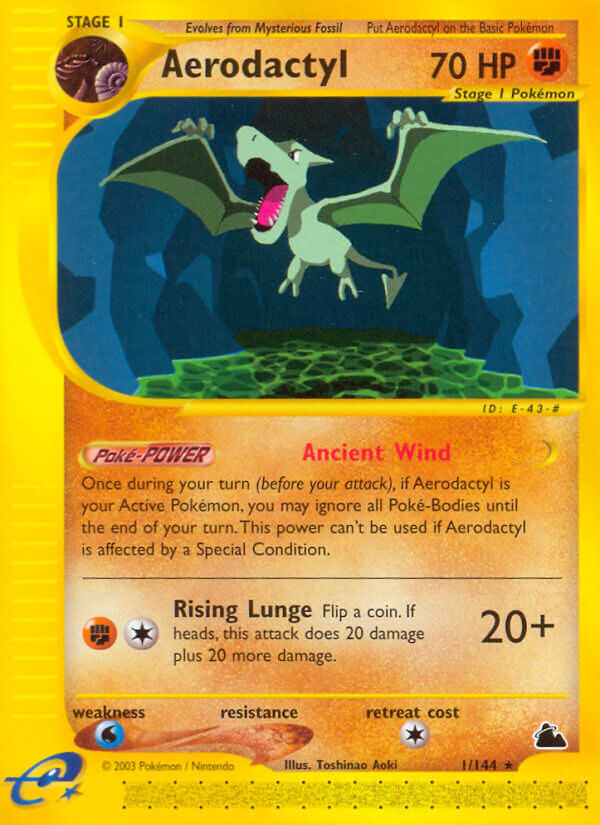
EX Legend Maker
Example: Aerodactyl #1, Holo Rare.
On this era, the expansion mark and collector number sit near the lower-right card identity line. Match that mark and number before using a price page.
Set mark/numberMatch each marked zone against the set icon, stamp, and collector number before checking value.
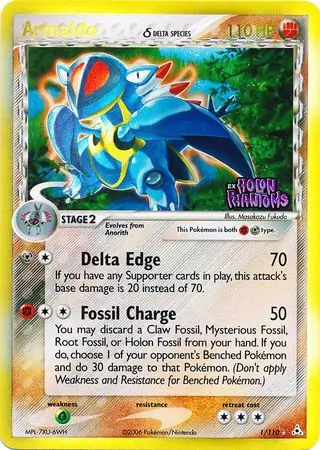
EX Holon Phantoms
Example: Armaldo (Delta Species) #1, Holo Rare.
On this era, the expansion mark and collector number sit near the lower-right card identity line. Match that mark and number before using a price page.
Set mark/numberMatch each marked zone against the set icon, stamp, and collector number before checking value.
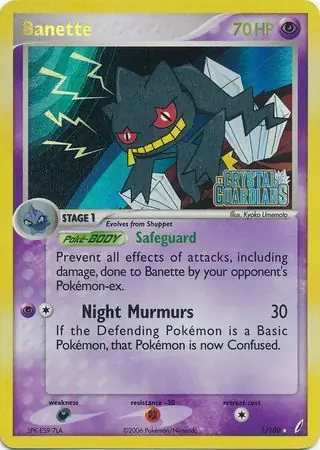
EX Crystal Guardians
Example: Banette #1, Holo Rare.
On this era, the expansion mark and collector number sit near the lower-right card identity line. Match that mark and number before using a price page.
Set mark/numberMatch each marked zone against the set icon, stamp, and collector number before checking value.
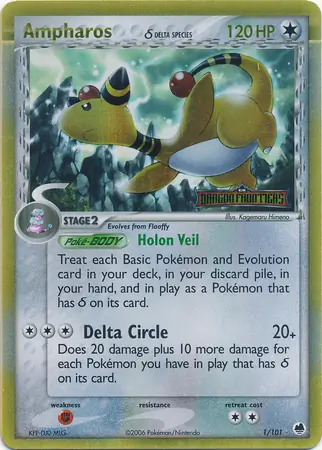
EX Dragon Frontiers
Example: Ampharos (Delta Species) #1/101, Holo Rare.
On this era, the expansion mark and collector number sit near the lower-right card identity line. Match that mark and number before using a price page.
Set mark/numberMatch each marked zone against the set icon, stamp, and collector number before checking value.
EX Power Keepers
Example: Aggron #1, Holo Rare.
On this era, the expansion mark and collector number sit near the lower-right card identity line. Match that mark and number before using a price page.
Set mark/numberMatch each marked zone against the set icon, stamp, and collector number before checking value.
E-Card
3 sets in this snapshot
Expedition
Example: Alakazam #1, Holo Rare.
E-Card layouts put the set mark and collector number into the lower-right e-Reader frame area. Read the frame, mark, and number together.
e-Card markMatch each marked zone against the set icon, stamp, and collector number before checking value.
Aquapolis
Example: Ampharos #1, Rare.
E-Card layouts put the set mark and collector number into the lower-right e-Reader frame area. Read the frame, mark, and number together.
e-Card markMatch each marked zone against the set icon, stamp, and collector number before checking value.
Skyridge
Example: Aerodactyl #1, Rare.
E-Card layouts put the set mark and collector number into the lower-right e-Reader frame area. Read the frame, mark, and number together.
e-Card markMatch each marked zone against the set icon, stamp, and collector number before checking value.
Neo
4 sets in this snapshot
Neo Genesis
Example: Ampharos #1, Holo Rare.
Wizards-era expansion marks sit on or just to the right of the species line below the art. Match that small mark first, then confirm the bottom collector number.
WotC expansion symbolMatch each marked zone against the set icon, stamp, and collector number before checking value.
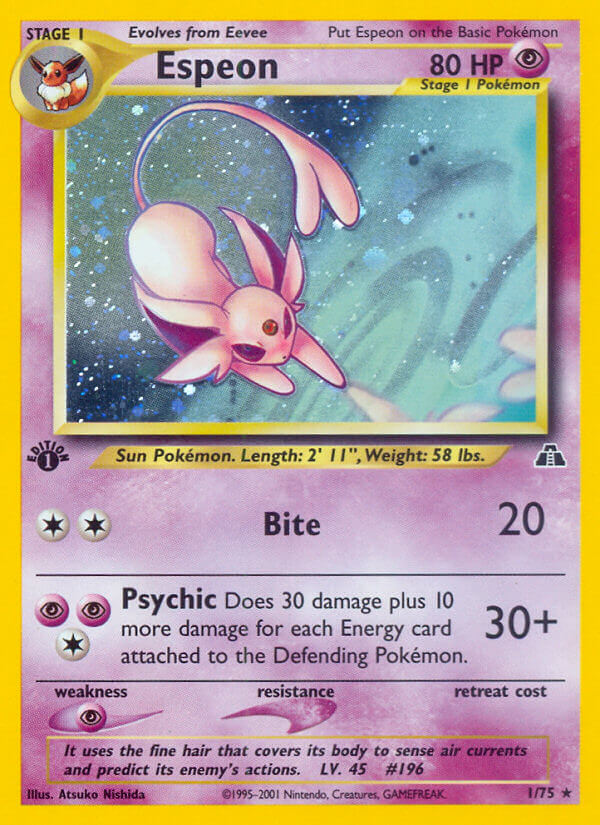
Neo Discovery
Example: Espeon #1, Holo Rare.
Wizards-era expansion marks sit on or just to the right of the species line below the art. Match that small mark first, then confirm the bottom collector number.
WotC expansion symbolMatch each marked zone against the set icon, stamp, and collector number before checking value.
Neo Revelation
Example: Ampharos #1, Holo Rare.
Wizards-era expansion marks sit on or just to the right of the species line below the art. Match that small mark first, then confirm the bottom collector number.
WotC expansion symbolMatch each marked zone against the set icon, stamp, and collector number before checking value.
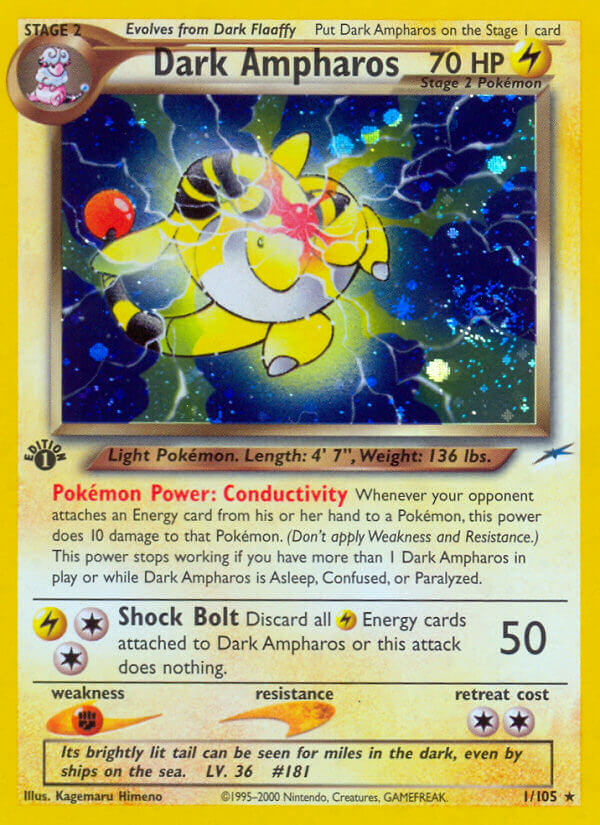
Neo Destiny
Example: Dark Ampharos #1, Holo Rare.
Wizards-era expansion marks sit on or just to the right of the species line below the art. Match that small mark first, then confirm the bottom collector number.
WotC expansion symbolMatch each marked zone against the set icon, stamp, and collector number before checking value.
Gym
2 sets in this snapshot
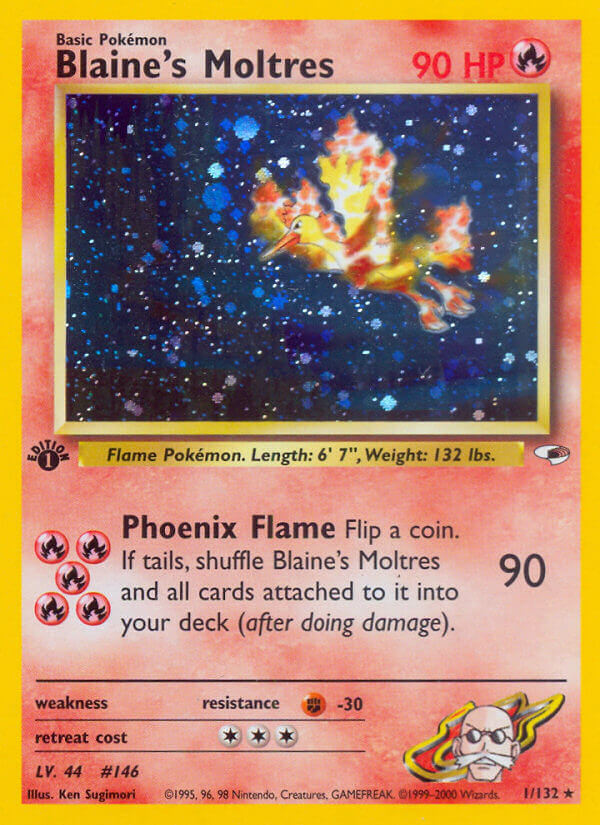
Gym Heroes
Example: Blaine's Moltres #1, Holo Rare.
Wizards-era expansion marks sit on or just to the right of the species line below the art. Match that small mark first, then confirm the bottom collector number.
WotC expansion symbolMatch each marked zone against the set icon, stamp, and collector number before checking value.
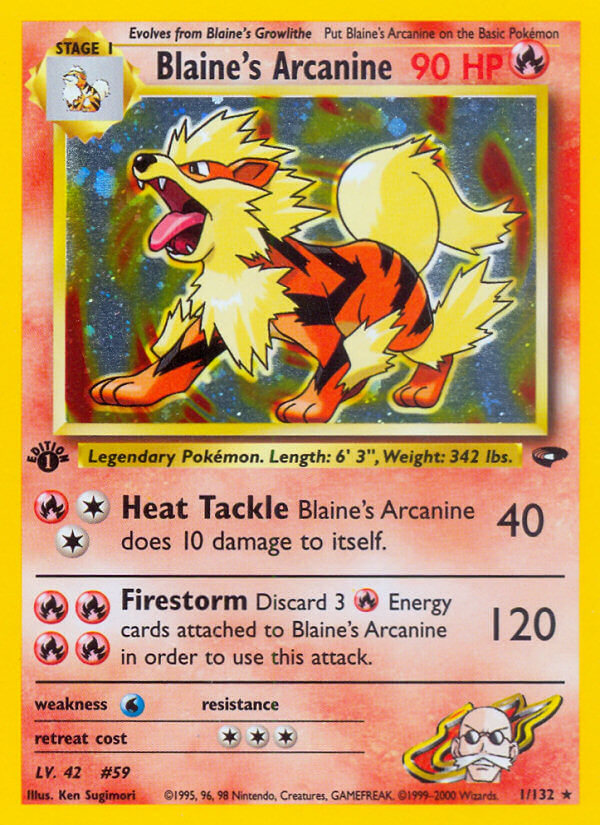
Gym Challenge
Example: Blaine's Arcanine #1, Holo Rare.
Wizards-era expansion marks sit on or just to the right of the species line below the art. Match that small mark first, then confirm the bottom collector number.
WotC expansion symbolMatch each marked zone against the set icon, stamp, and collector number before checking value.
Base
7 sets in this snapshot
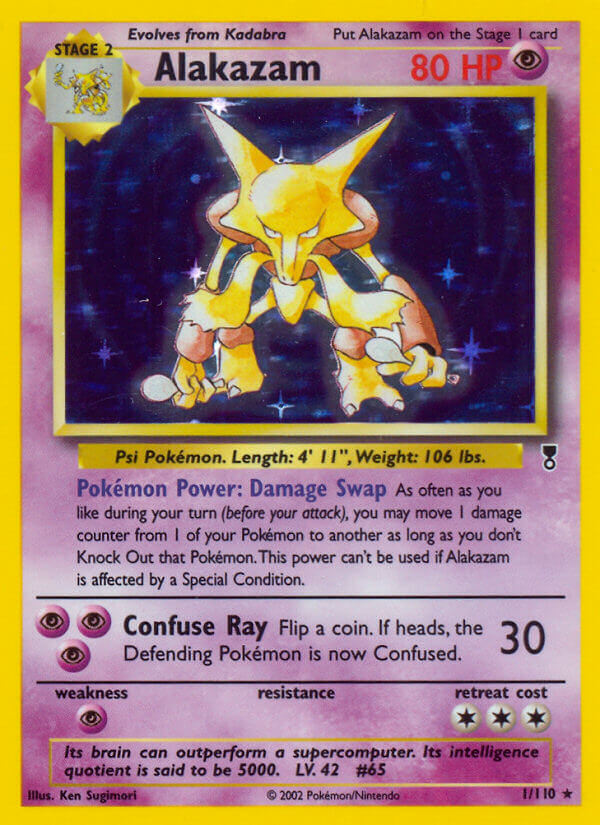
Base Set (1st Edition & Shadowless)
Example: Alakazam #1, Holo Rare.
English Base Set has no expansion symbol. Use the bottom-right collector number, copyright line, and print traits instead of hunting for a missing logo.
Number lineMatch each marked zone against the set icon, stamp, and collector number before checking value.
Base Set (Unlimited)
Example: Alakazam #1, Holo Rare.
English Base Set has no expansion symbol. Use the bottom-right collector number, copyright line, and print traits instead of hunting for a missing logo.
Number lineMatch each marked zone against the set icon, stamp, and collector number before checking value.
Jungle
Example: Clefable #1, Holo Rare.
Wizards-era expansion marks sit on or just to the right of the species line below the art. Match that small mark first, then confirm the bottom collector number.
WotC expansion symbolMatch each marked zone against the set icon, stamp, and collector number before checking value.

WoTC Promo
Example: Aerodactyl (Prerelease) #01/62, Promo.
This WotC promo example uses a visible Prerelease stamp, a normal expansion symbol near the species line, and the bottom collector number. Check all three before treating it as a normal Fossil copy.
Prerelease stampWotC expansion symbolCollector numberMatch each marked zone against the set icon, stamp, and collector number before checking value.

Fossil
Example: Aerodactyl #1, Holo Rare.
Wizards-era expansion marks sit on or just to the right of the species line below the art. Match that small mark first, then confirm the bottom collector number.
WotC expansion symbolMatch each marked zone against the set icon, stamp, and collector number before checking value.
Base Set 2
Example: Alakazam #1, Holo Rare.
Wizards-era expansion marks sit on or just to the right of the species line below the art. Match that small mark first, then confirm the bottom collector number.
WotC expansion symbolMatch each marked zone against the set icon, stamp, and collector number before checking value.

Team Rocket
Example: Dark Alakazam #1, Holo Rare.
Wizards-era expansion marks sit on or just to the right of the species line below the art. Match that small mark first, then confirm the bottom collector number.
WotC expansion symbolMatch each marked zone against the set icon, stamp, and collector number before checking value.
Other
18 sets in this snapshot
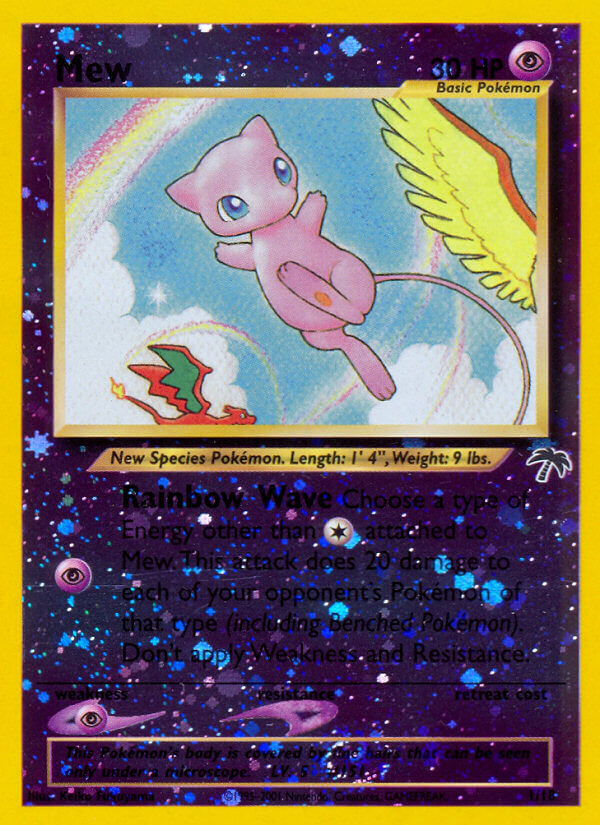
Southern Islands
Example: Mew #1, Promo.
Wizards-era expansion marks sit on or just to the right of the species line below the art. Match that small mark first, then confirm the bottom collector number.
WotC expansion symbolMatch each marked zone against the set icon, stamp, and collector number before checking value.
Legendary Collection
Example: Alakazam #1, Holo Rare.
Wizards-era expansion marks sit on or just to the right of the species line below the art. Match that small mark first, then confirm the bottom collector number.
WotC expansion symbolMatch each marked zone against the set icon, stamp, and collector number before checking value.
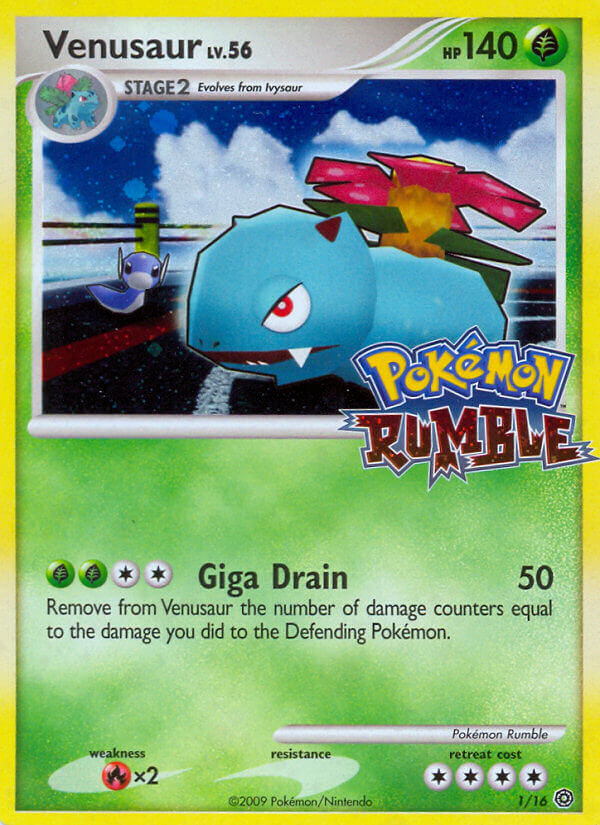
Rumble
Example: Venusaur #1, Promo.
Pokemon Rumble cards carry a large Rumble logo in the art and a smaller set mark/number at the bottom-right. Use both before comparing the card.
Rumble logoSet mark/numberMatch each marked zone against the set icon, stamp, and collector number before checking value.
McDonald's Promos 2011
On this promo-era layout, the promo mark or expansion mark and number sit near the lower-right identity line. Confirm any stamped product source separately.
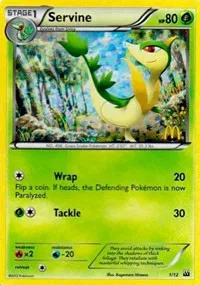
McDonald's Promos 2012
Example: Servine #1, Promo.
On this promo-era layout, the promo mark or expansion mark and number sit near the lower-right identity line. Confirm any stamped product source separately.
Promo mark/numberMatch each marked zone against the set icon, stamp, and collector number before checking value.
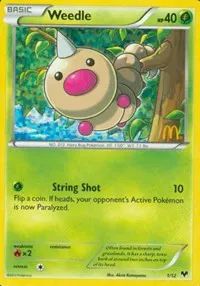
McDonald's Promos 2014
Example: Weedle #1, Promo.
On this promo-era layout, the promo mark or expansion mark and number sit near the lower-right identity line. Confirm any stamped product source separately.
Promo mark/numberMatch each marked zone against the set icon, stamp, and collector number before checking value.
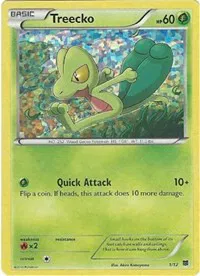
McDonald's Promos 2015
Example: Treecko #1, Promo.
On this promo-era layout, the promo mark or expansion mark and number sit near the lower-right identity line. Confirm any stamped product source separately.
Promo mark/numberMatch each marked zone against the set icon, stamp, and collector number before checking value.
McDonald's Promos 2016
Example: Vulpix #1/12, Promo.
On this promo-era layout, the promo mark or expansion mark and number sit near the lower-right identity line. Confirm any stamped product source separately.
Promo mark/numberMatch each marked zone against the set icon, stamp, and collector number before checking value.

McDonald's Promos 2017
Example: Rowlet #1, Promo.
On this promo-era layout, the promo mark or expansion mark and number sit near the lower-right identity line. Confirm any stamped product source separately.
Promo mark/numberMatch each marked zone against the set icon, stamp, and collector number before checking value.
McDonald's Promos 2018
Example: Growlithe #1, Promo.
On this promo-era layout, the promo mark or expansion mark and number sit near the lower-right identity line. Confirm any stamped product source separately.
Promo mark/numberMatch each marked zone against the set icon, stamp, and collector number before checking value.
McDonald's Promos 2019
Example: Caterpie #1/12, Promo.
On this promo-era layout, the promo mark or expansion mark and number sit near the lower-right identity line. Confirm any stamped product source separately.
Promo mark/numberMatch each marked zone against the set icon, stamp, and collector number before checking value.
McDonald's 25th Anniversary Promos
Example: Bulbasaur #001/025, Promo.
On this promo-era layout, the promo mark or expansion mark and number sit near the lower-right identity line. Confirm any stamped product source separately.
Promo mark/numberMatch each marked zone against the set icon, stamp, and collector number before checking value.

McDonald's Promos 2022
Example: Ledyba #01/15, Common.
On this promo-style layout, use the lower-left promo/set code and collector number first, then confirm the product or distribution source if the card has one.
Promo codeMatch each marked zone against the set icon, stamp, and collector number before checking value.
Trick or Trade BOOster Bundle
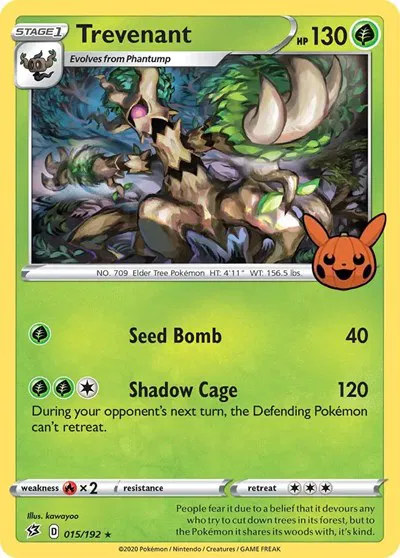
Example: Trevenant #015/192, Promo.
Trick or Trade reprints are identified by the pumpkin product stamp. After that, use the lower-left set code and collector number to avoid mixing the stamped reprint with the original set card.
pumpkin product stampSet mark/codeMatch each marked zone against the set icon, stamp, and collector number before checking value.

McDonald's Promos 2023
Example: Sprigatito #001/015, Promo.
On this promo-style layout, use the lower-left promo/set code and collector number first, then confirm the product or distribution source if the card has one.
Promo codeMatch each marked zone against the set icon, stamp, and collector number before checking value.
Trick or Trade BOOster Bundle 2023
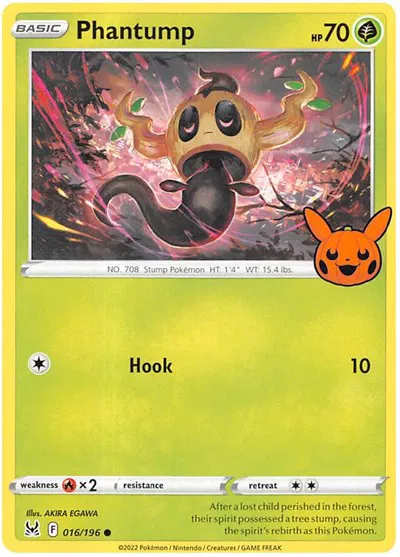
Example: Phantump #016/196, Common.
Trick or Trade reprints are identified by the pumpkin product stamp. After that, use the lower-left set code and collector number to avoid mixing the stamped reprint with the original set card.
pumpkin product stampSet mark/codeMatch each marked zone against the set icon, stamp, and collector number before checking value.
McDonald's Promos 2024
Example: Charizard #001/015, Promo.
On this promo-style layout, use the lower-left promo/set code and collector number first, then confirm the product or distribution source if the card has one.
Promo codeMatch each marked zone against the set icon, stamp, and collector number before checking value.
Trick or Trade BOOster Bundle 2024
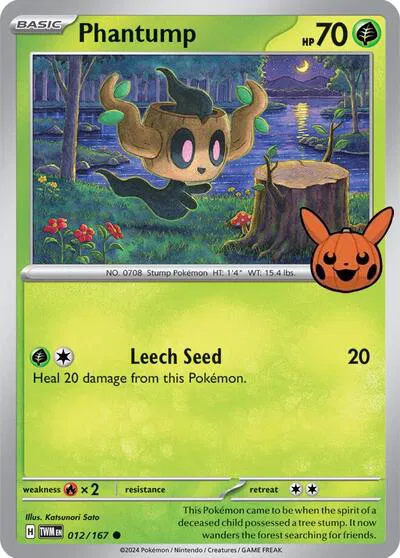
Example: Phantump #012/167, Common.
Trick or Trade reprints are identified by the pumpkin product stamp. After that, use the lower-left set code and collector number to avoid mixing the stamped reprint with the original set card.
pumpkin product stampSet mark/codeMatch each marked zone against the set icon, stamp, and collector number before checking value.
How To Use BinderDex After You Identify The Set
Once the card identity is clear, the next move depends on your job.
If you are sorting a binder, open the set page and group cards by set and number. If you are checking value, open the exact card page and compare the same condition and finish. If you are deciding whether a card is a keeper, keep the identity note attached to the card so you do not have to repeat the same lookup later.
For a clean note, write it like this:
Bulbasaur, Mega Evolution, 001/132, English, Common, raw, front clean, back needs edge check.
That note is not fancy. It is useful because every important assumption is visible. A different set, number, language, finish, or condition would become a different note.
If the set is clear but the bottom rarity mark or finish is still confusing, move to Pokemon card rarity symbols explained or Pokemon holo vs reverse holo cards explained before checking value.
What To Watch Next
- Name-only searches: A famous Pokemon name can hide dozens of different prints. Risk: the highest visible price belongs to another card.
- Base Set exceptions: Base Set does not have an expansion symbol. Risk: a collector looks for a missing symbol instead of checking print traits.
- Promo source: Promo identity needs the source route and the promo mark. Risk: two promos with similar art get merged.
- Secret-number lane: Numbers above the set count usually signal a narrower premium lane. Risk: a secret rare gets compared to a regular set slot.
- Condition after identity: Condition matters after the exact card is known. Risk: a clean condition label gets attached to the wrong print.
Keep watchlist moves separate from your binder.
Download BinderDex on iPhone to track exact cards, organize portfolio decisions, and avoid turning every short-term price move into a buy.